0

How to Restore MS SQL database via Vembu

Topic outline:

MS SQL Restore

Previously Restored Data

Restore Data from Backup  

Time Stamp

Type of Restore

Recovery State


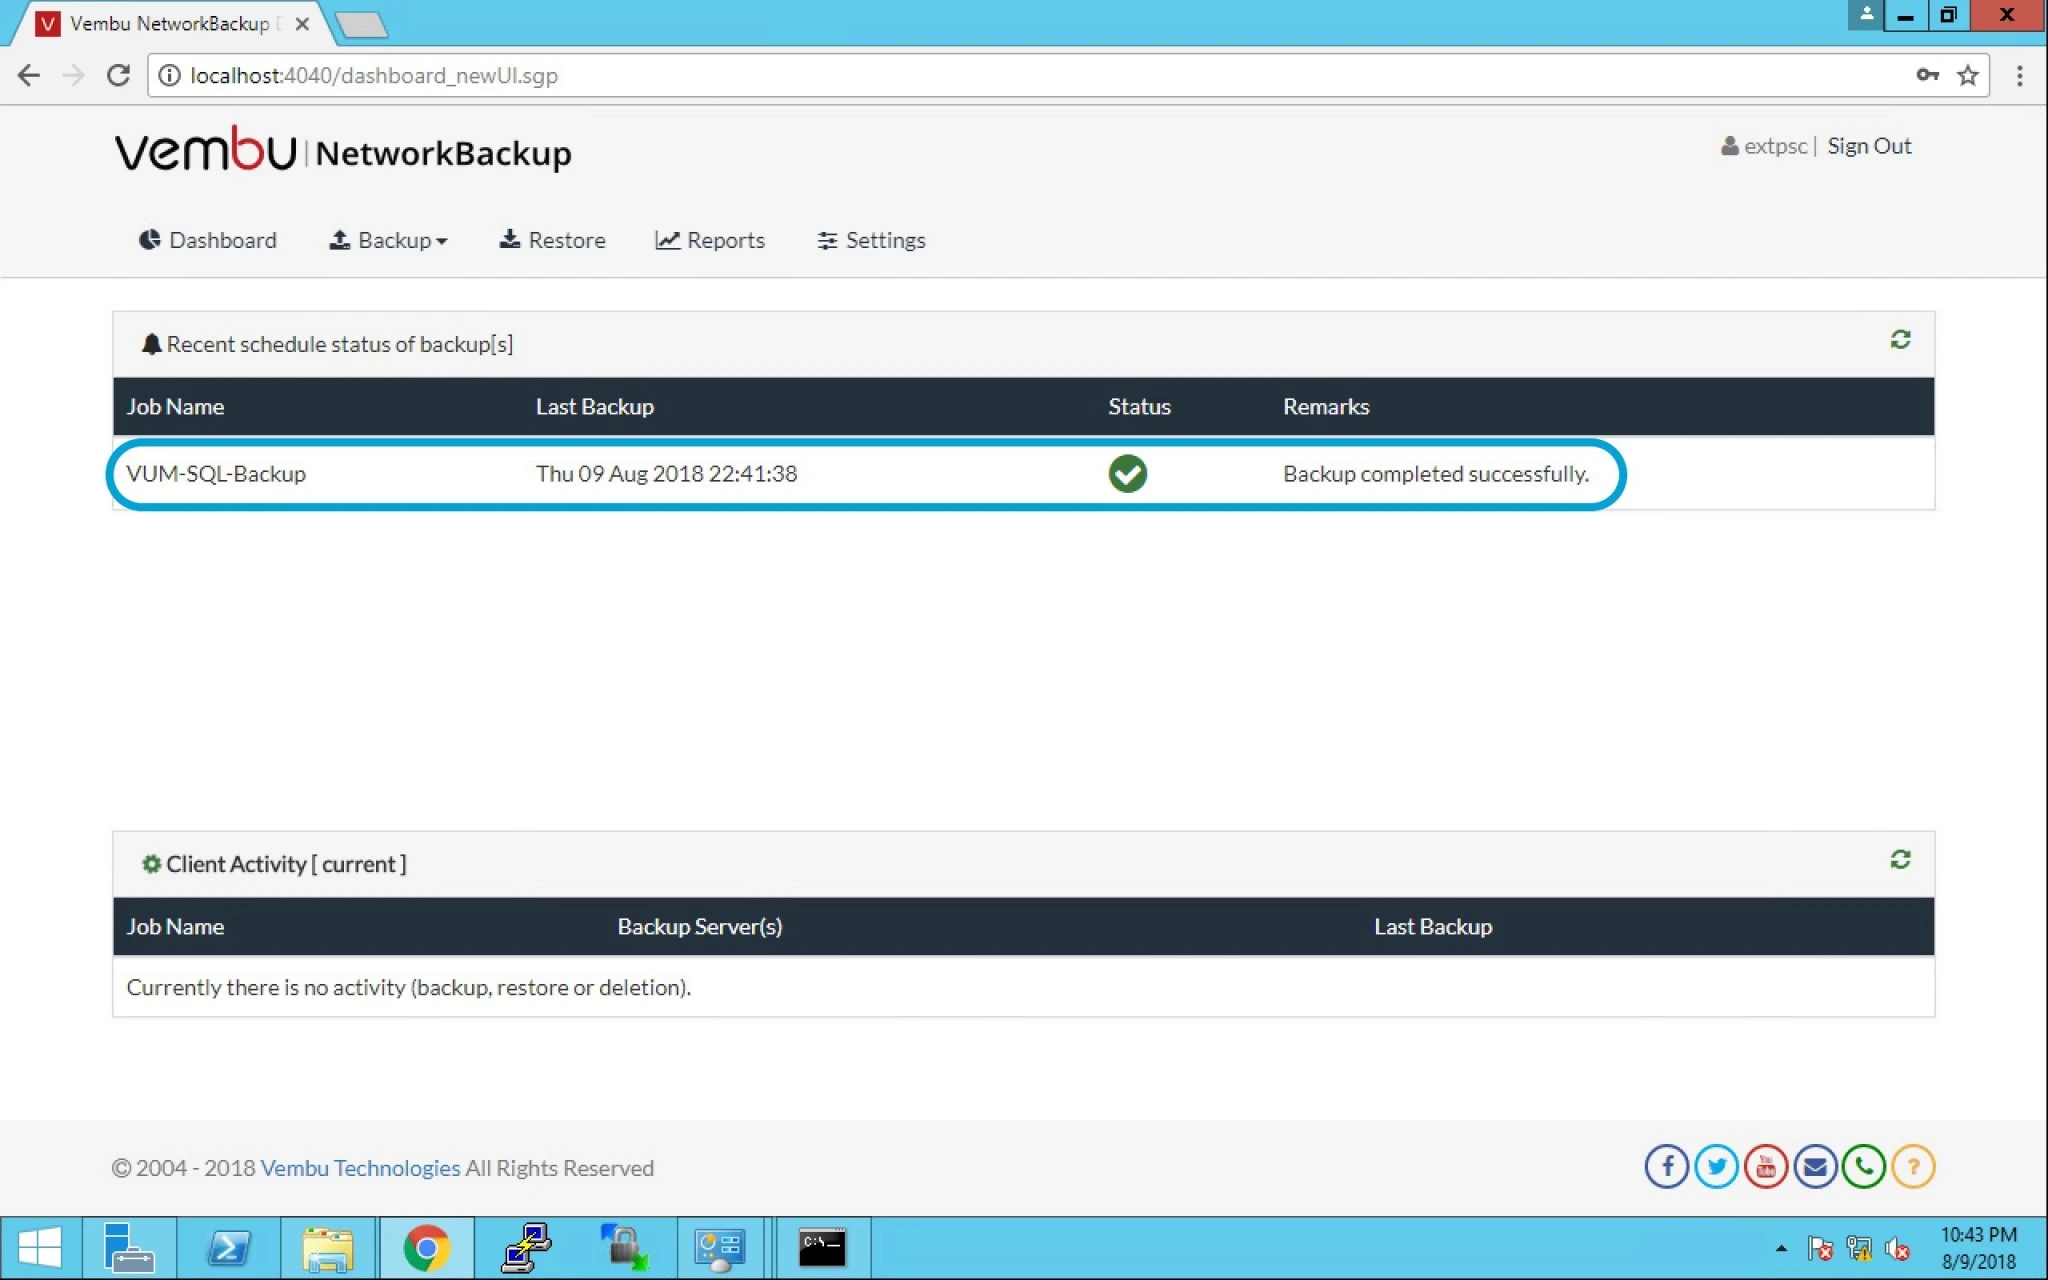
  1. Login into Vembu Network Backup page and check the last successfully completed backup.
 

2. Now Click on Restore option and you can see available backup to restore.
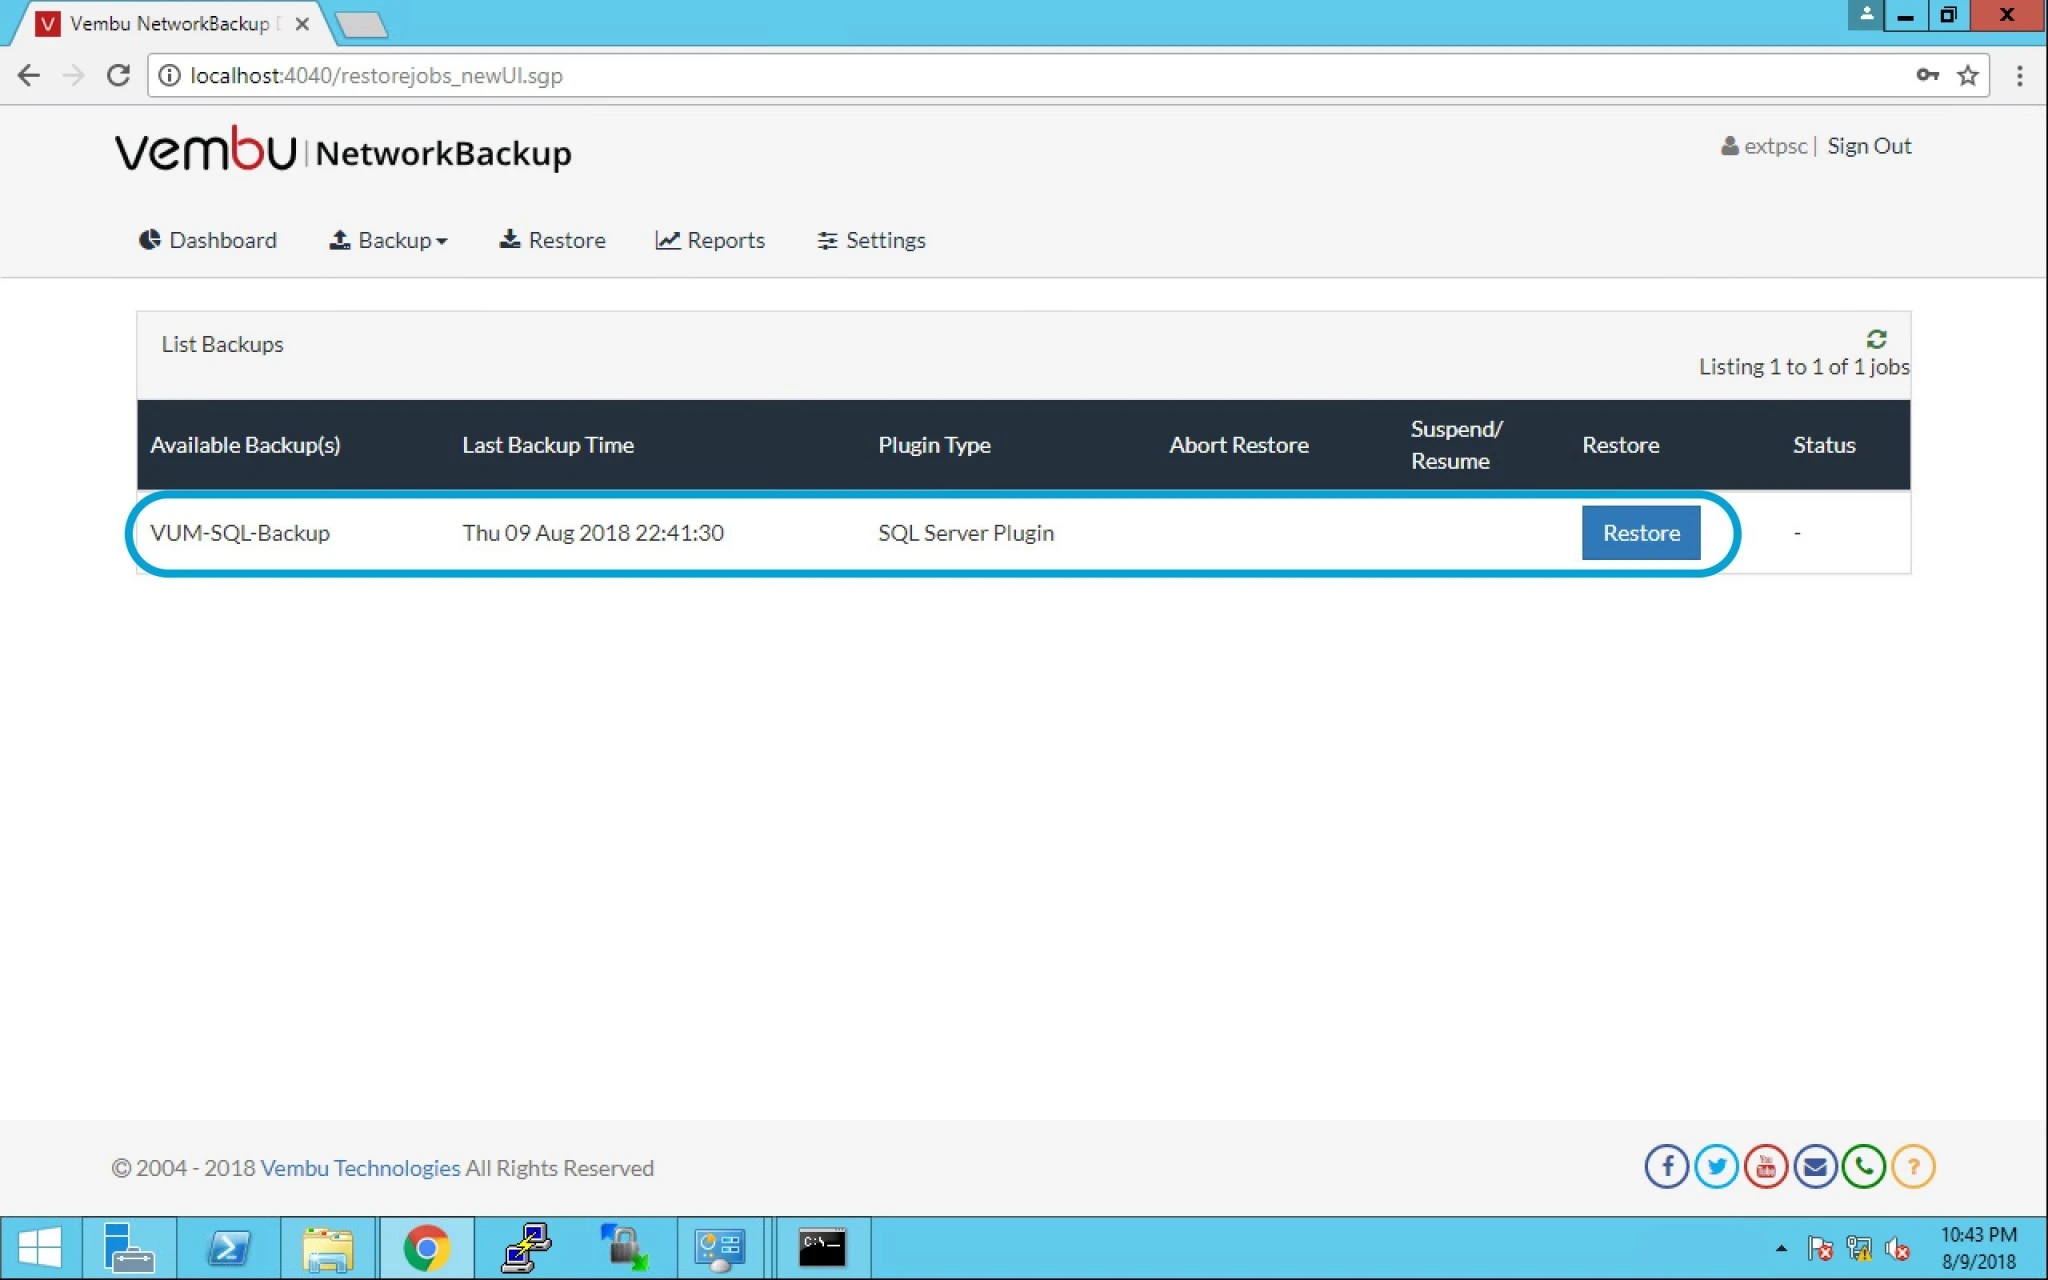


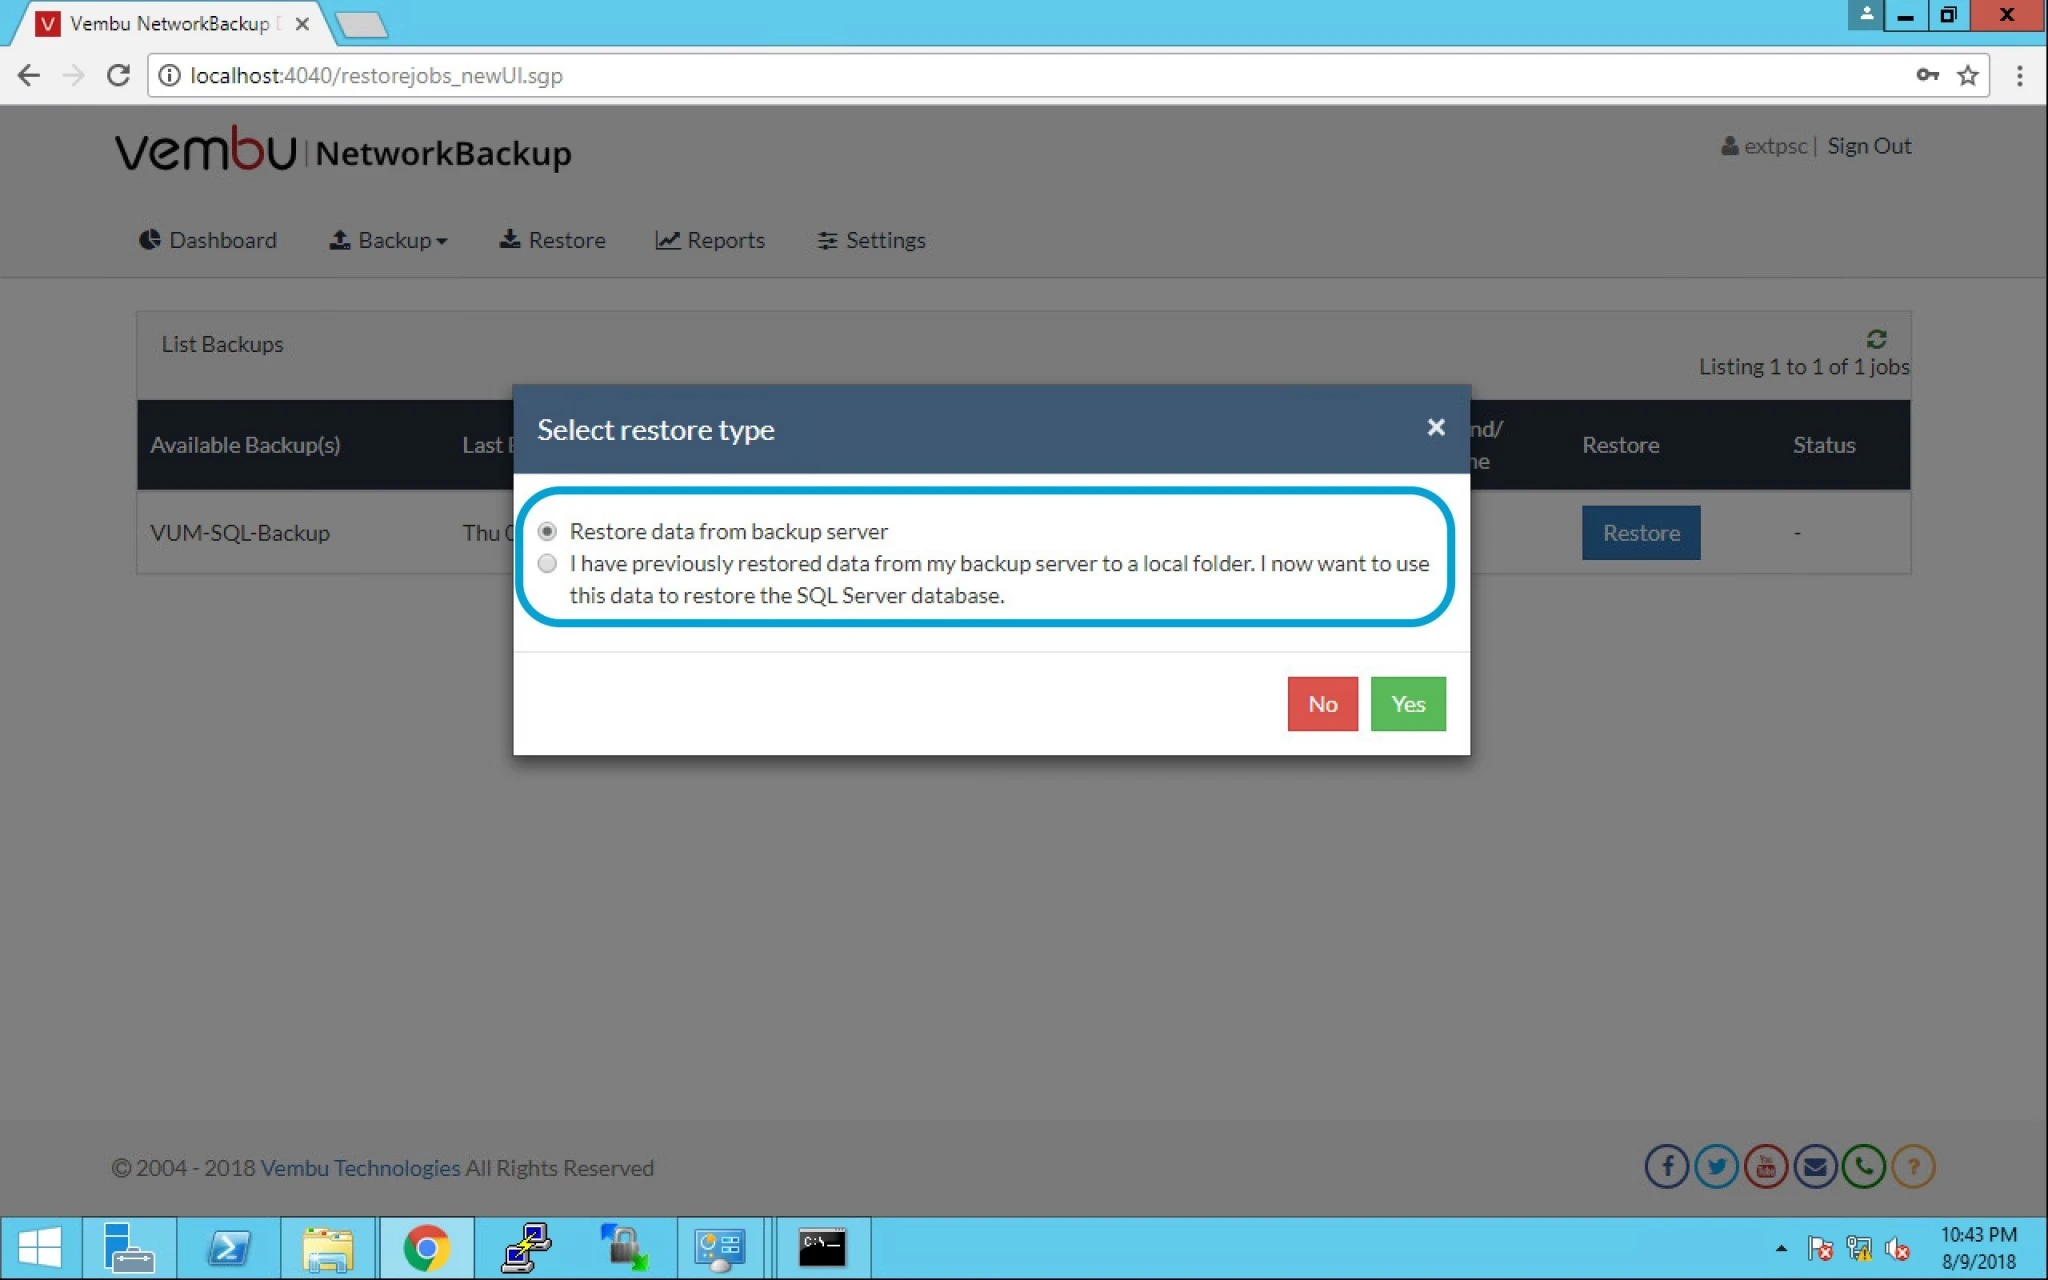
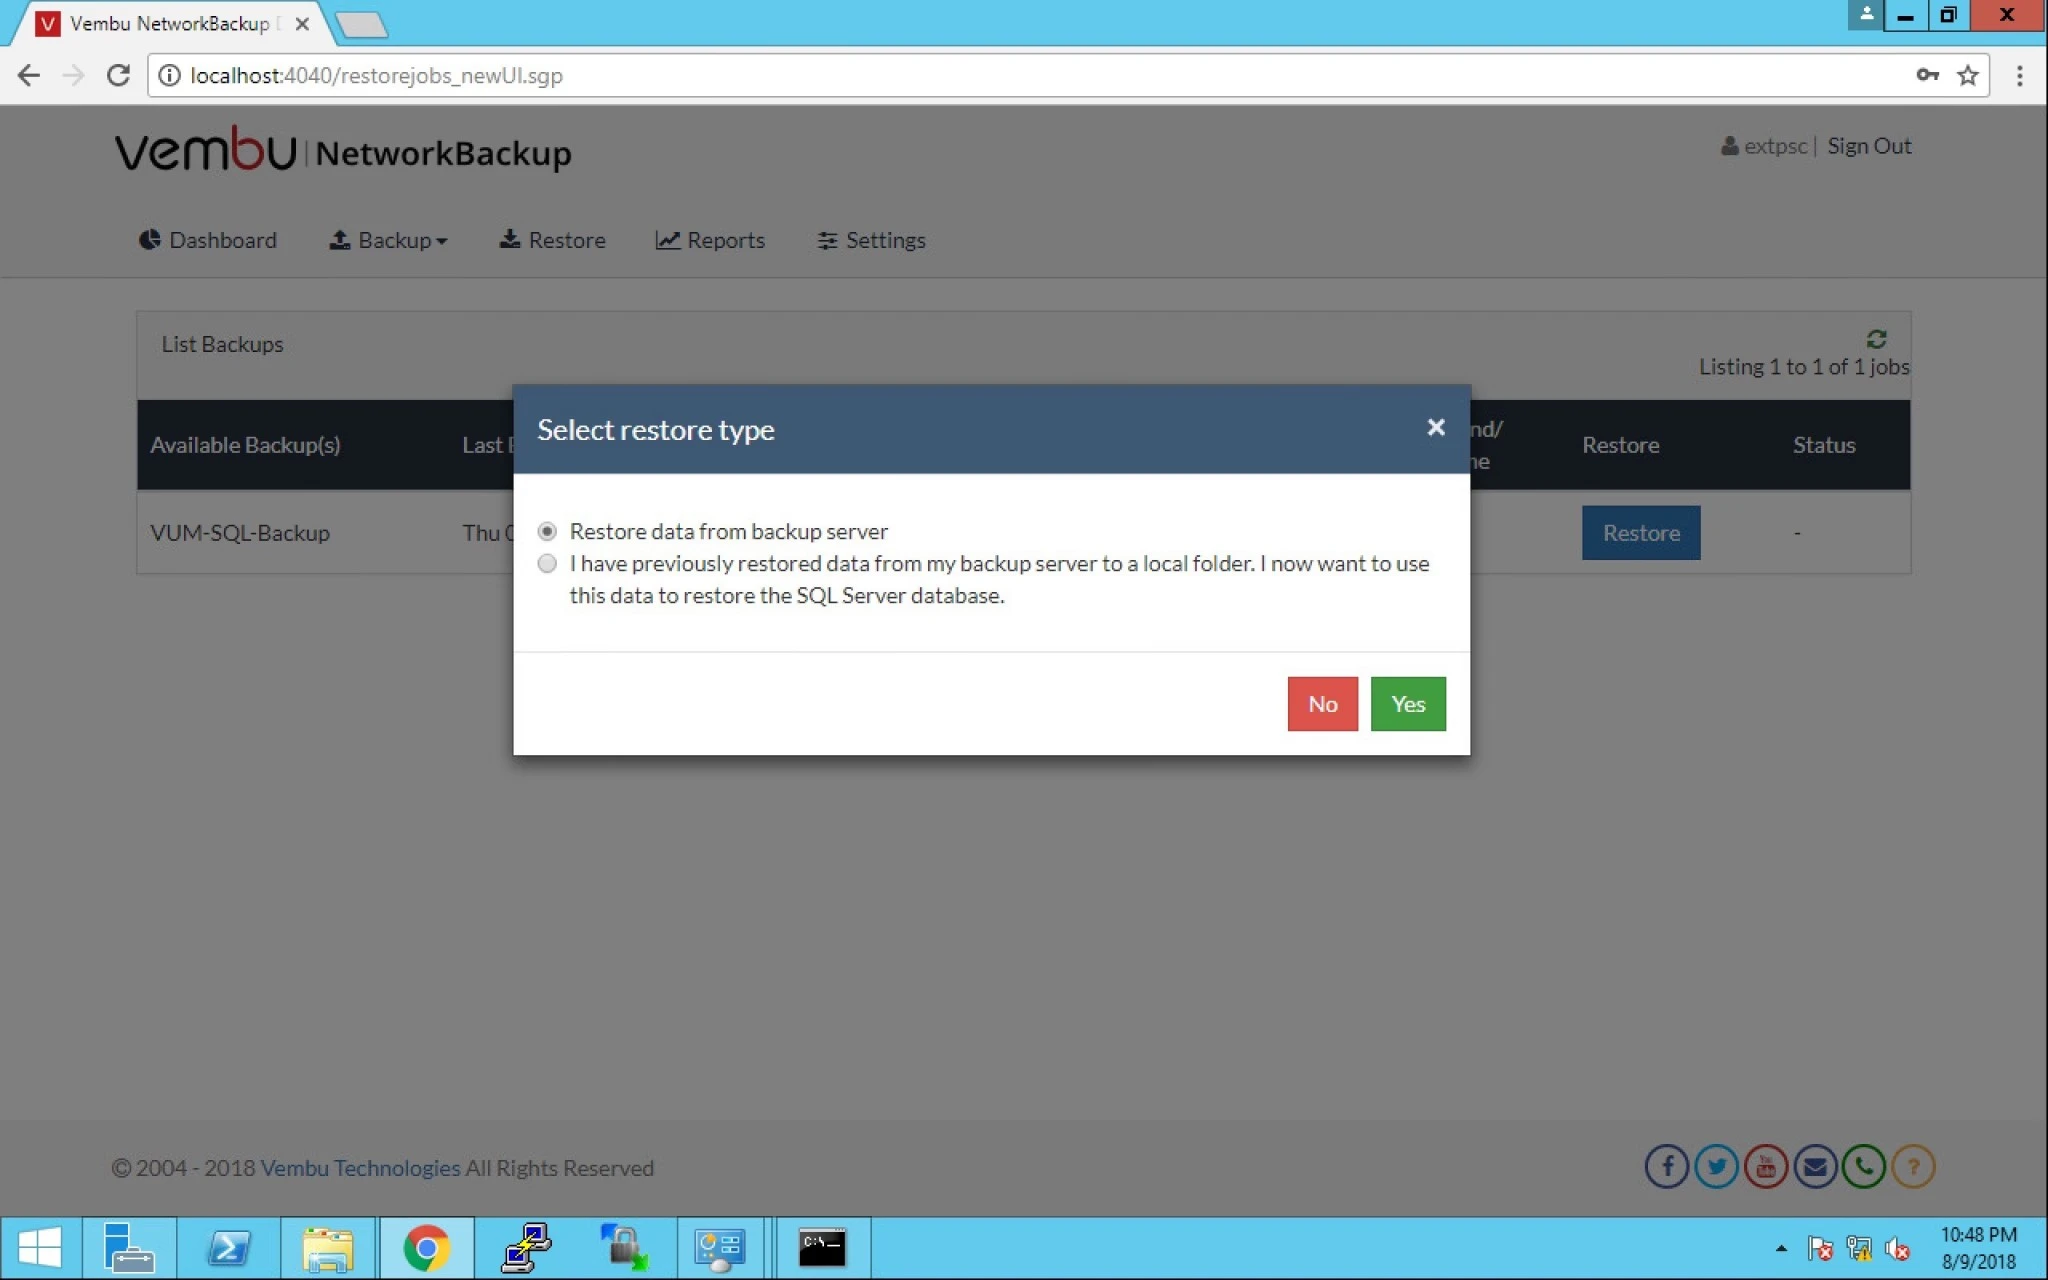
3. Now there are two options given below:

a) Restore Data from backup server. And

b) I have previously restored data from my backup server to a local folder. I now want to use this data to restore the MS SQL Server. 


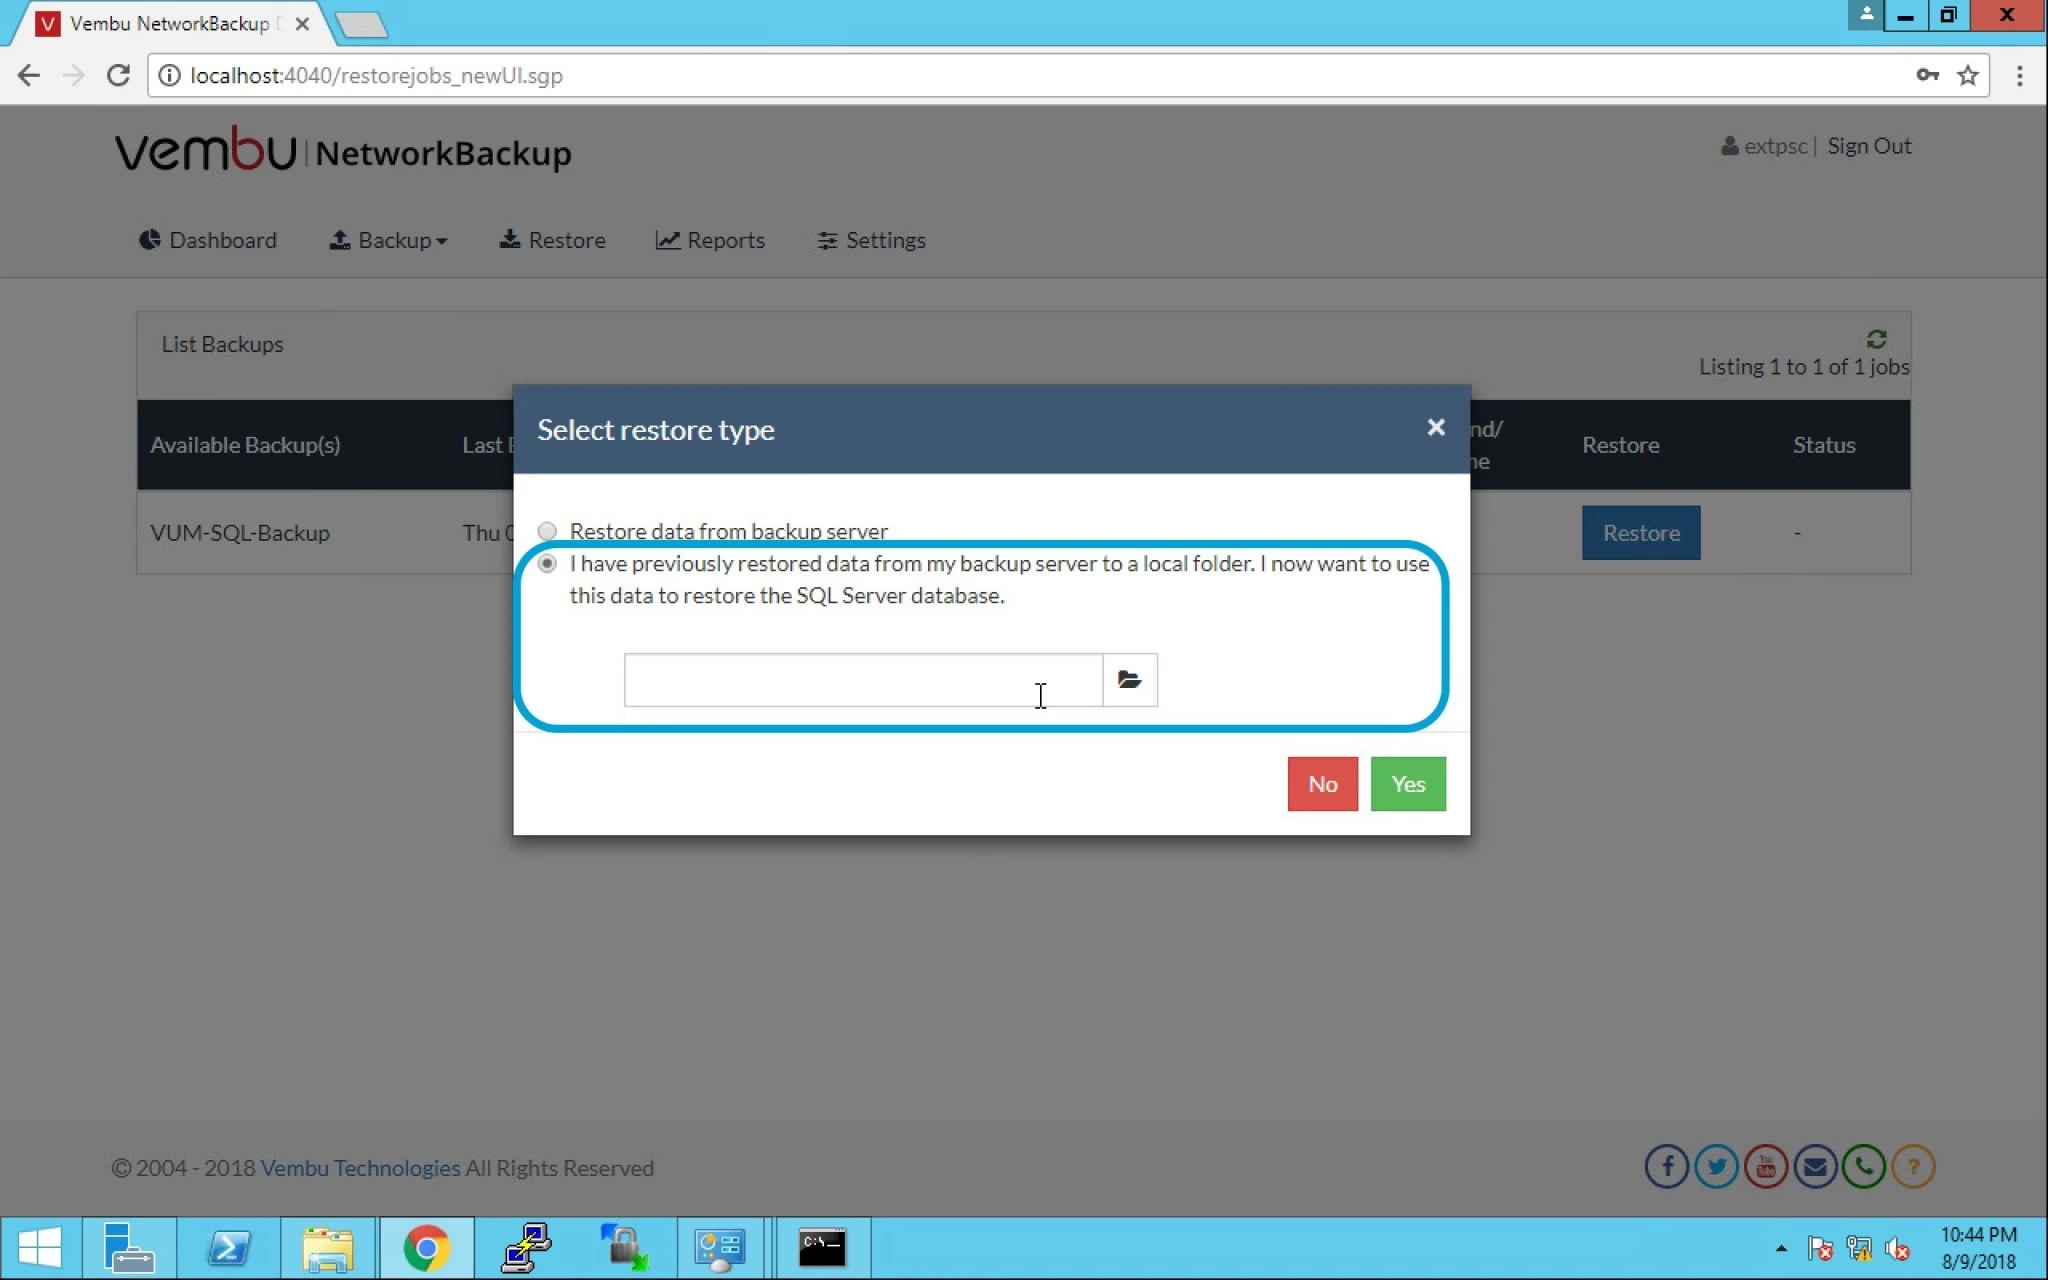
4. Browse the previously restored data from the backup server to a local folder.


5. Select the data location of the folder or path to the folder . Click Ok.
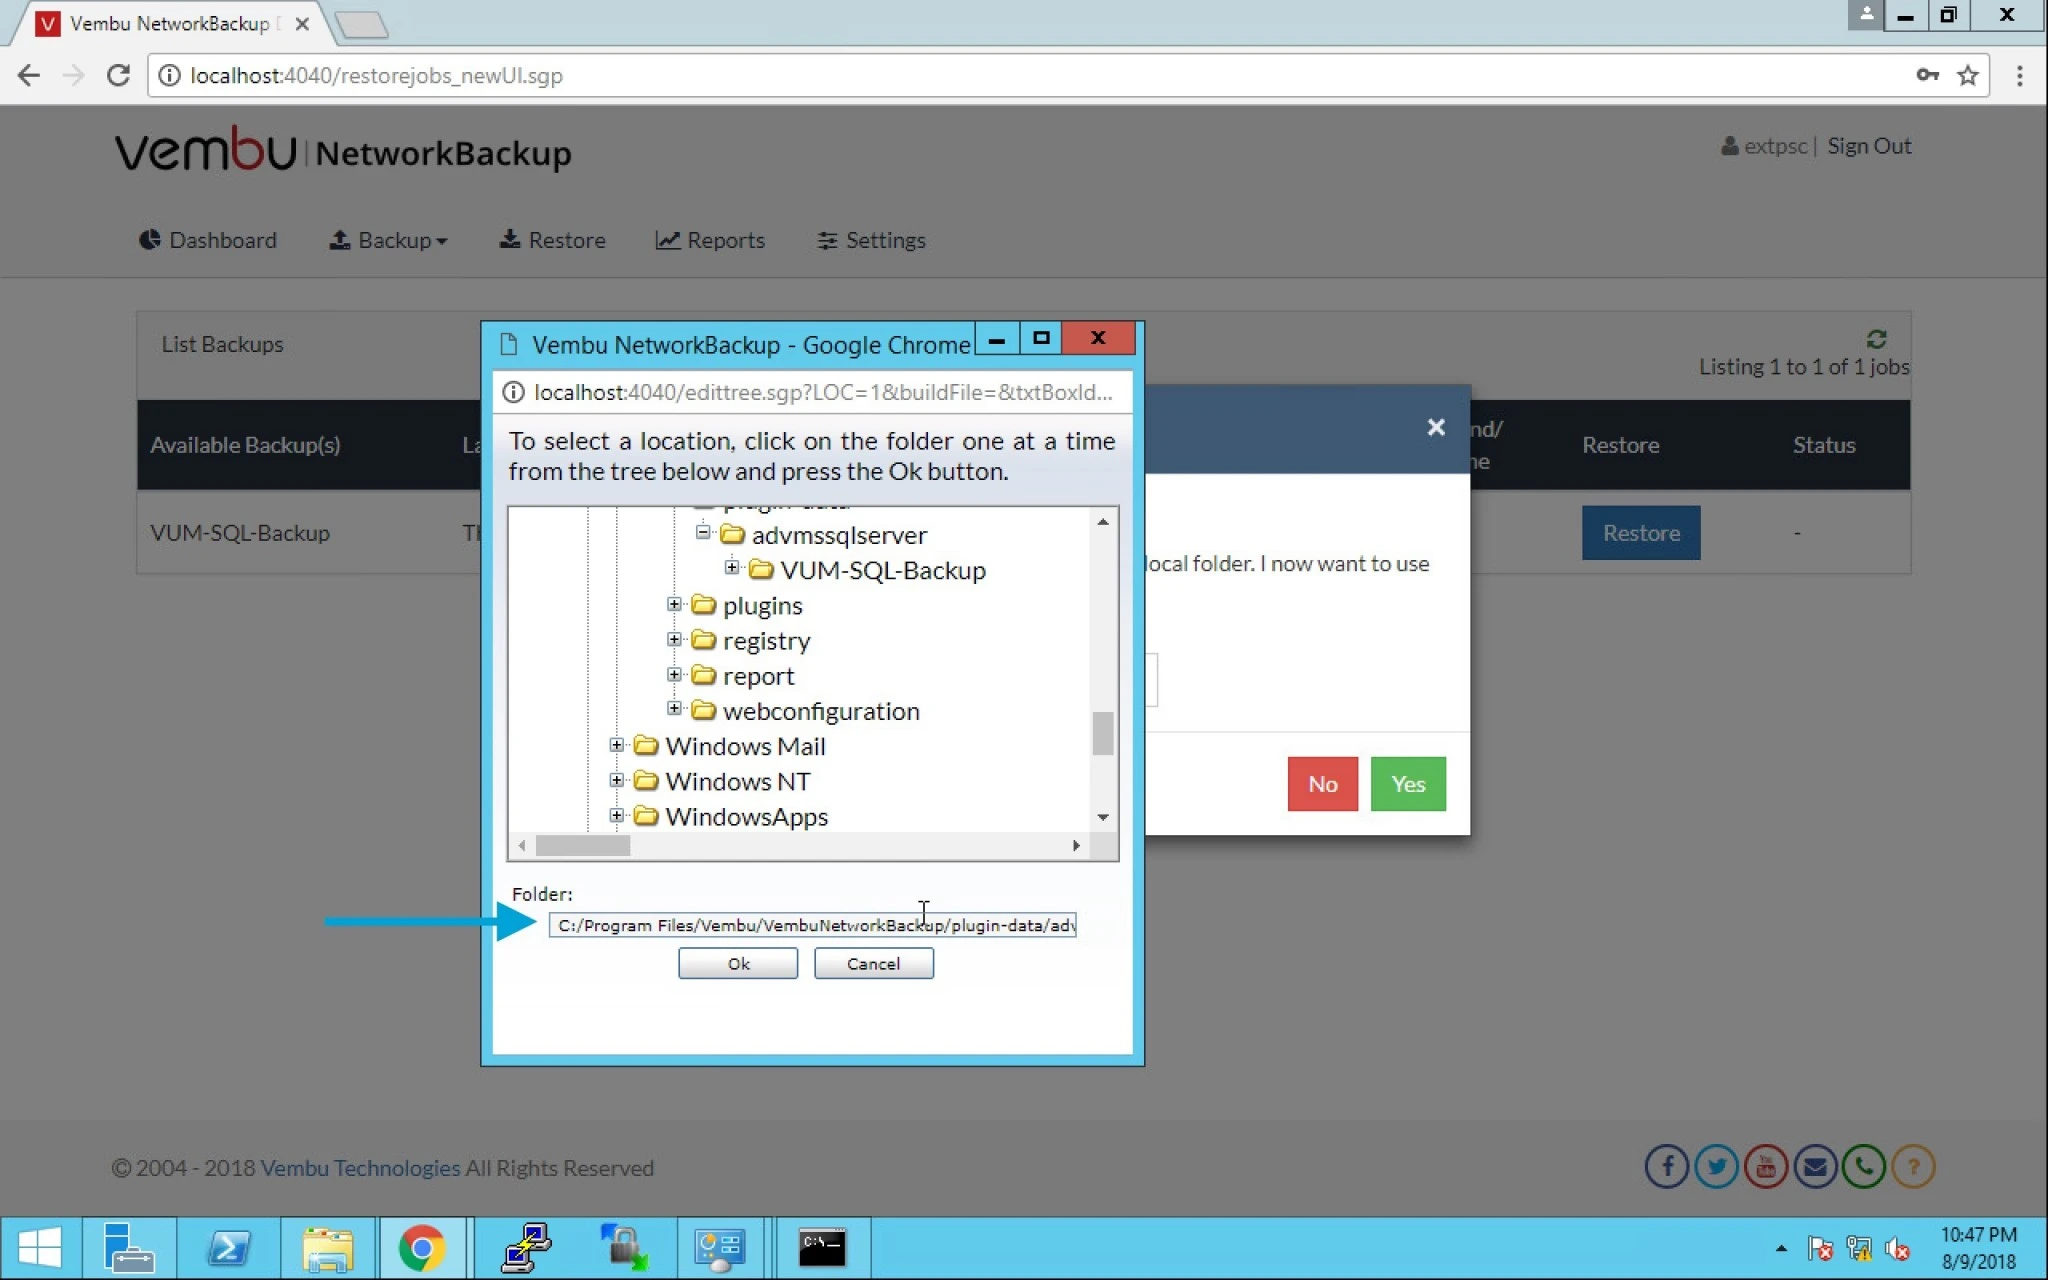


6. Click on Yes.
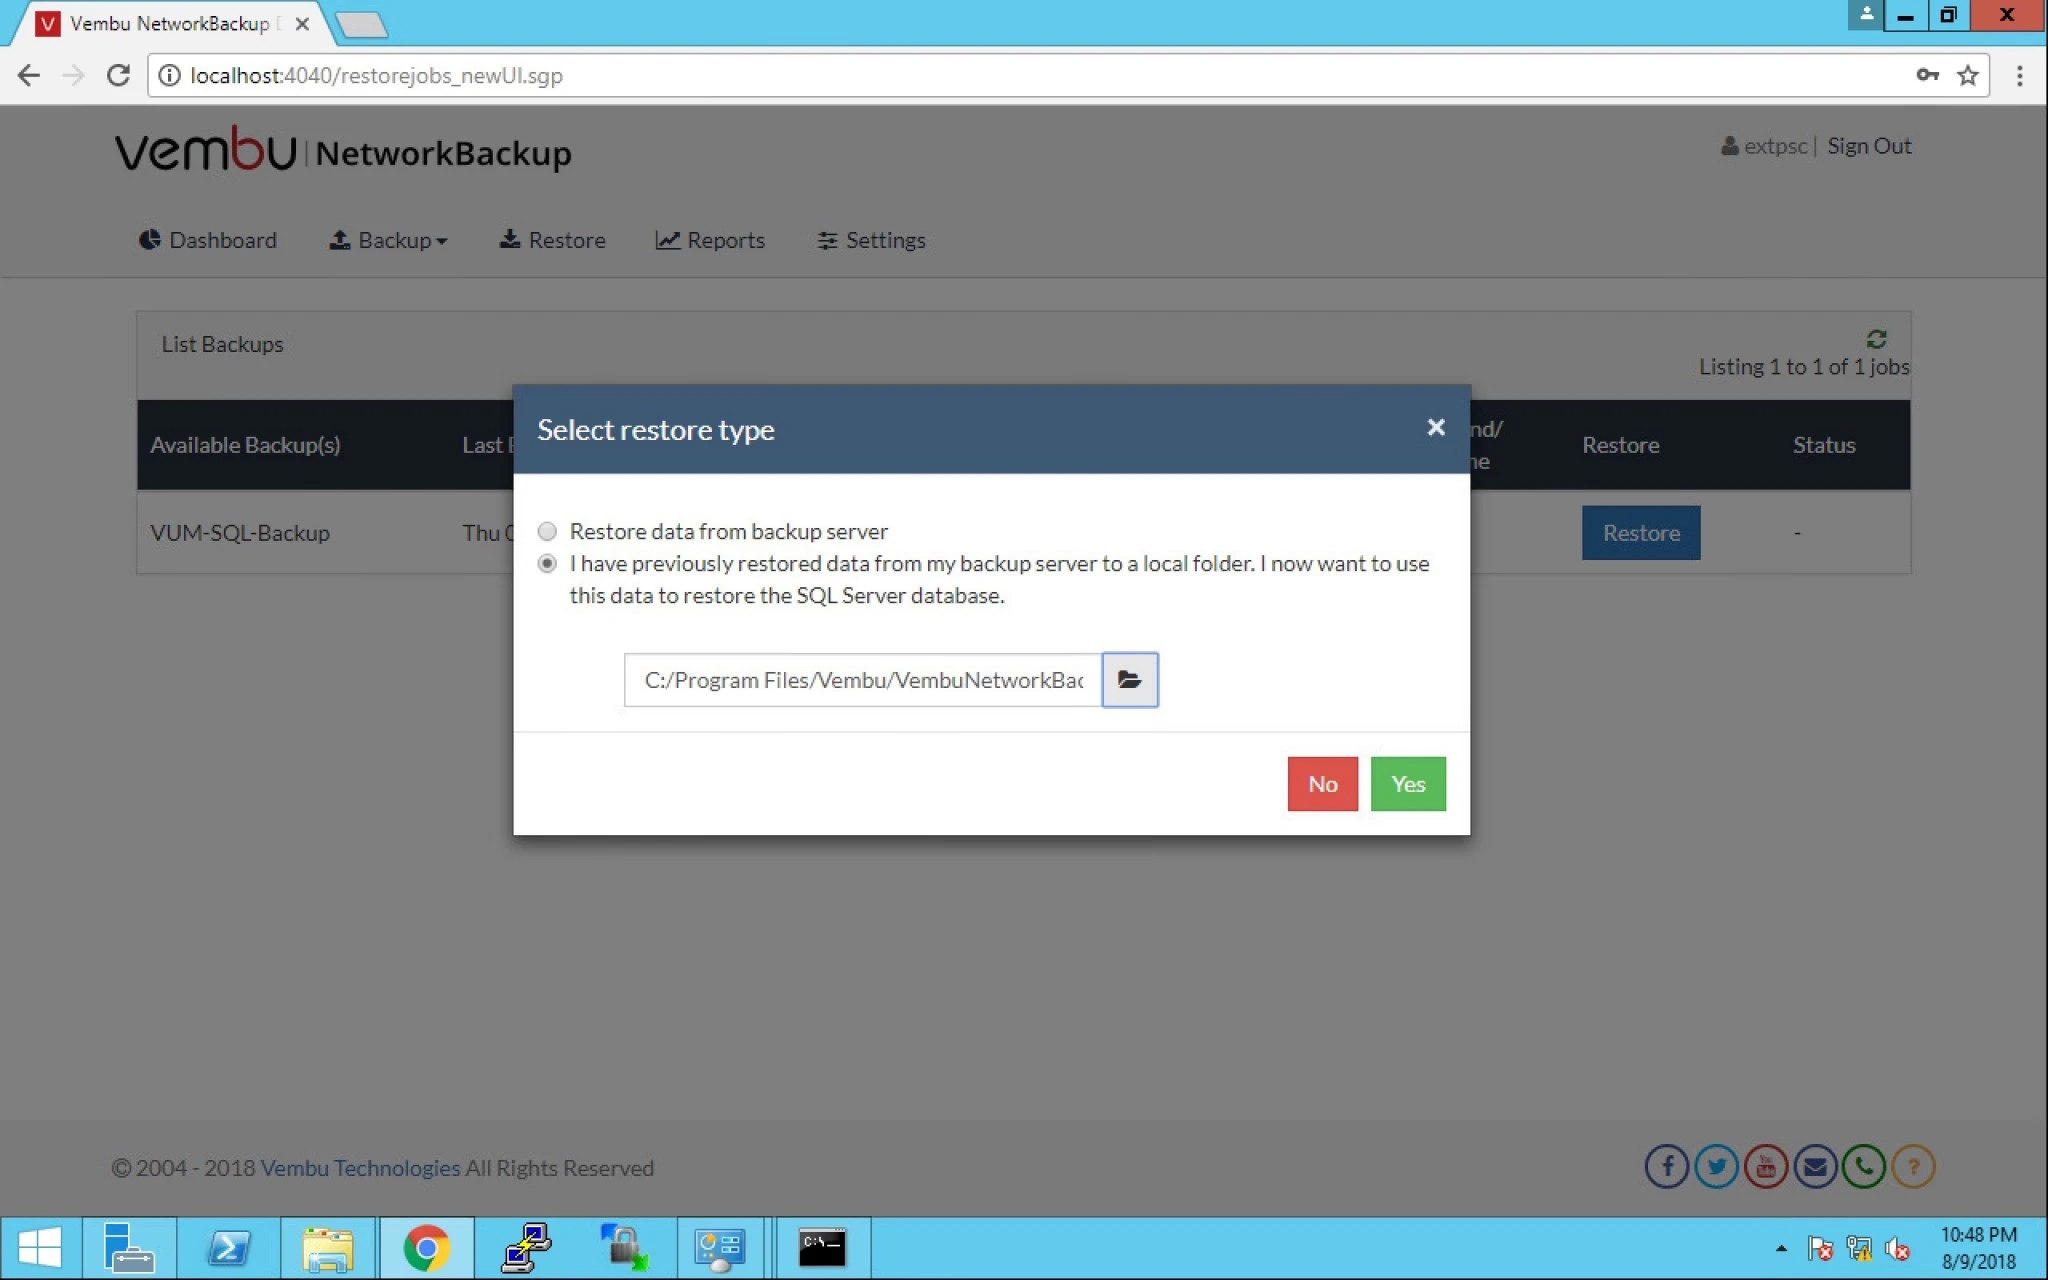
 

7. Let’s select the first one to get an overview of this option “Restore data from backup server”.


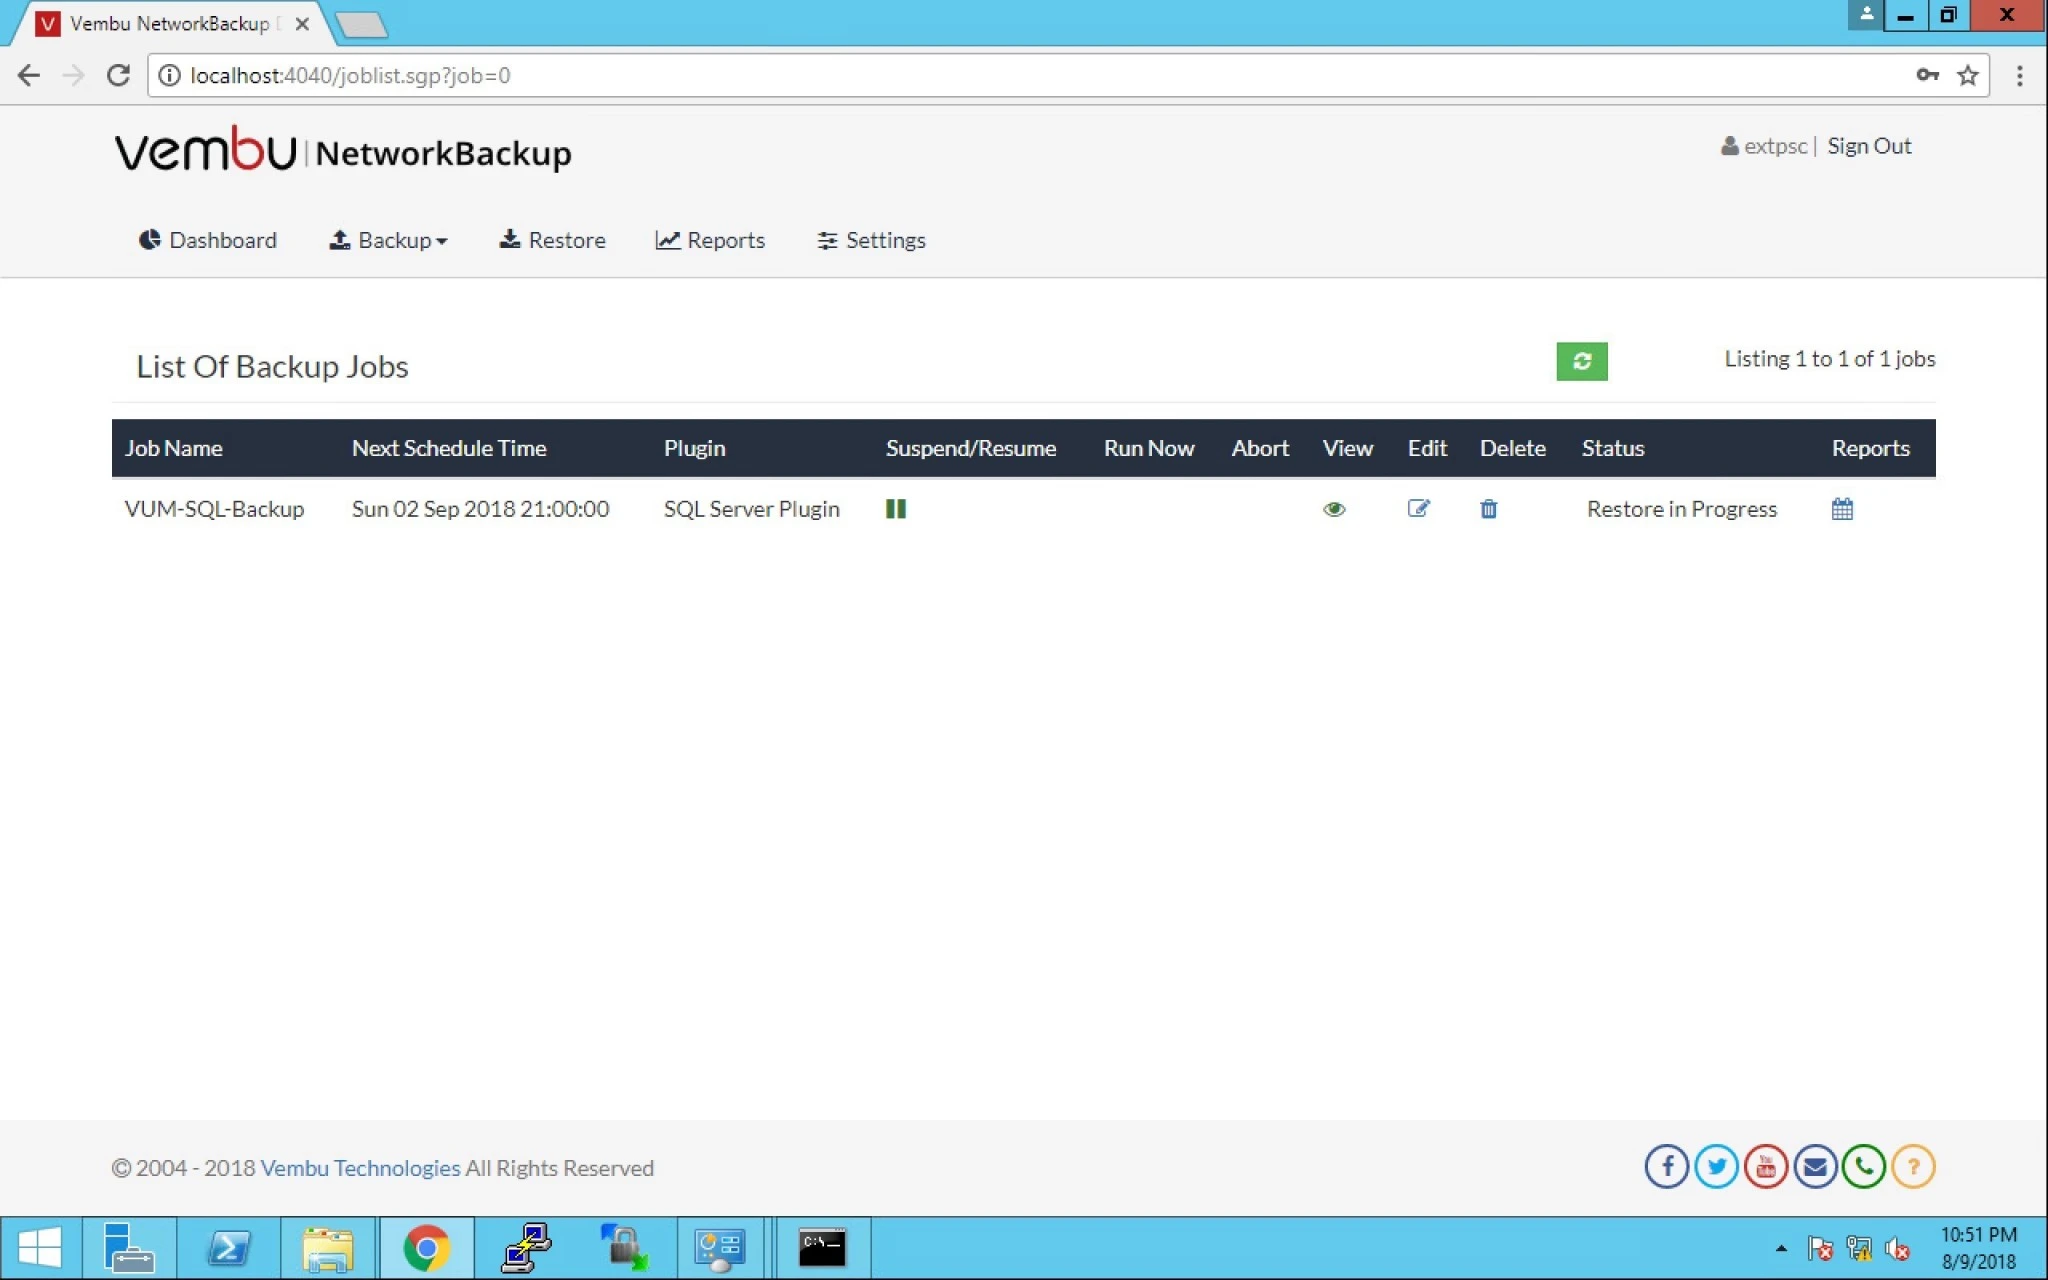
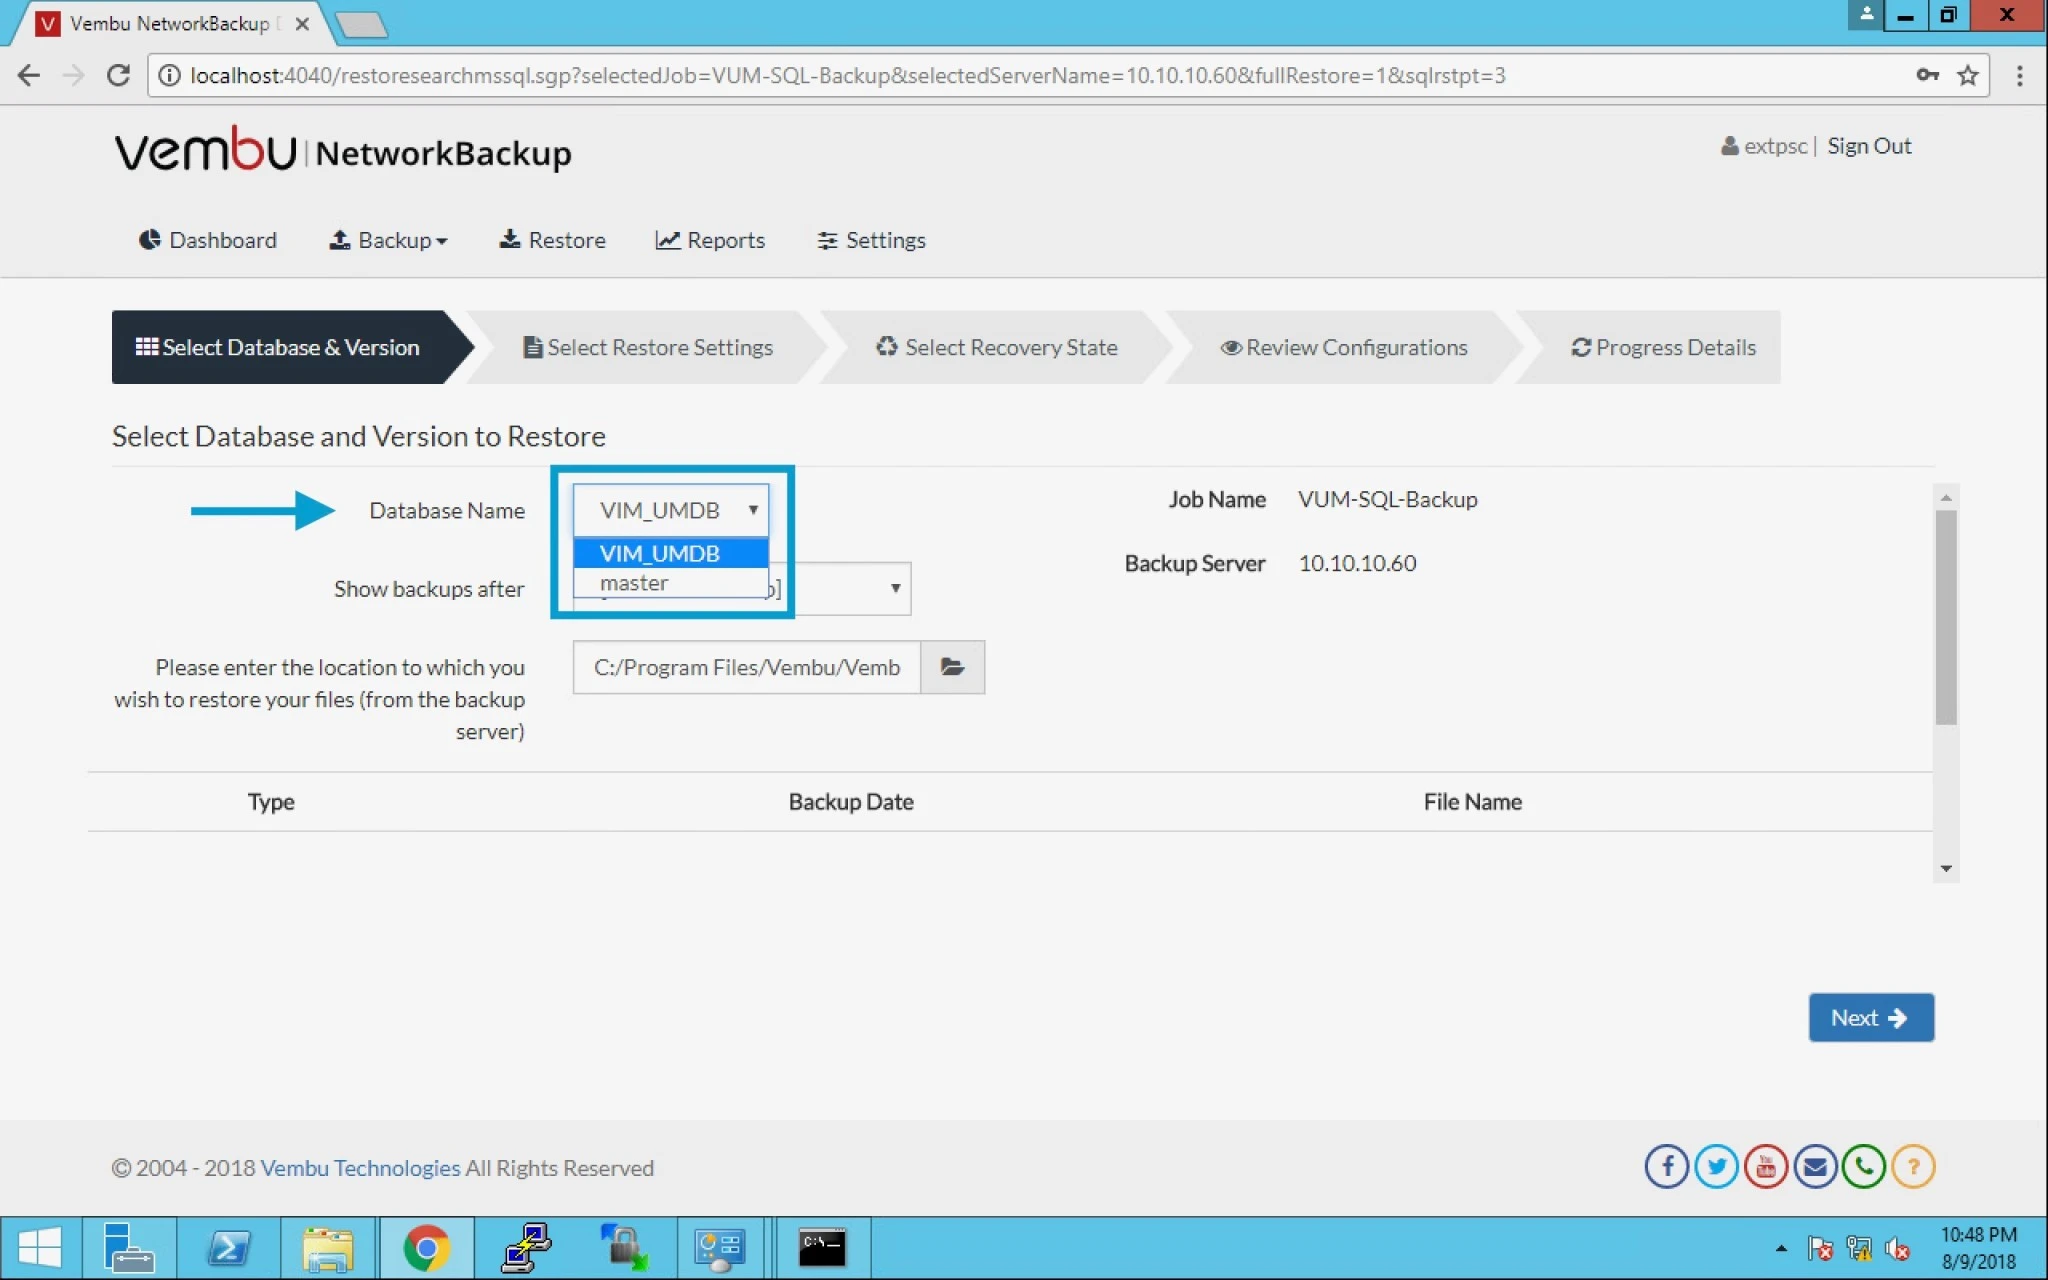
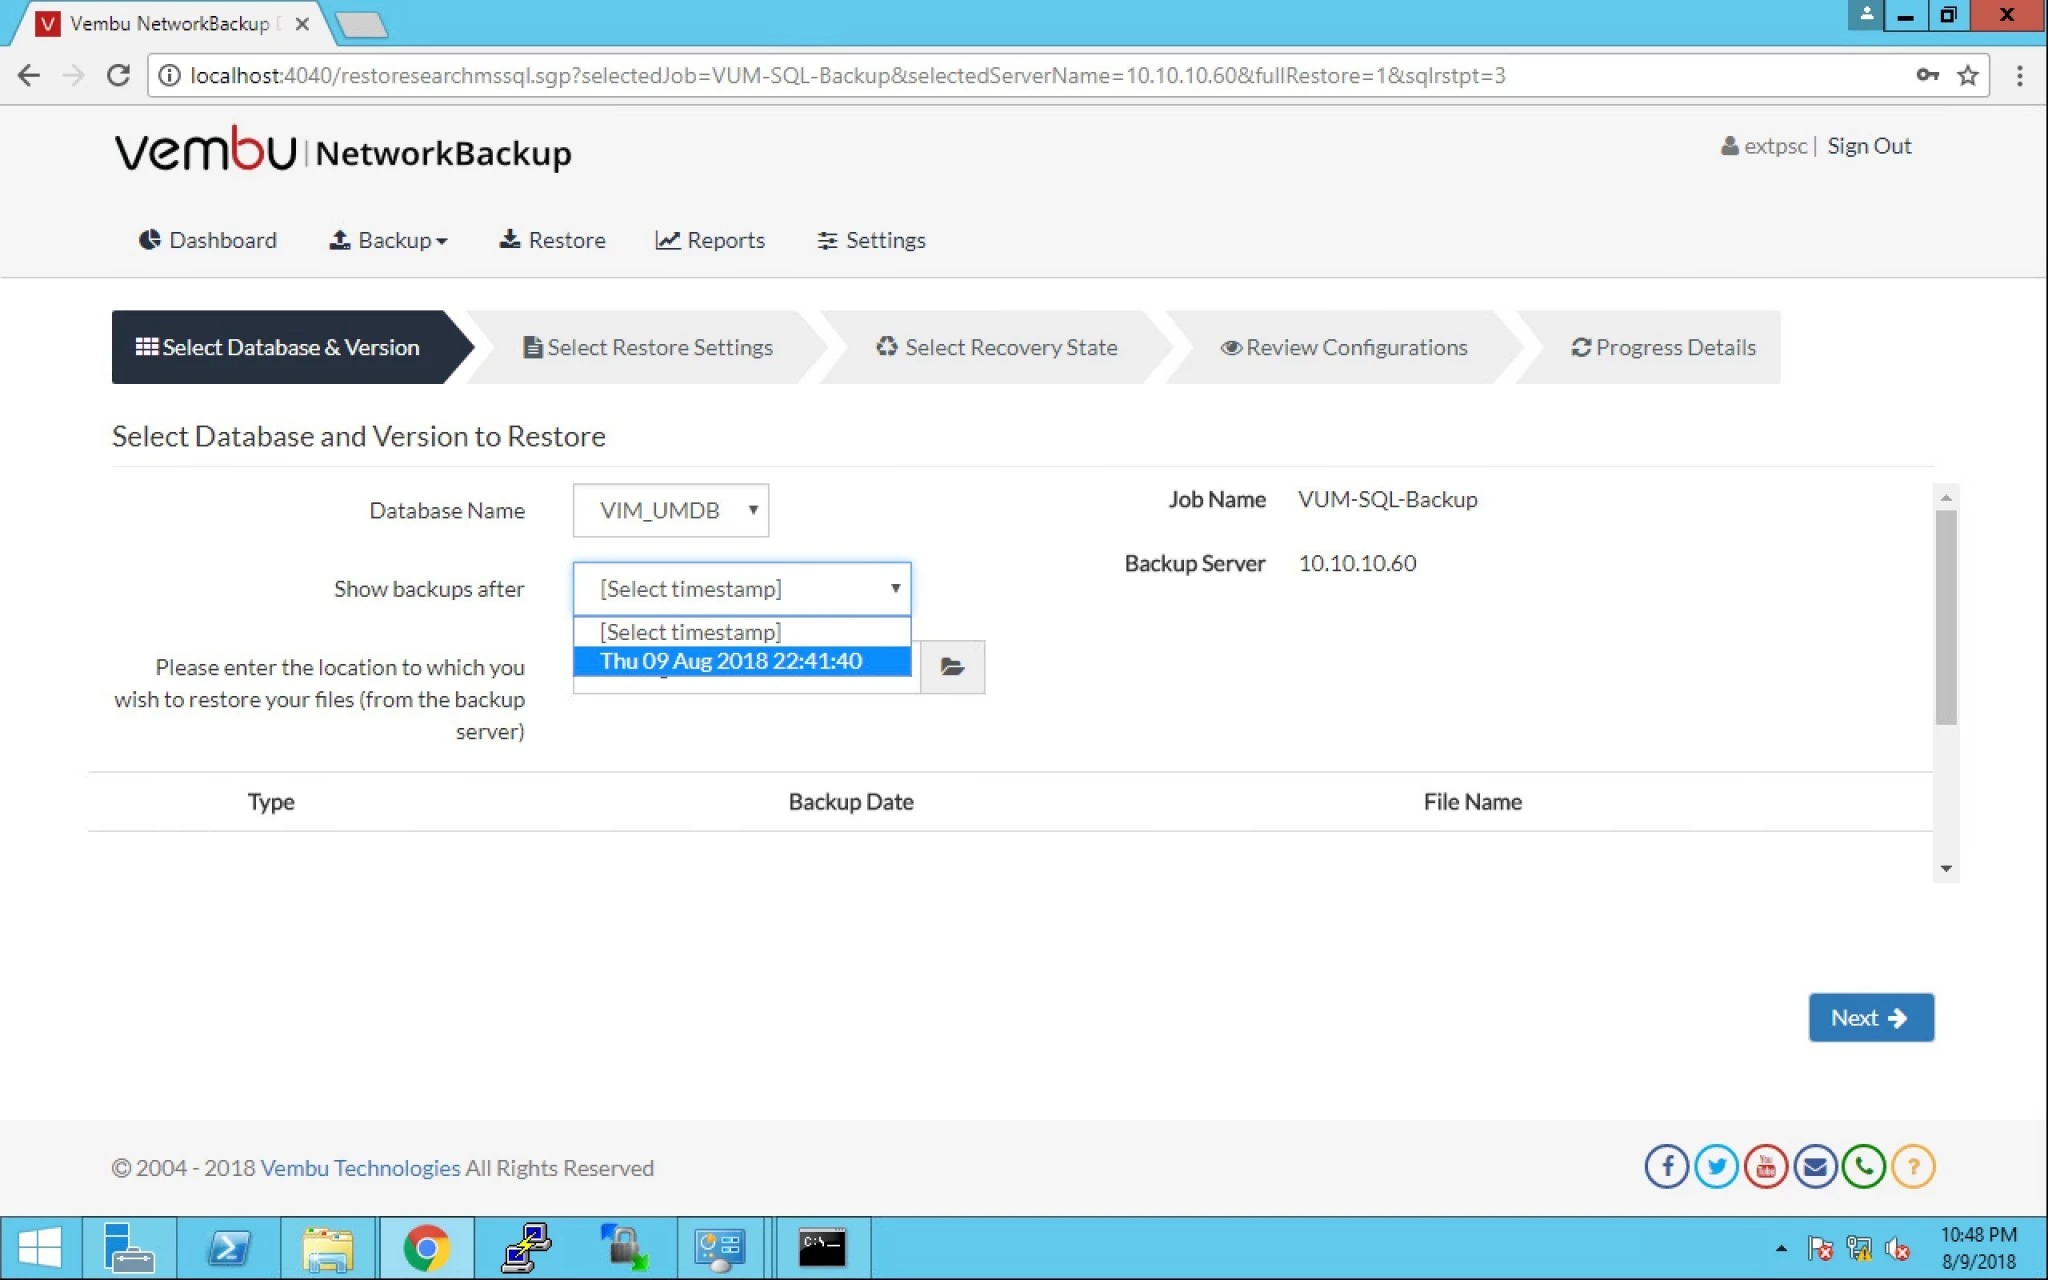
8. Now select the below information:

a) Database Name.

b) Select Time Stamp.

c) Location of file.



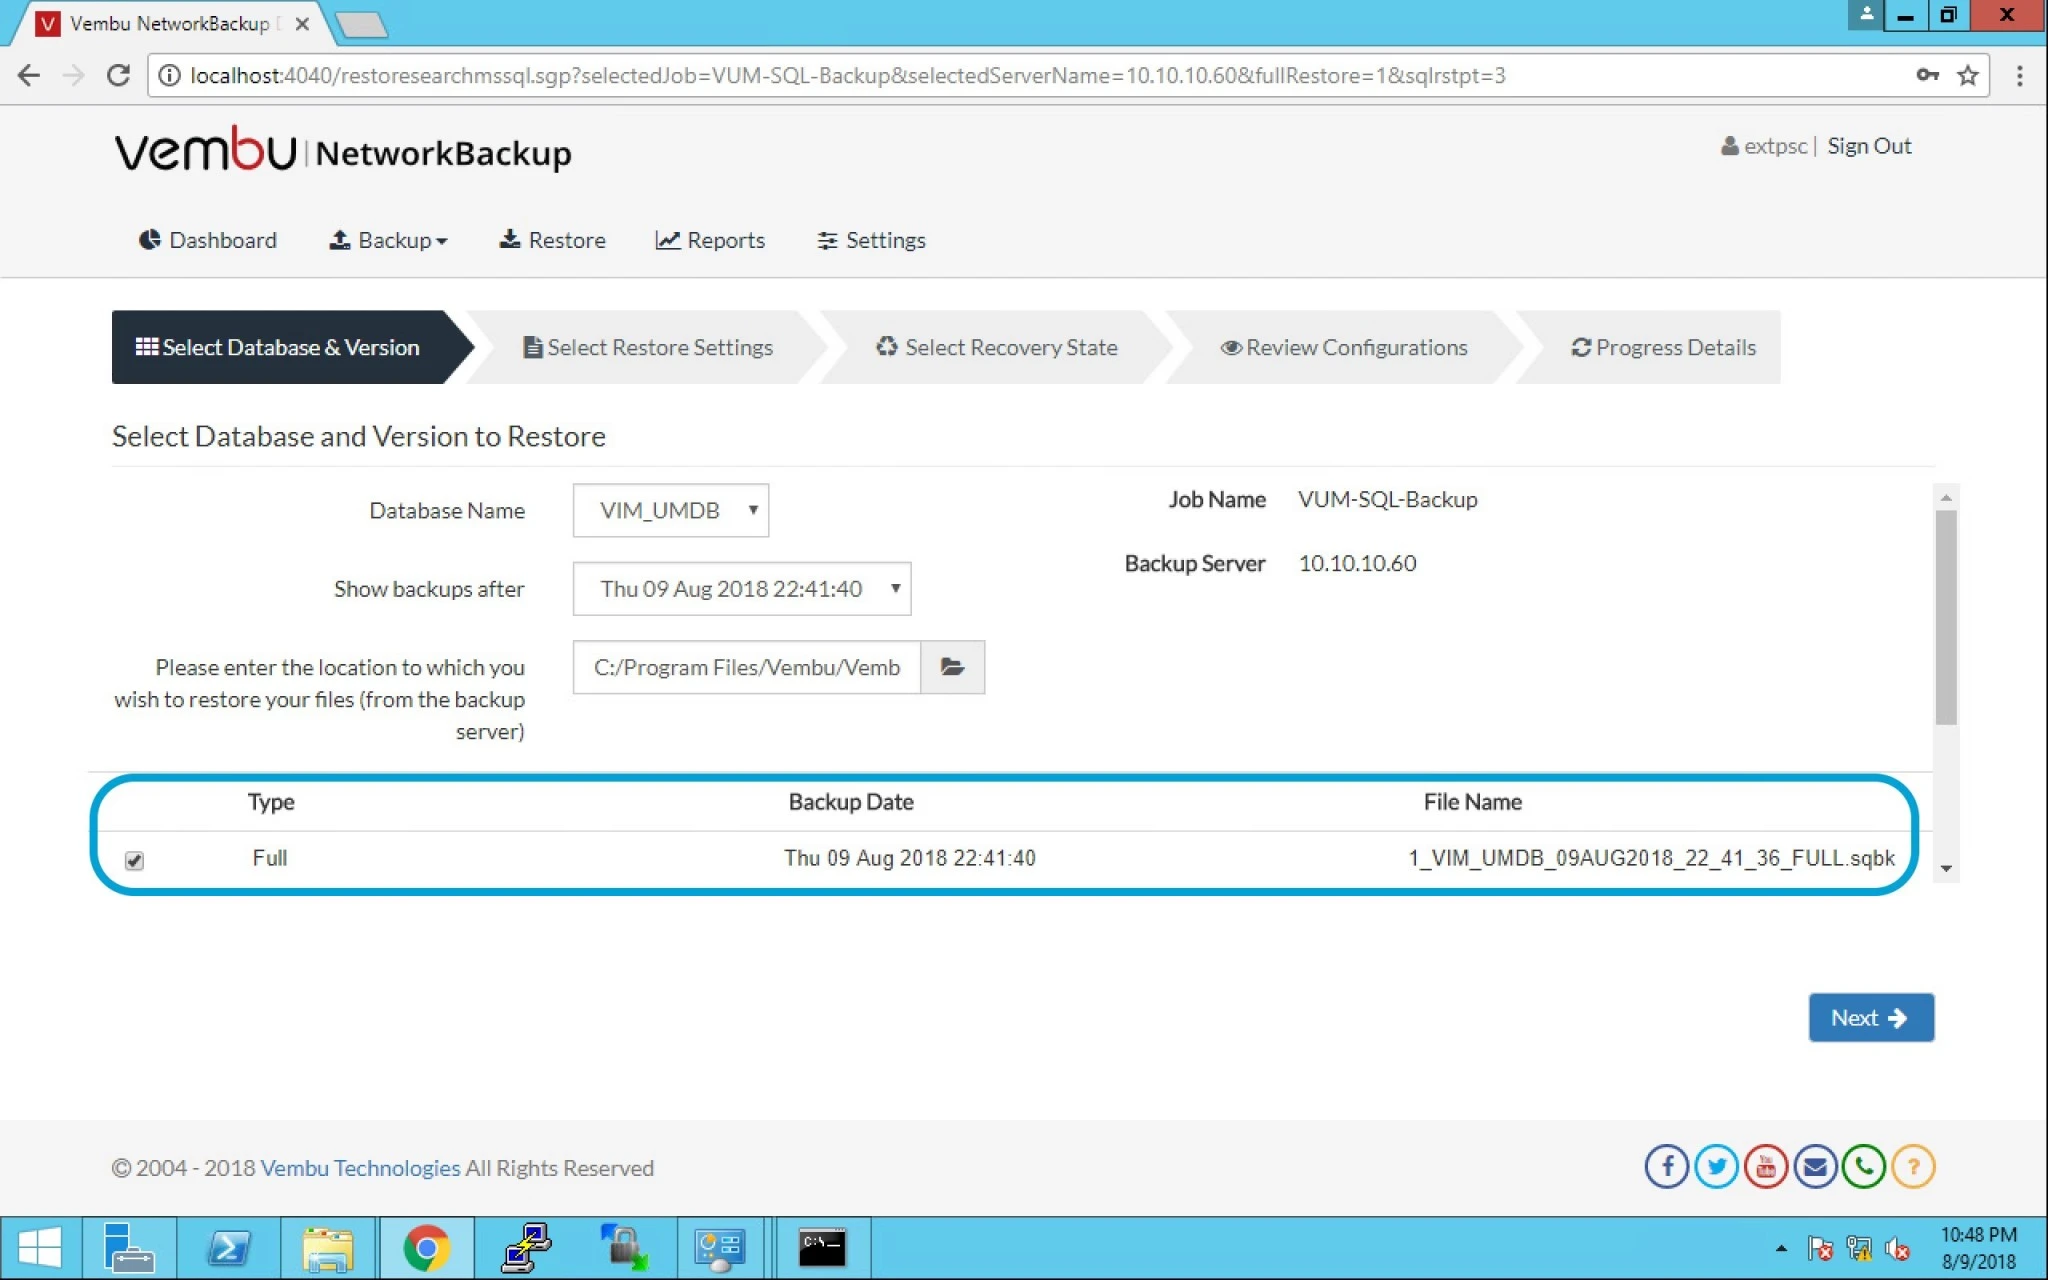
9. We have selected the VIM_UMDB as the database name.


10. We have selected the the Time Stamp of the backup for restore.


11. We have the prompt with the Full Backup to be restored option. Select Full and click next.


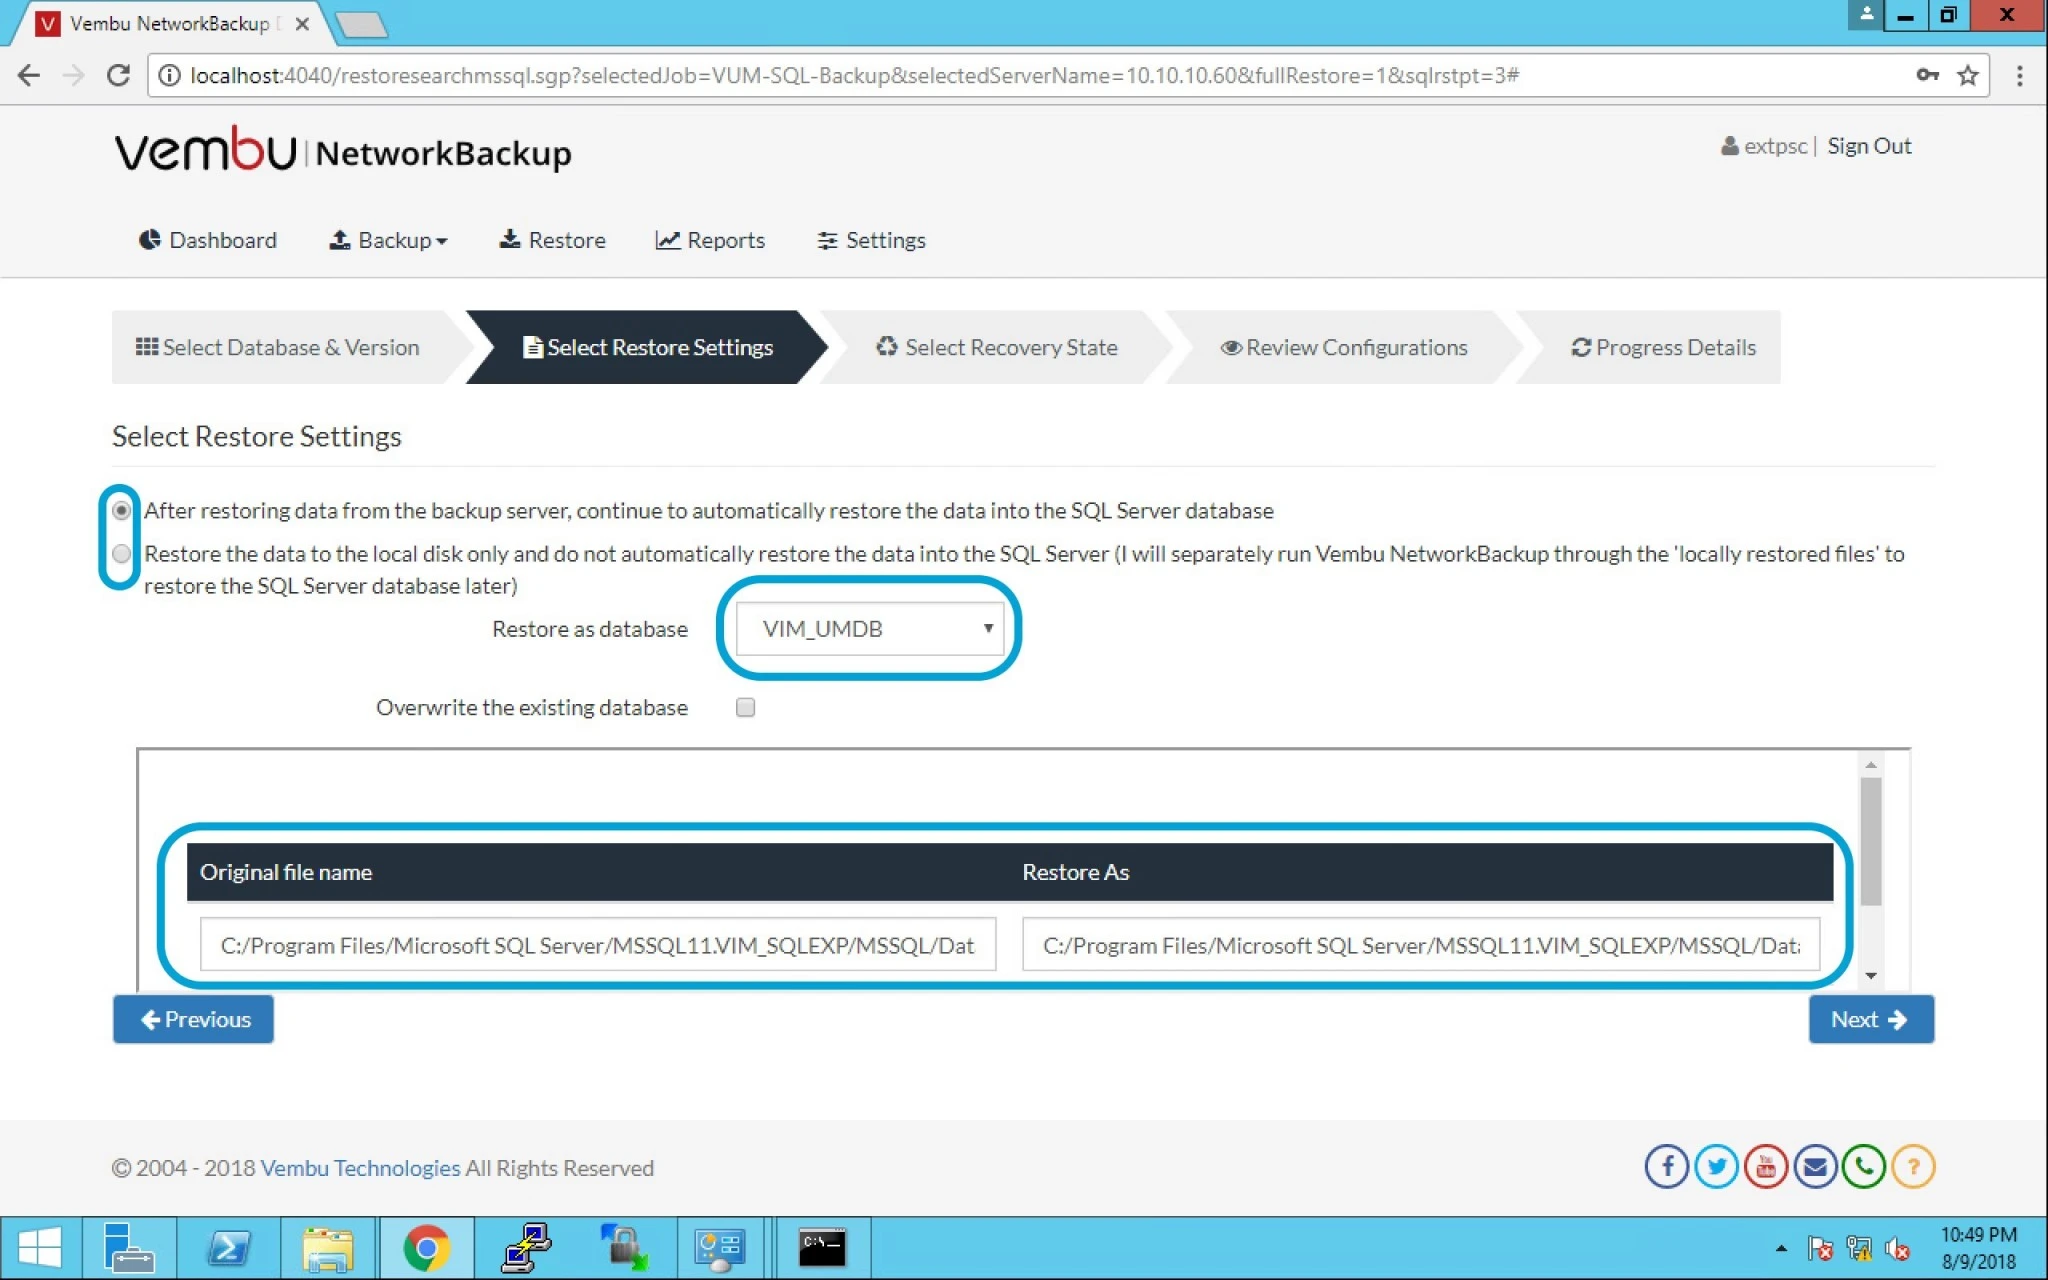
12. After restoring data from backup server, continue to auto restore data into SQL Server Database.

  • Choosing this option will let user restore data into SQL Server database, where user have the option to either overwrite an existing database or restore as separate database.



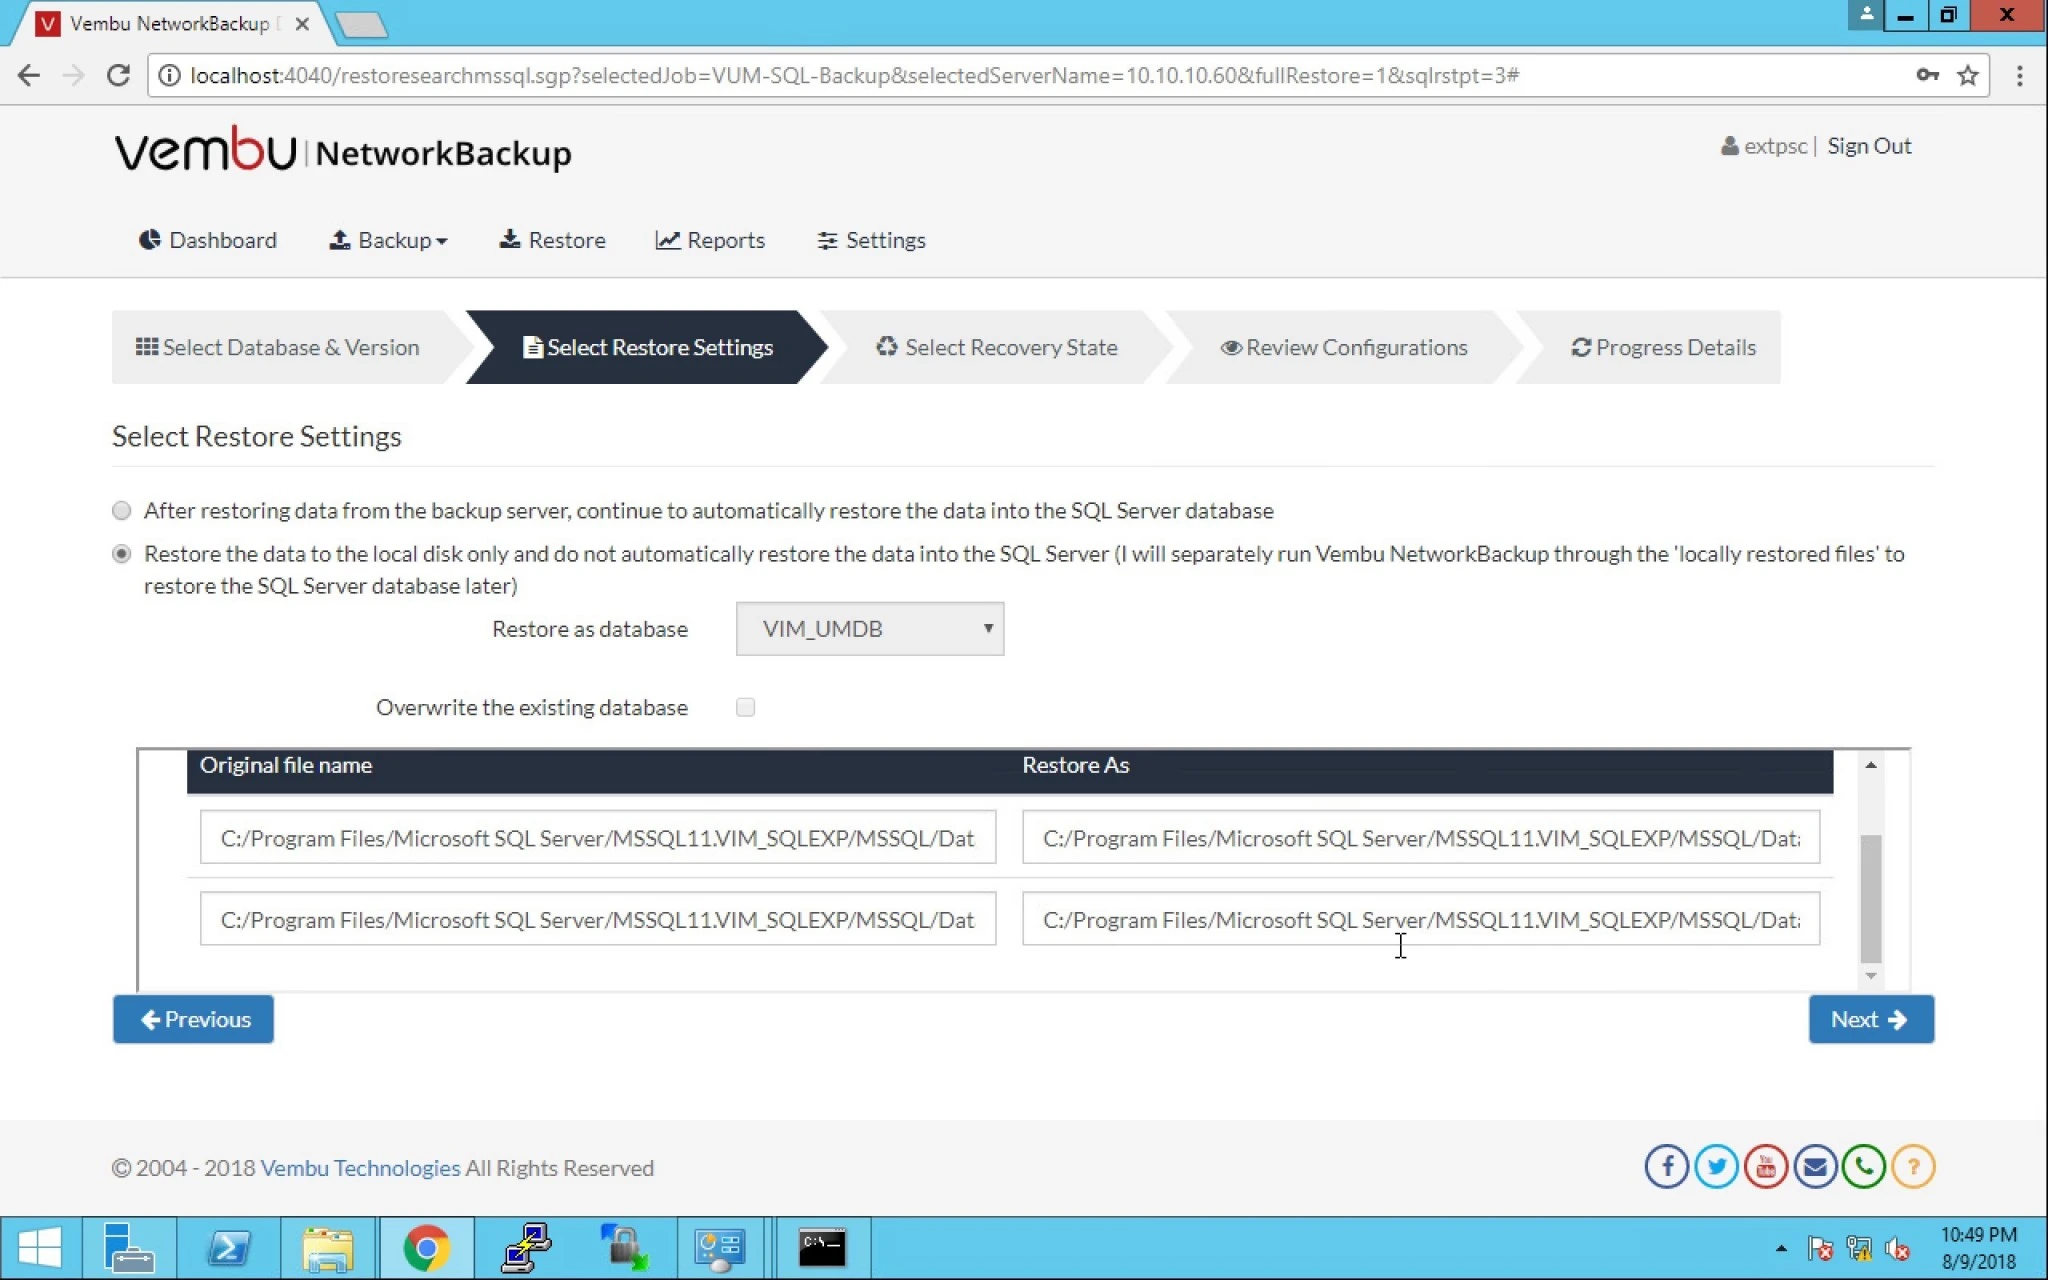
13. Restore data from backup server only (we will separately run Vembu NetworkBackup through the ‘locally restored files’ to restore the SQL Server database later).

  • Choosing this option will restore data in a separate user defined location instead restoring data into SQL Server.
 

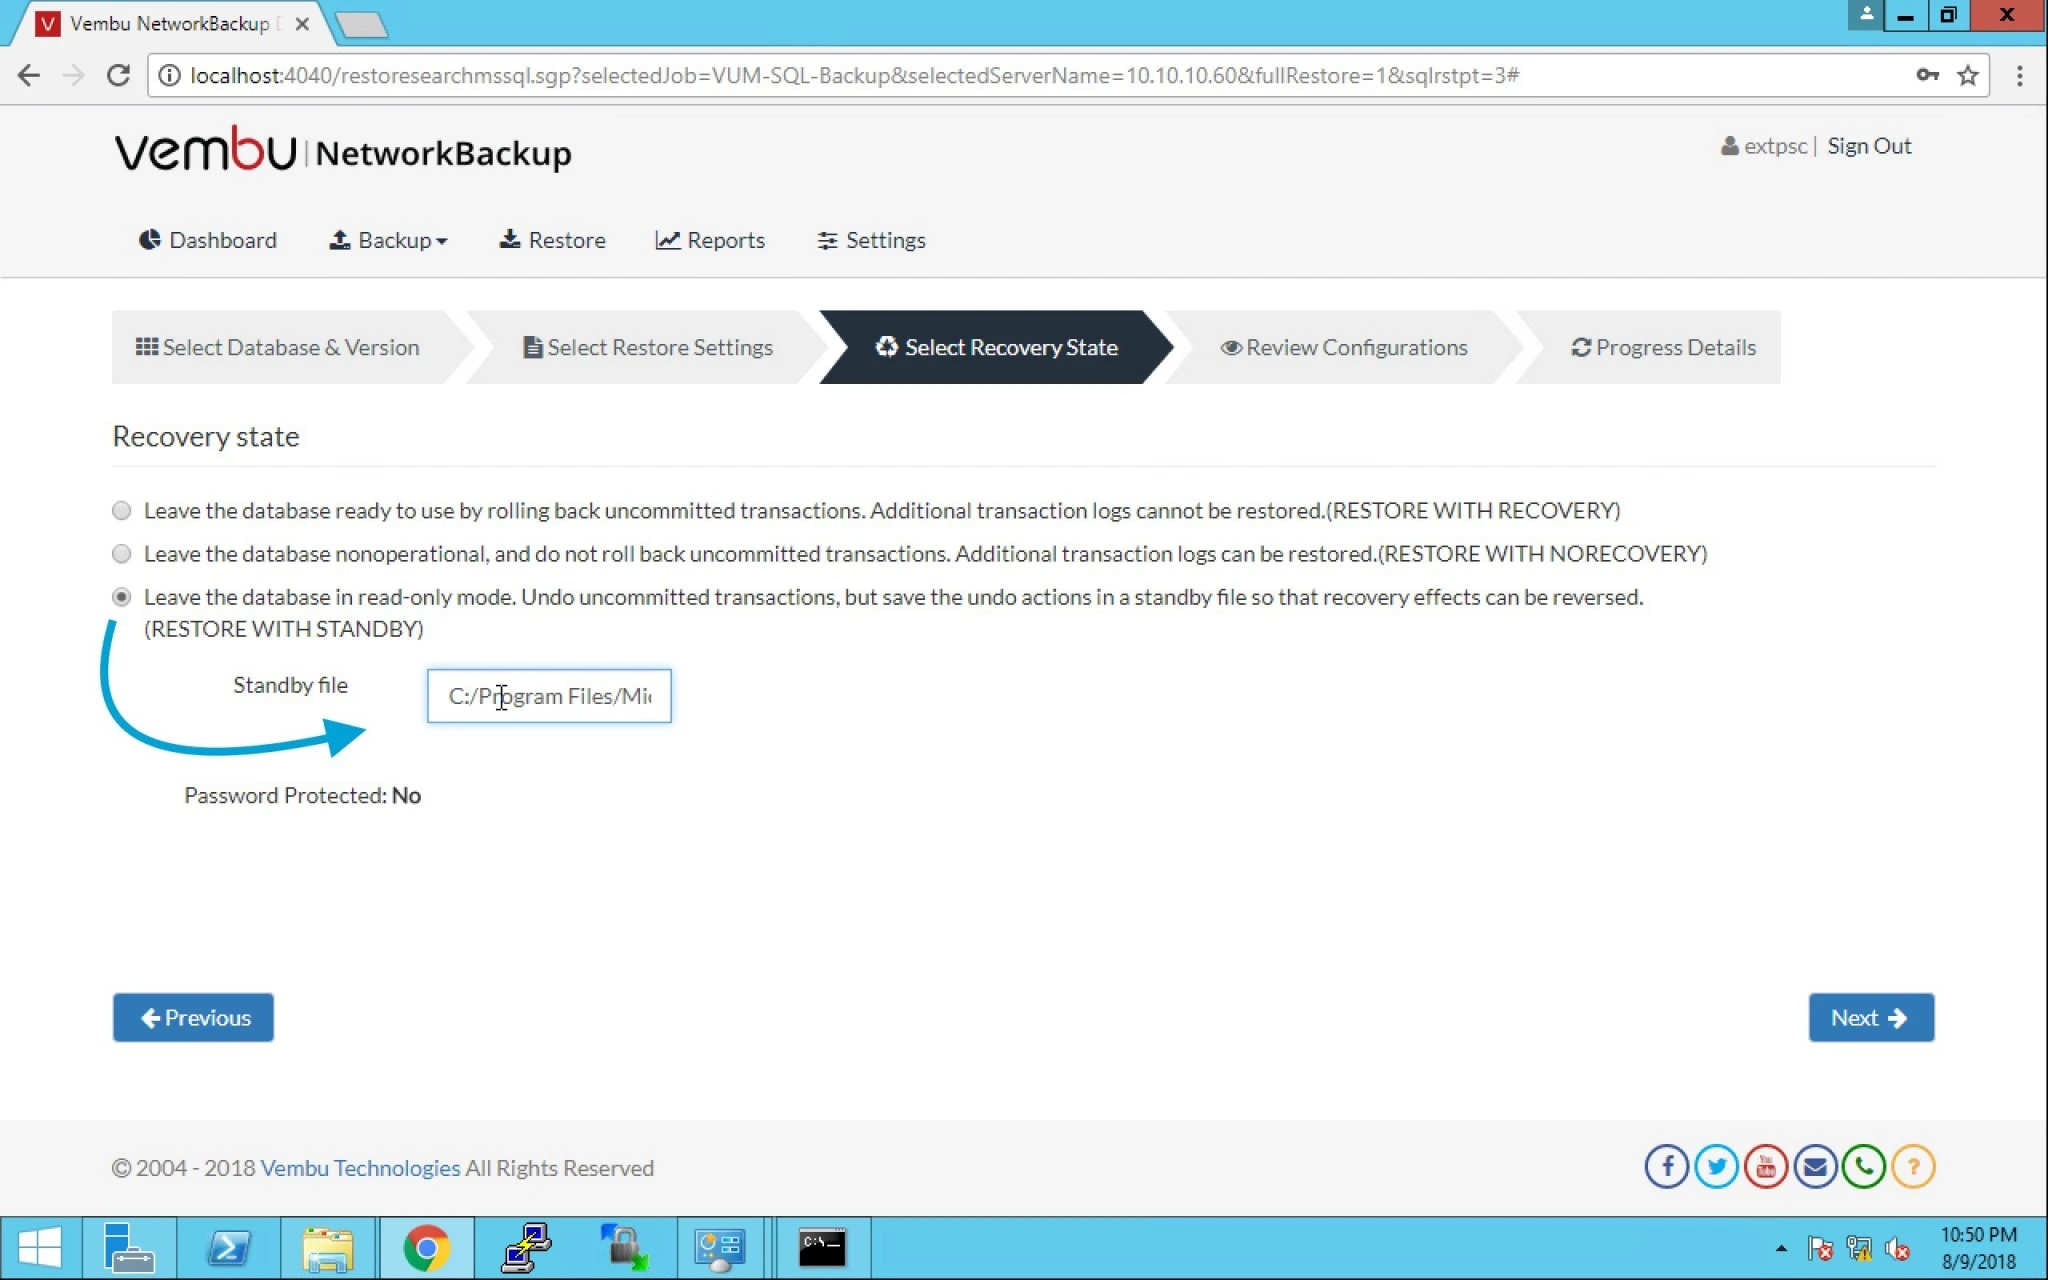
14.  We have got these three options given below:

  • Leave database in ready-to-use state by rolling back uncommitted transactions. Additional transaction logs cannot be restored (Restore with recovery).
  • Leave database non-operational, and do not rollback uncommitted transactions. Additional transaction logs can be restored (Restore with Non-Recovery).
  • Leave database in read-only mode. Undo uncommitted transactions, but save undo action in a standby file so that recovery effects can be reversed (Restore with Standby).
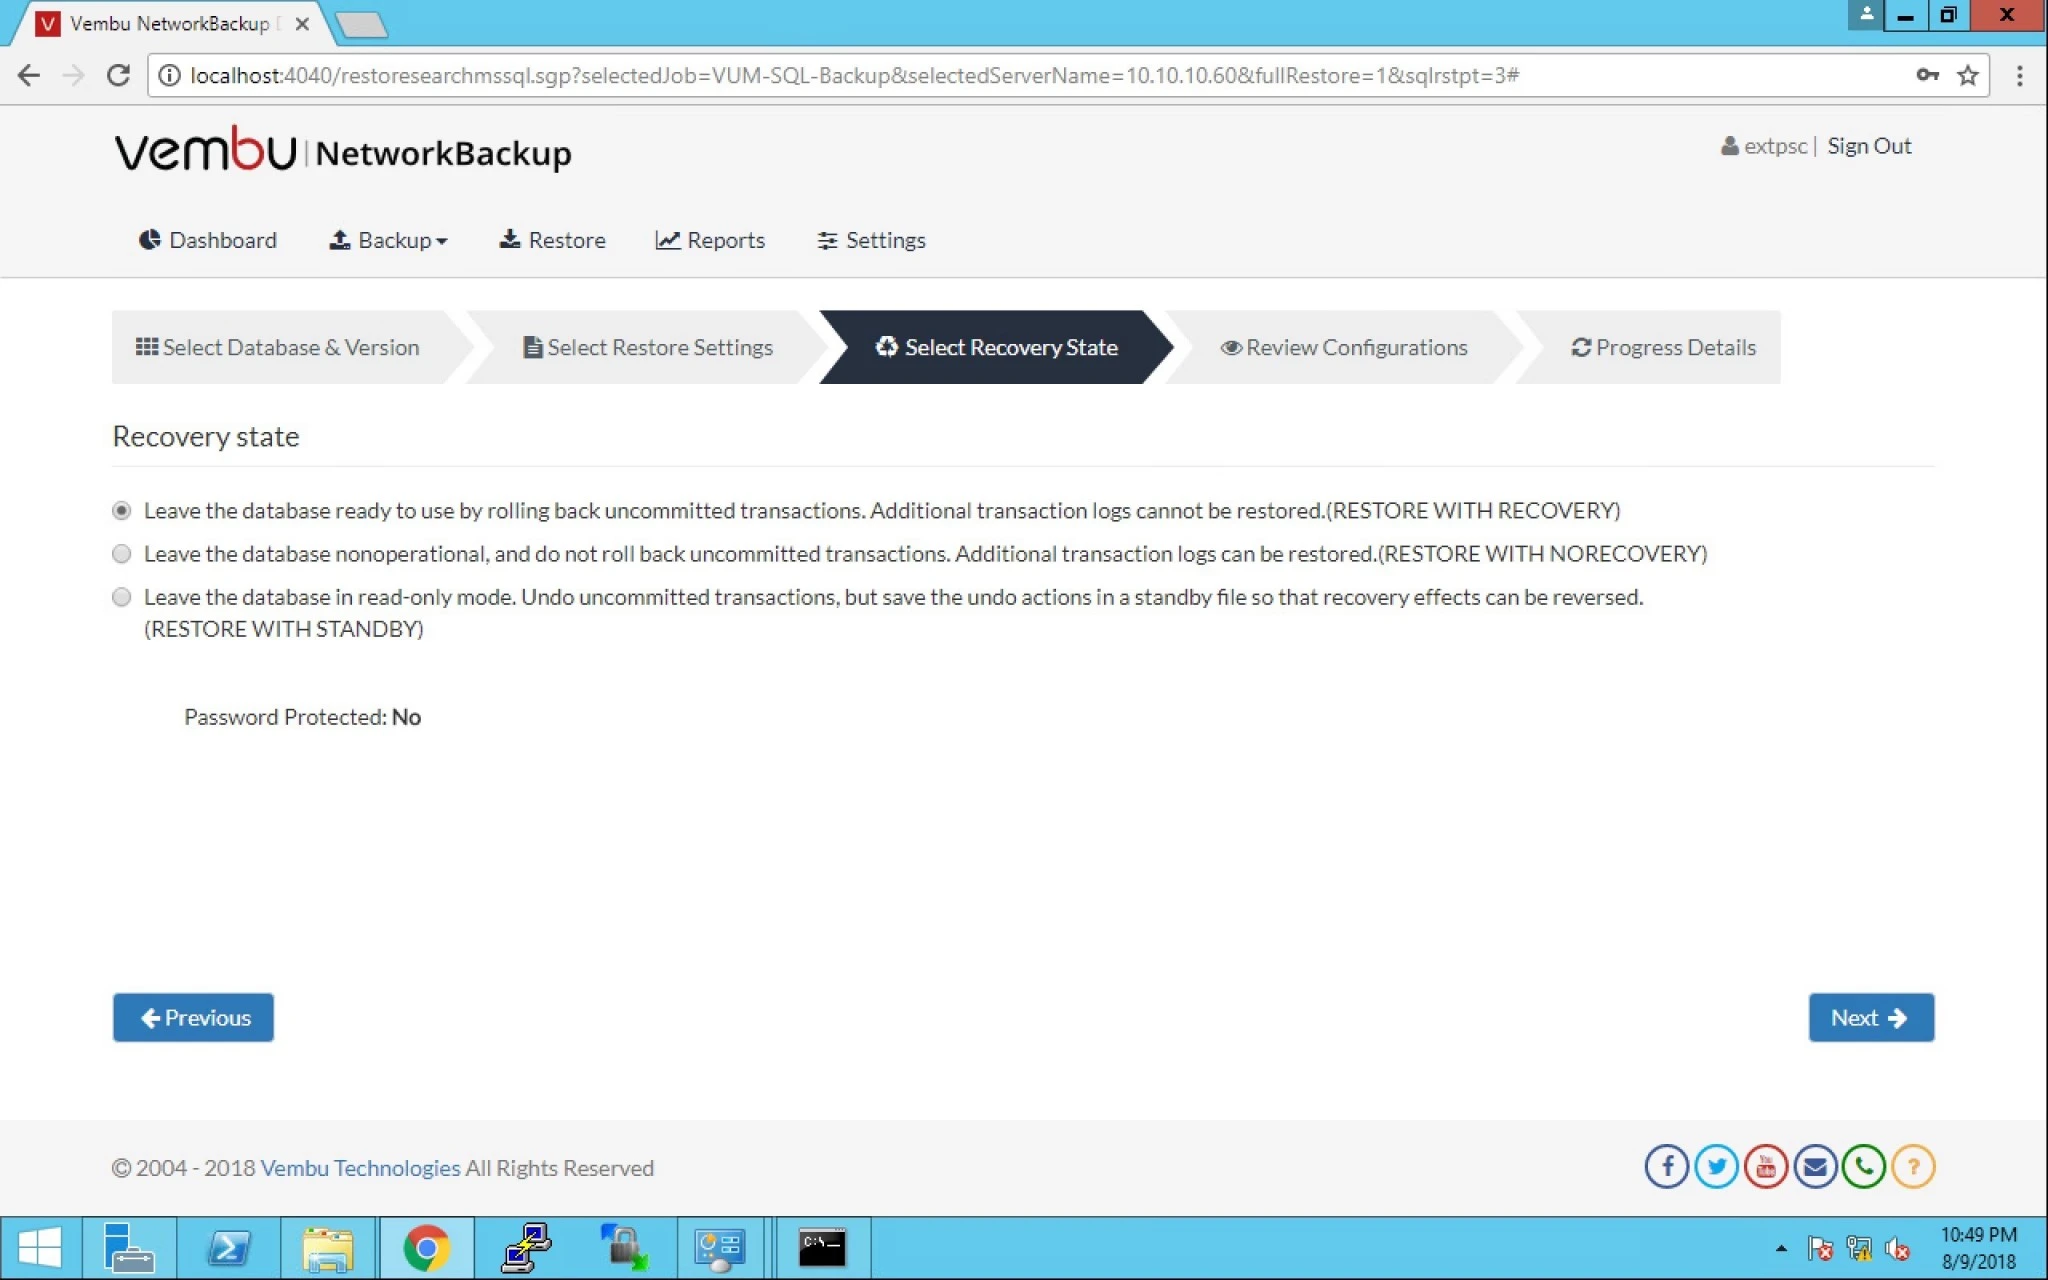
 

15. Lets choose the third option here and provide the Standby file location. Click Next.


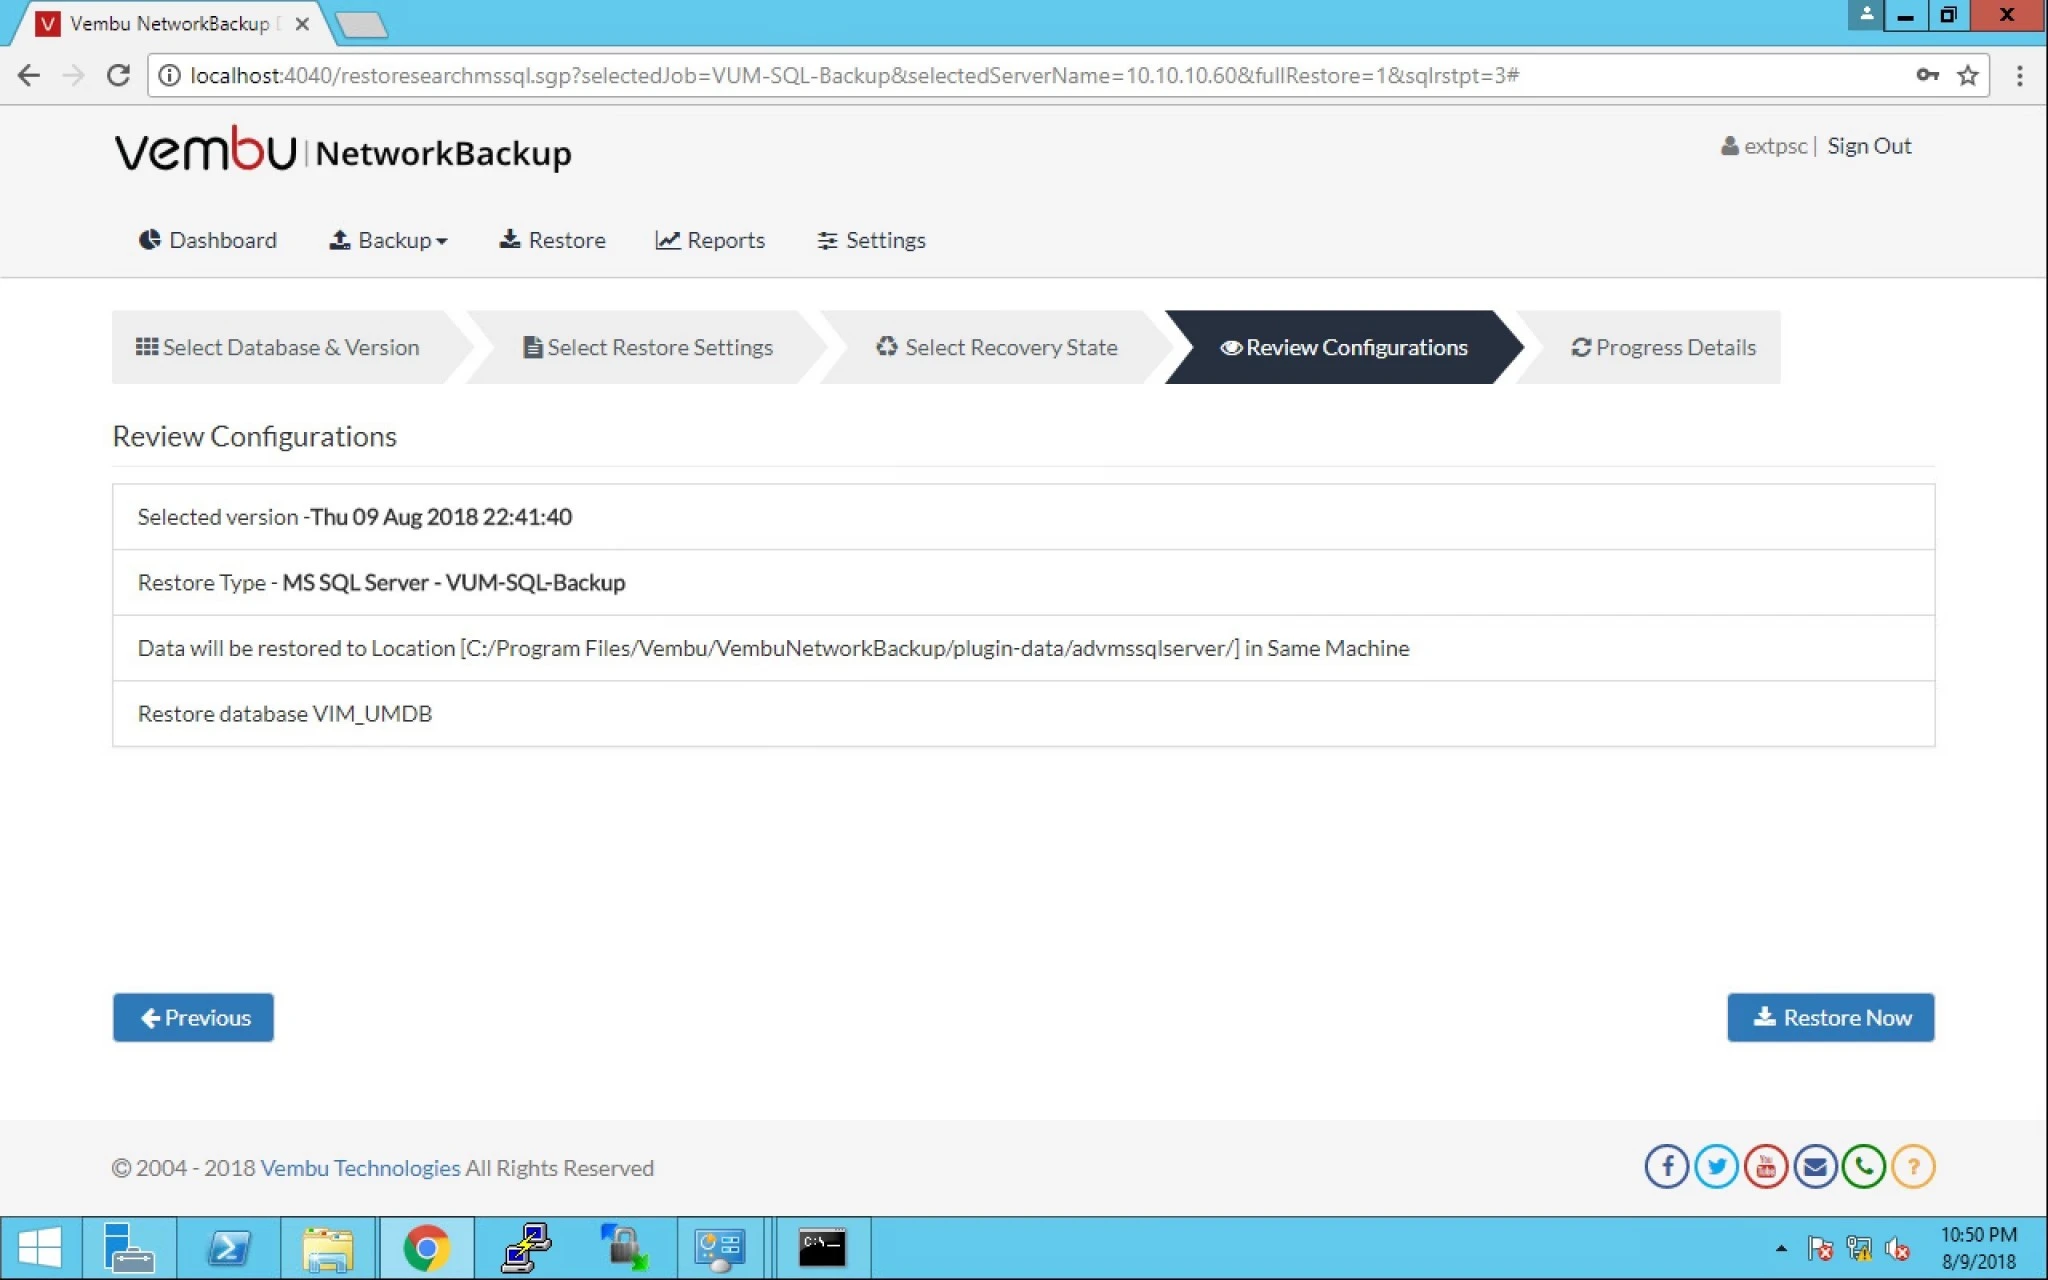
16. Now you can review the configuration and click on Restore Now.


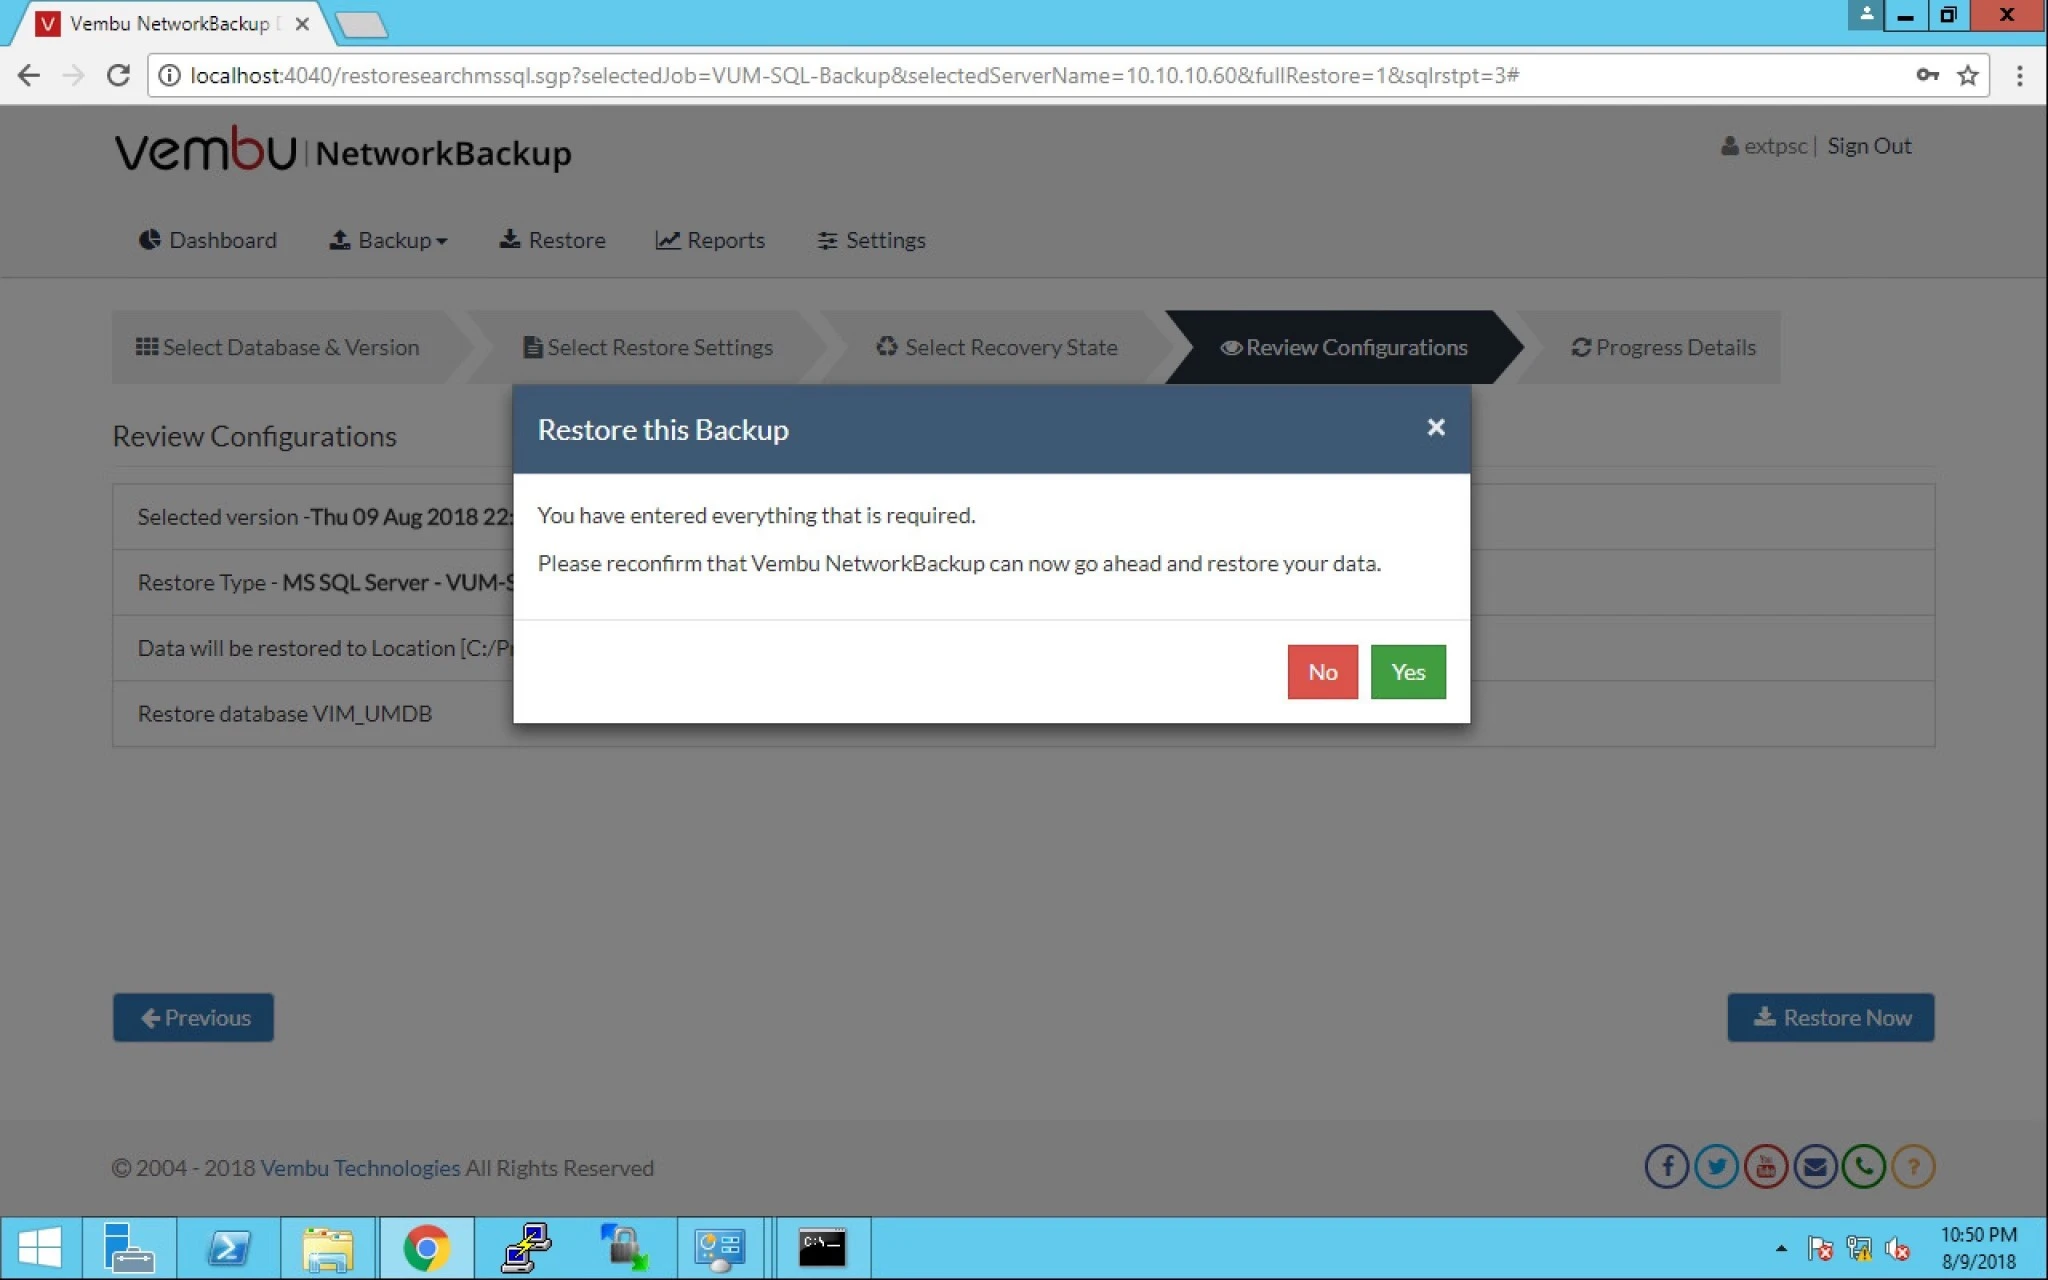
17. It will prompt you to confirm the restore operation to be executed. Click yes.


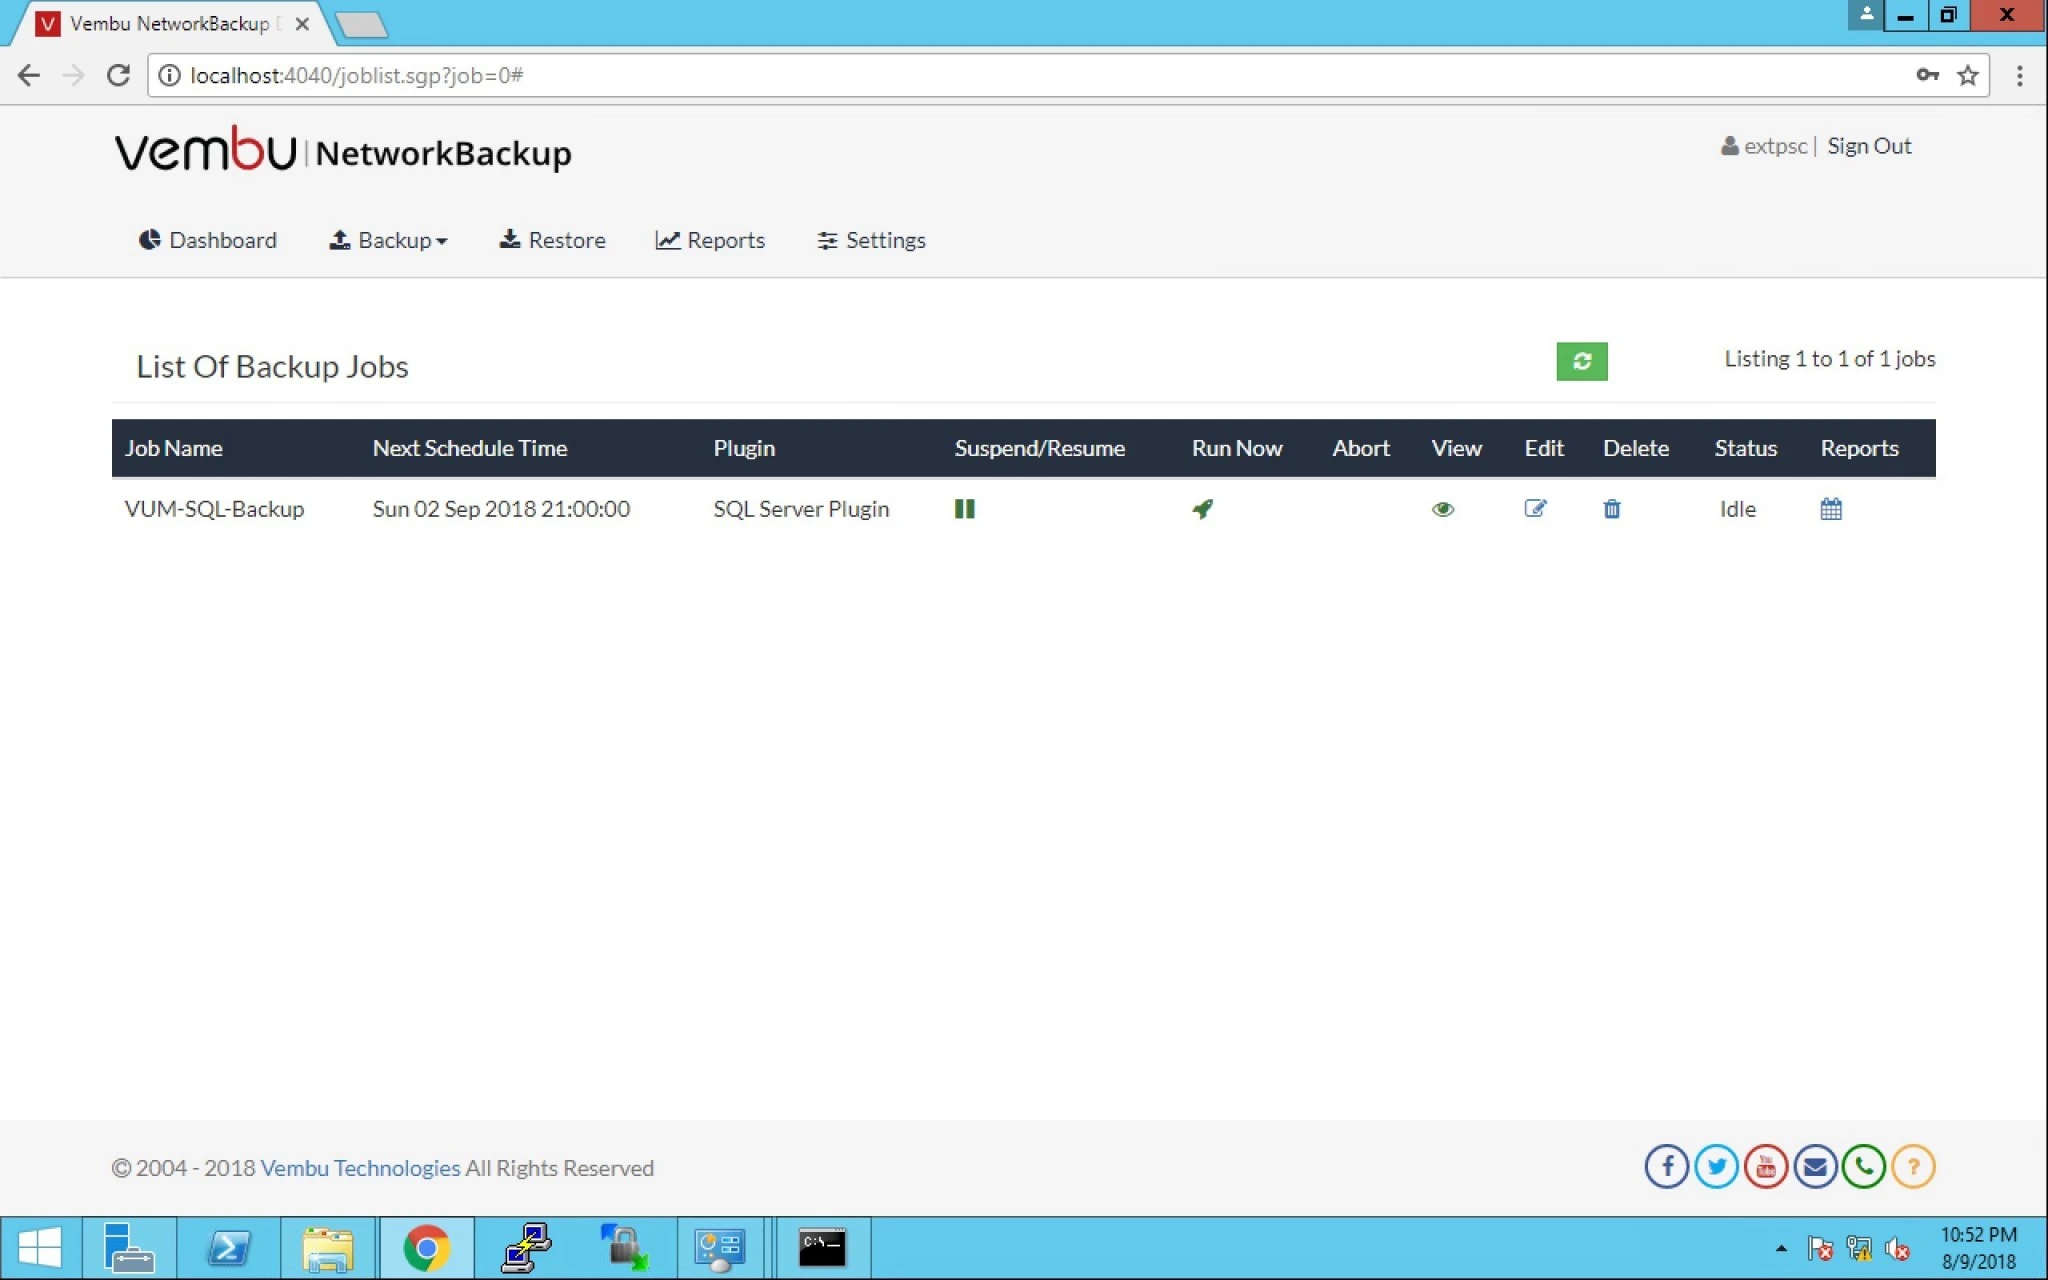
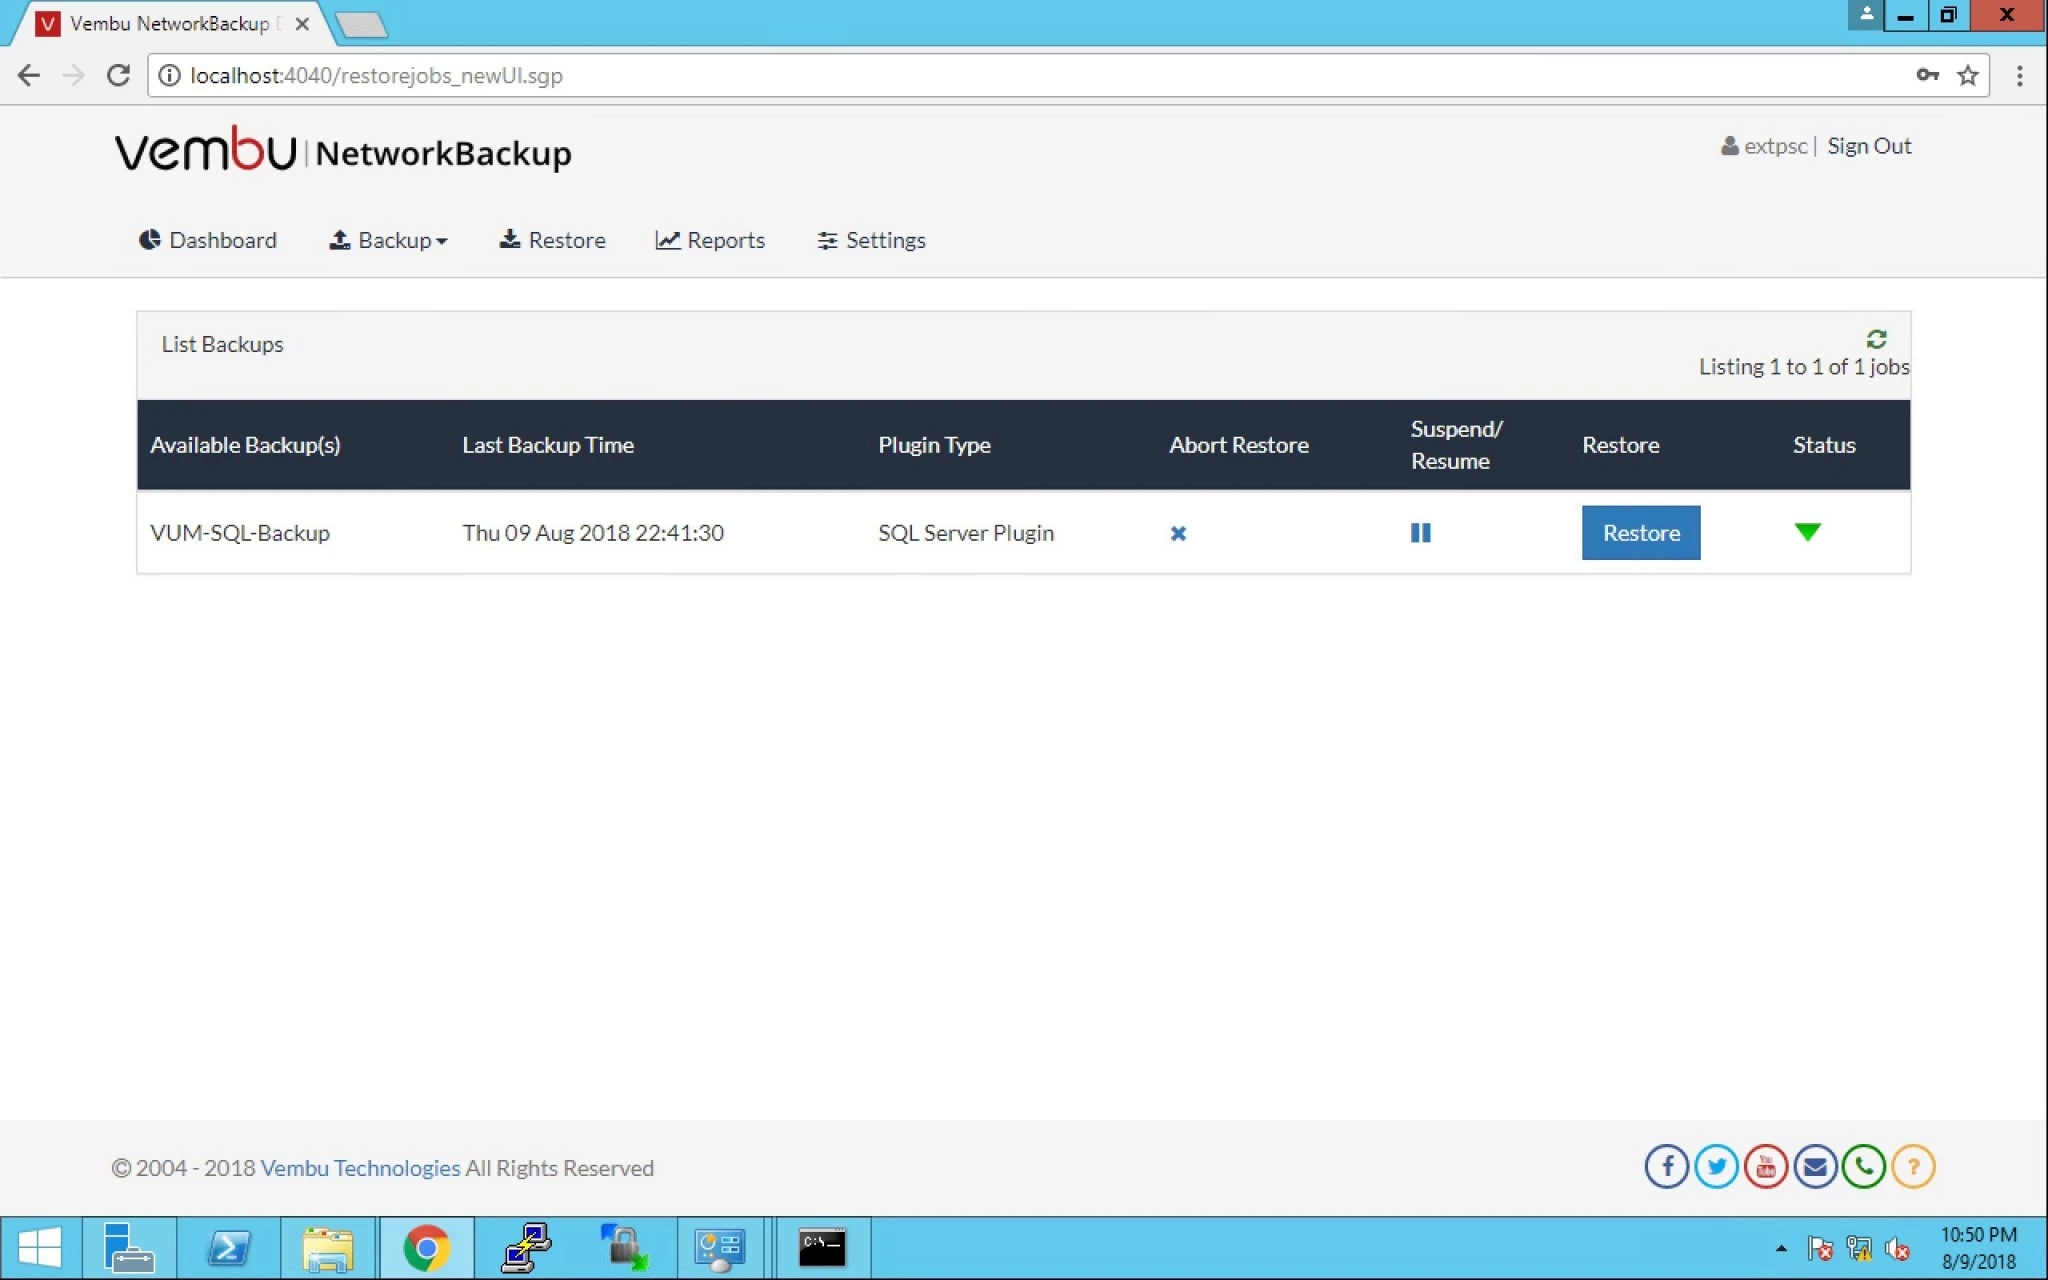
18. You can see the status for successful completion of the restore job.


19. You can also check the report by clicking on Reports > Restore Reports.
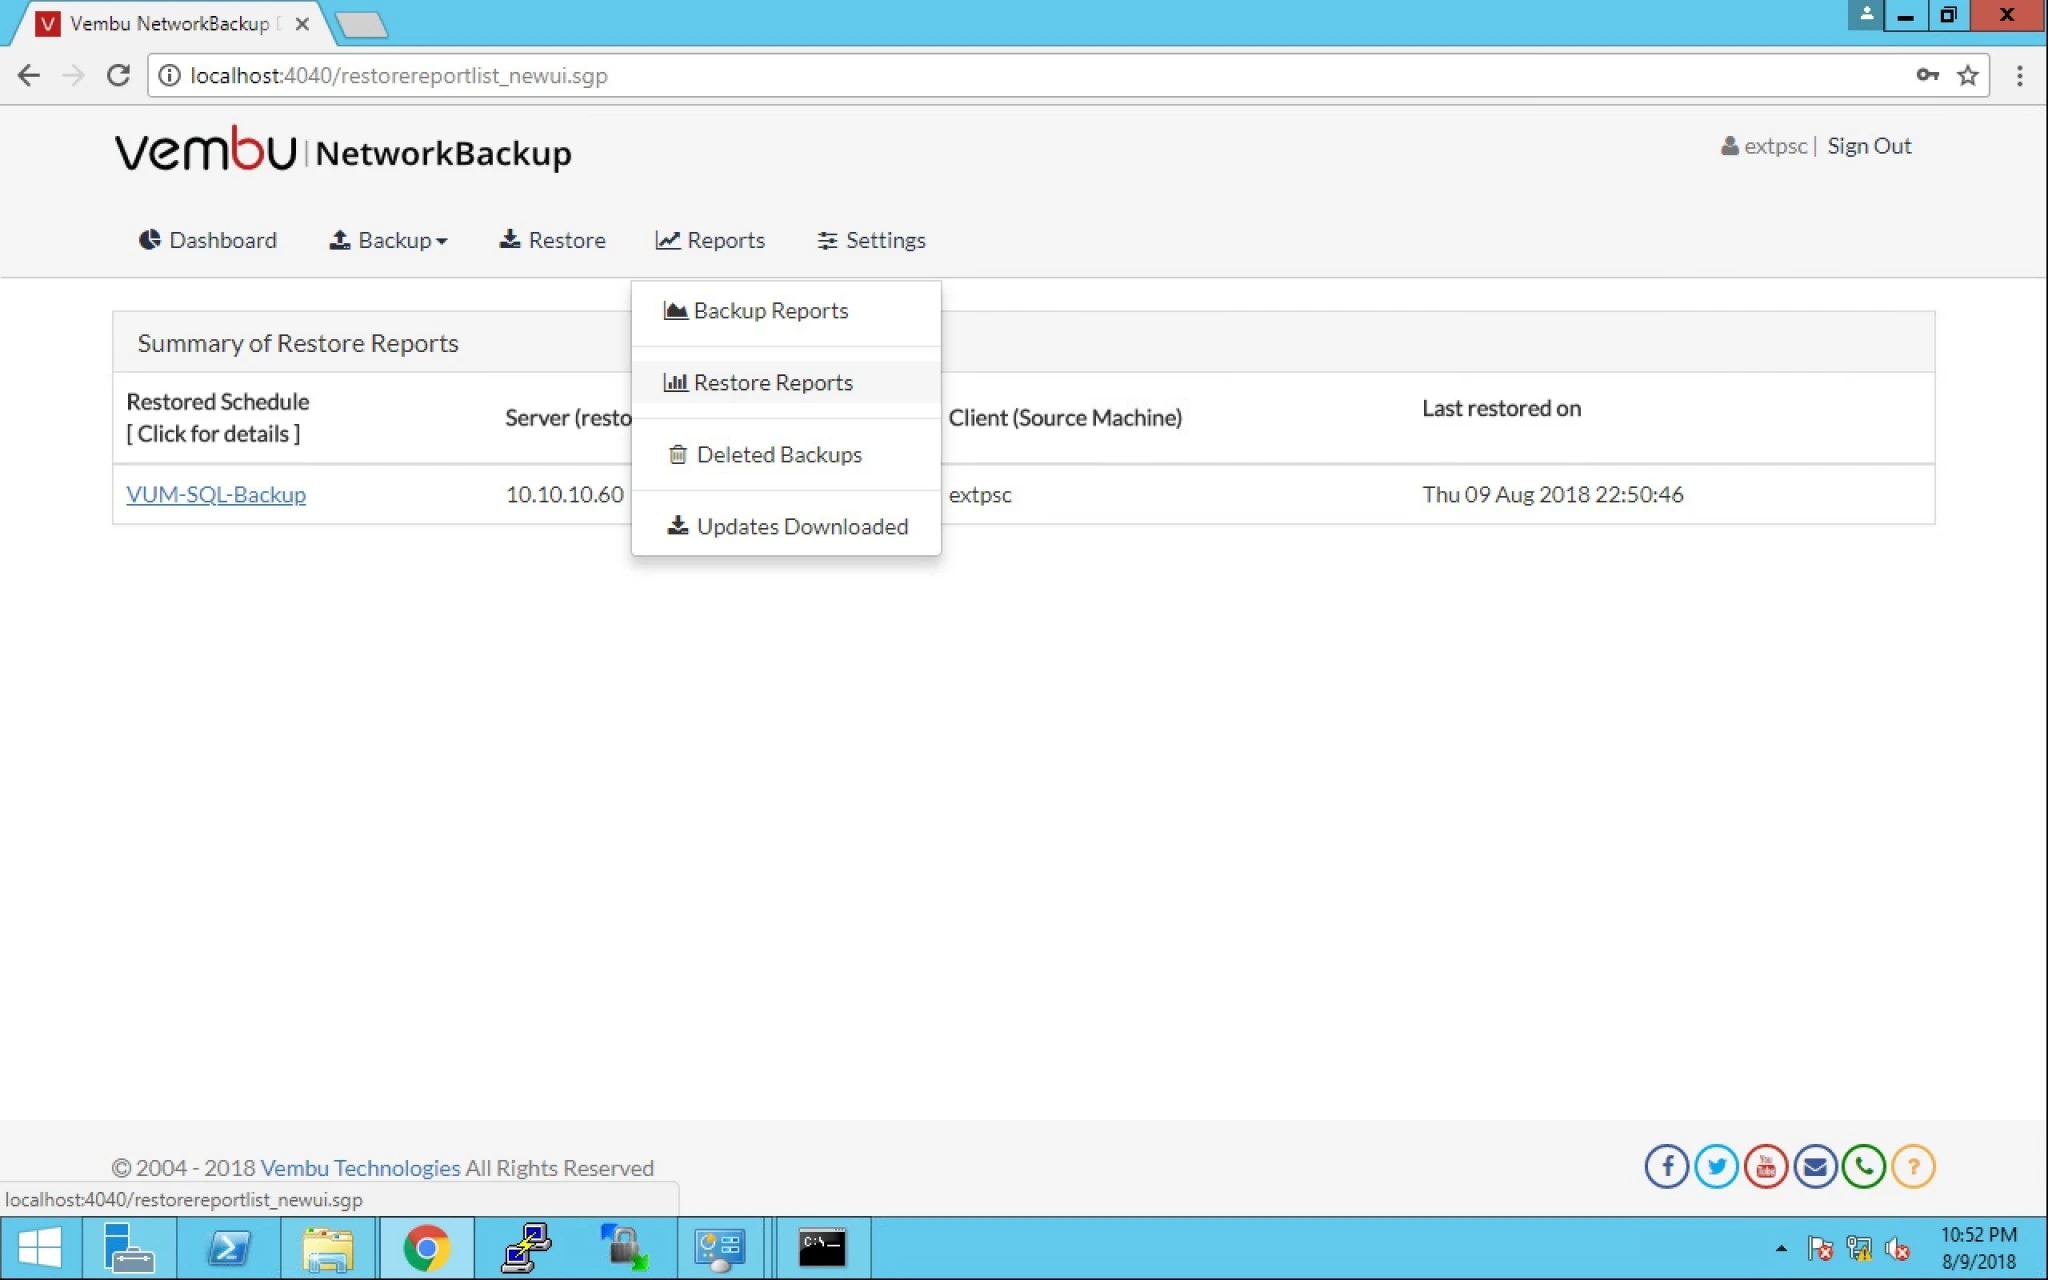


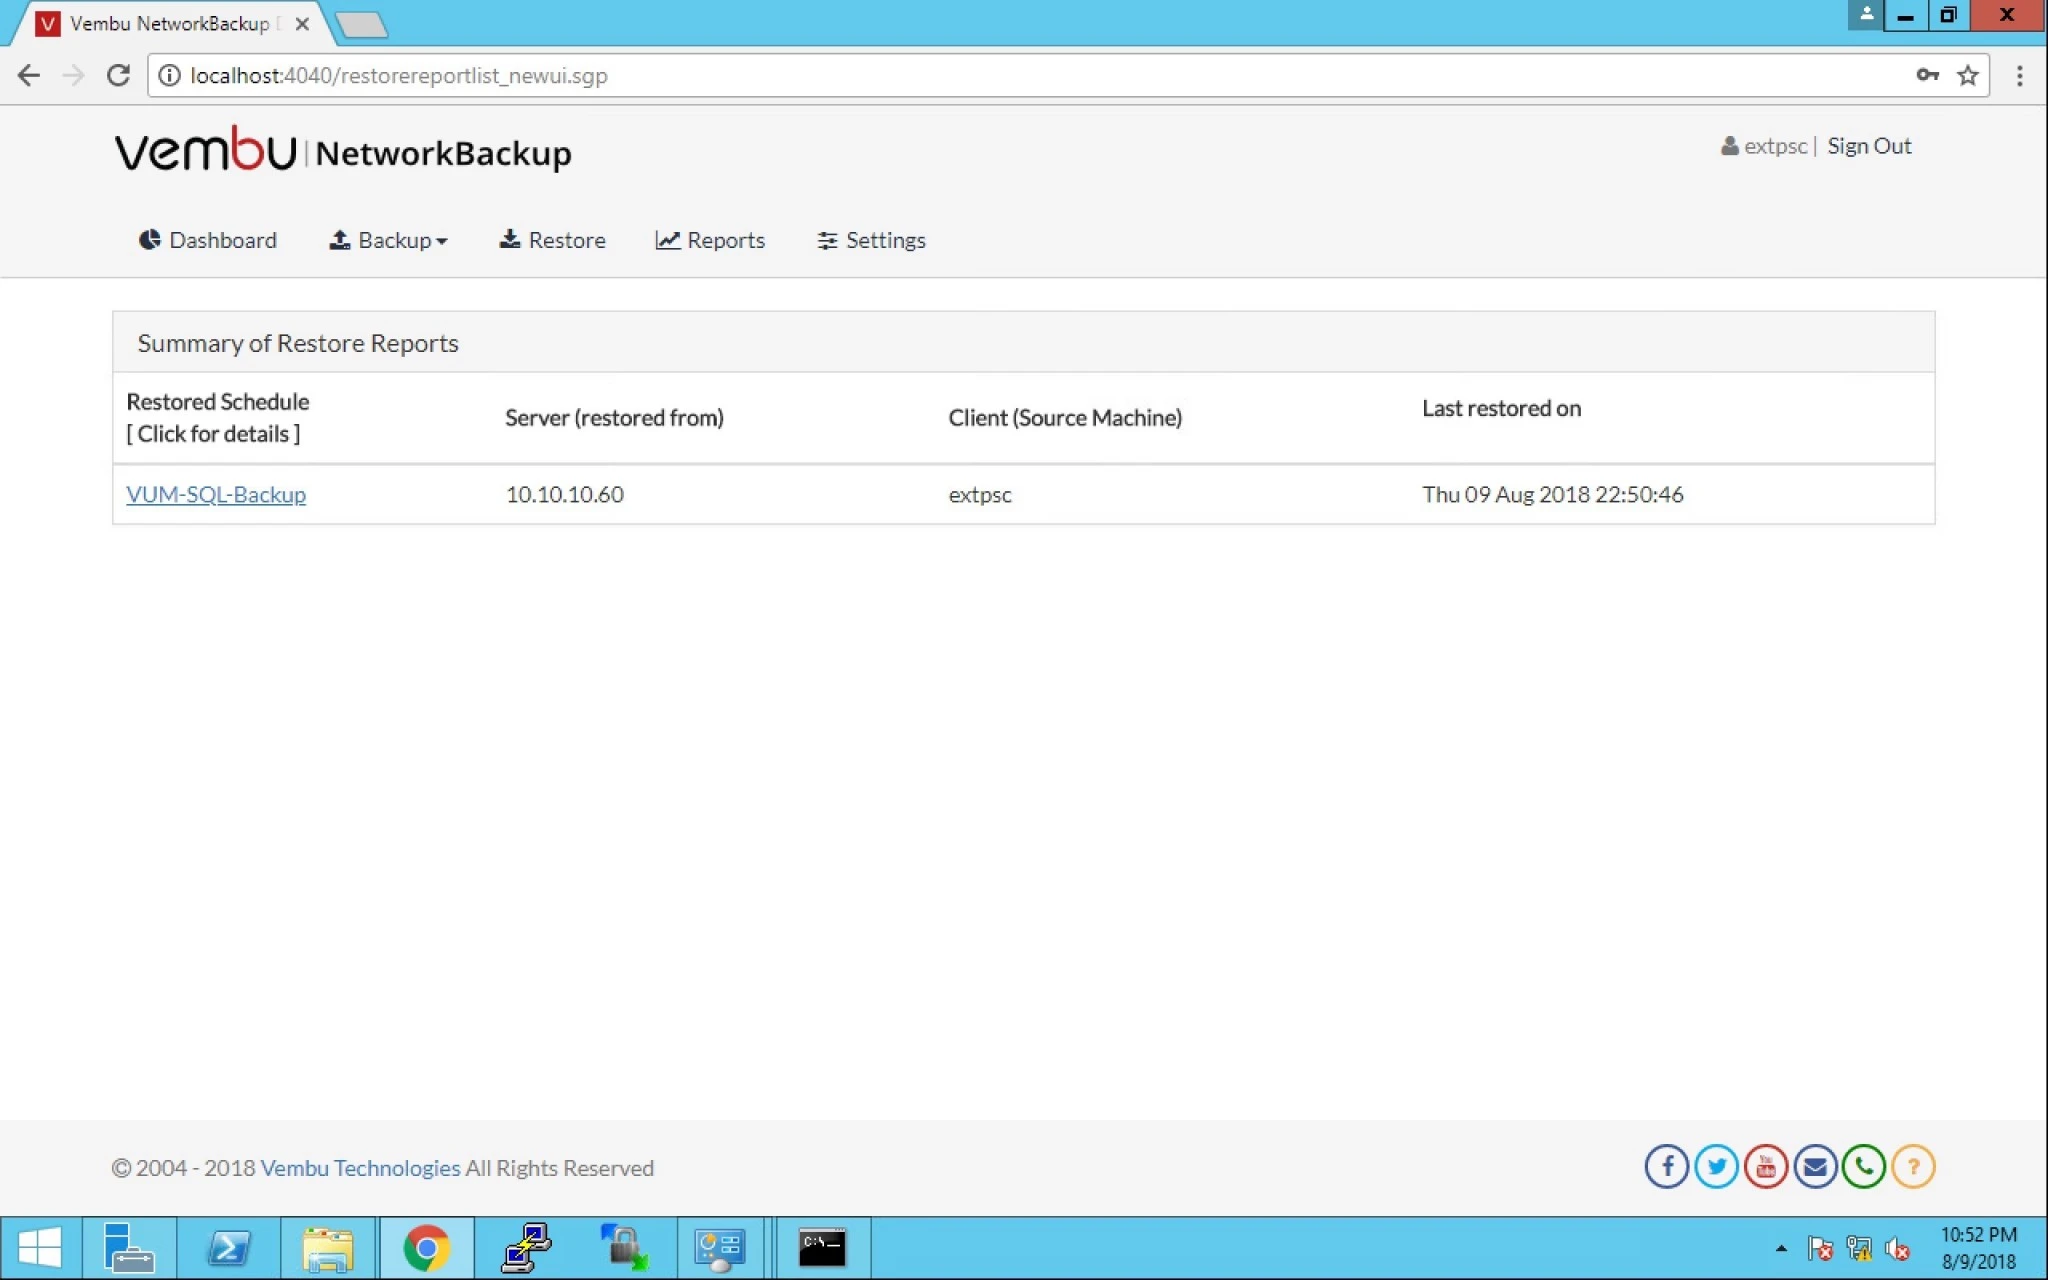
20. Click on Summary option and on VM hyperlink for report.


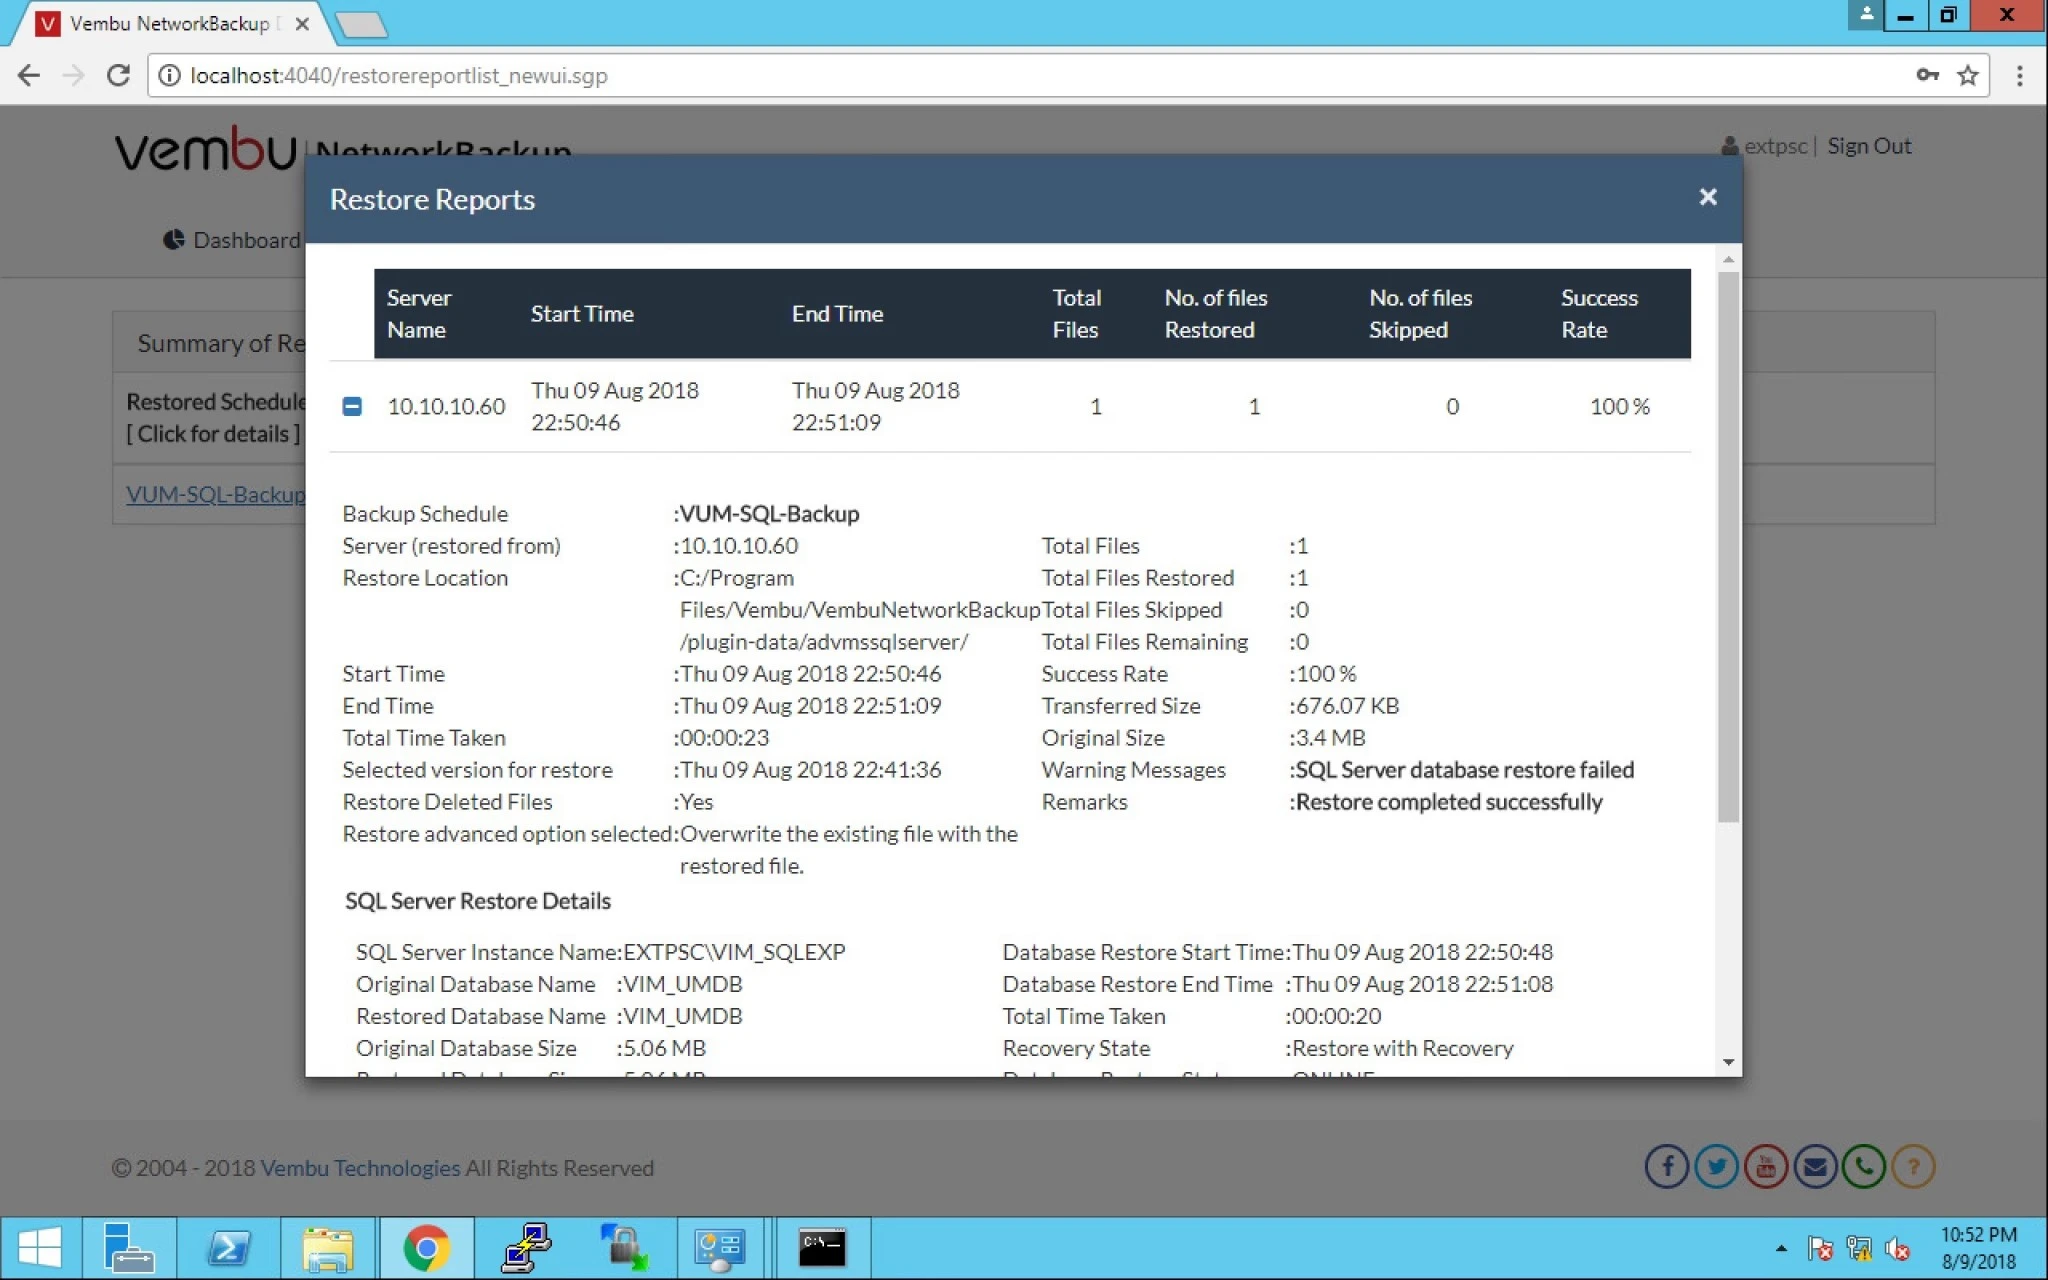
21. This is the restore report with all the details.
 

0

How to Backup MS SQL via Vembu

Topic Outline:

Backup MS SQL Database

Database Options

Scheduling

Differential & Transaction

Encryption 


If you are using Vembu BDR suits then you have a application backup option also. we will take MS SQL backup via Vembu Network Backup.

  1. First download the Vembu Network Backup (Click here).

2.  After that install on the server where you are running MS SQL.

3.  Open the console by typing URL : http://IP of server:4040 where the port is 4040.

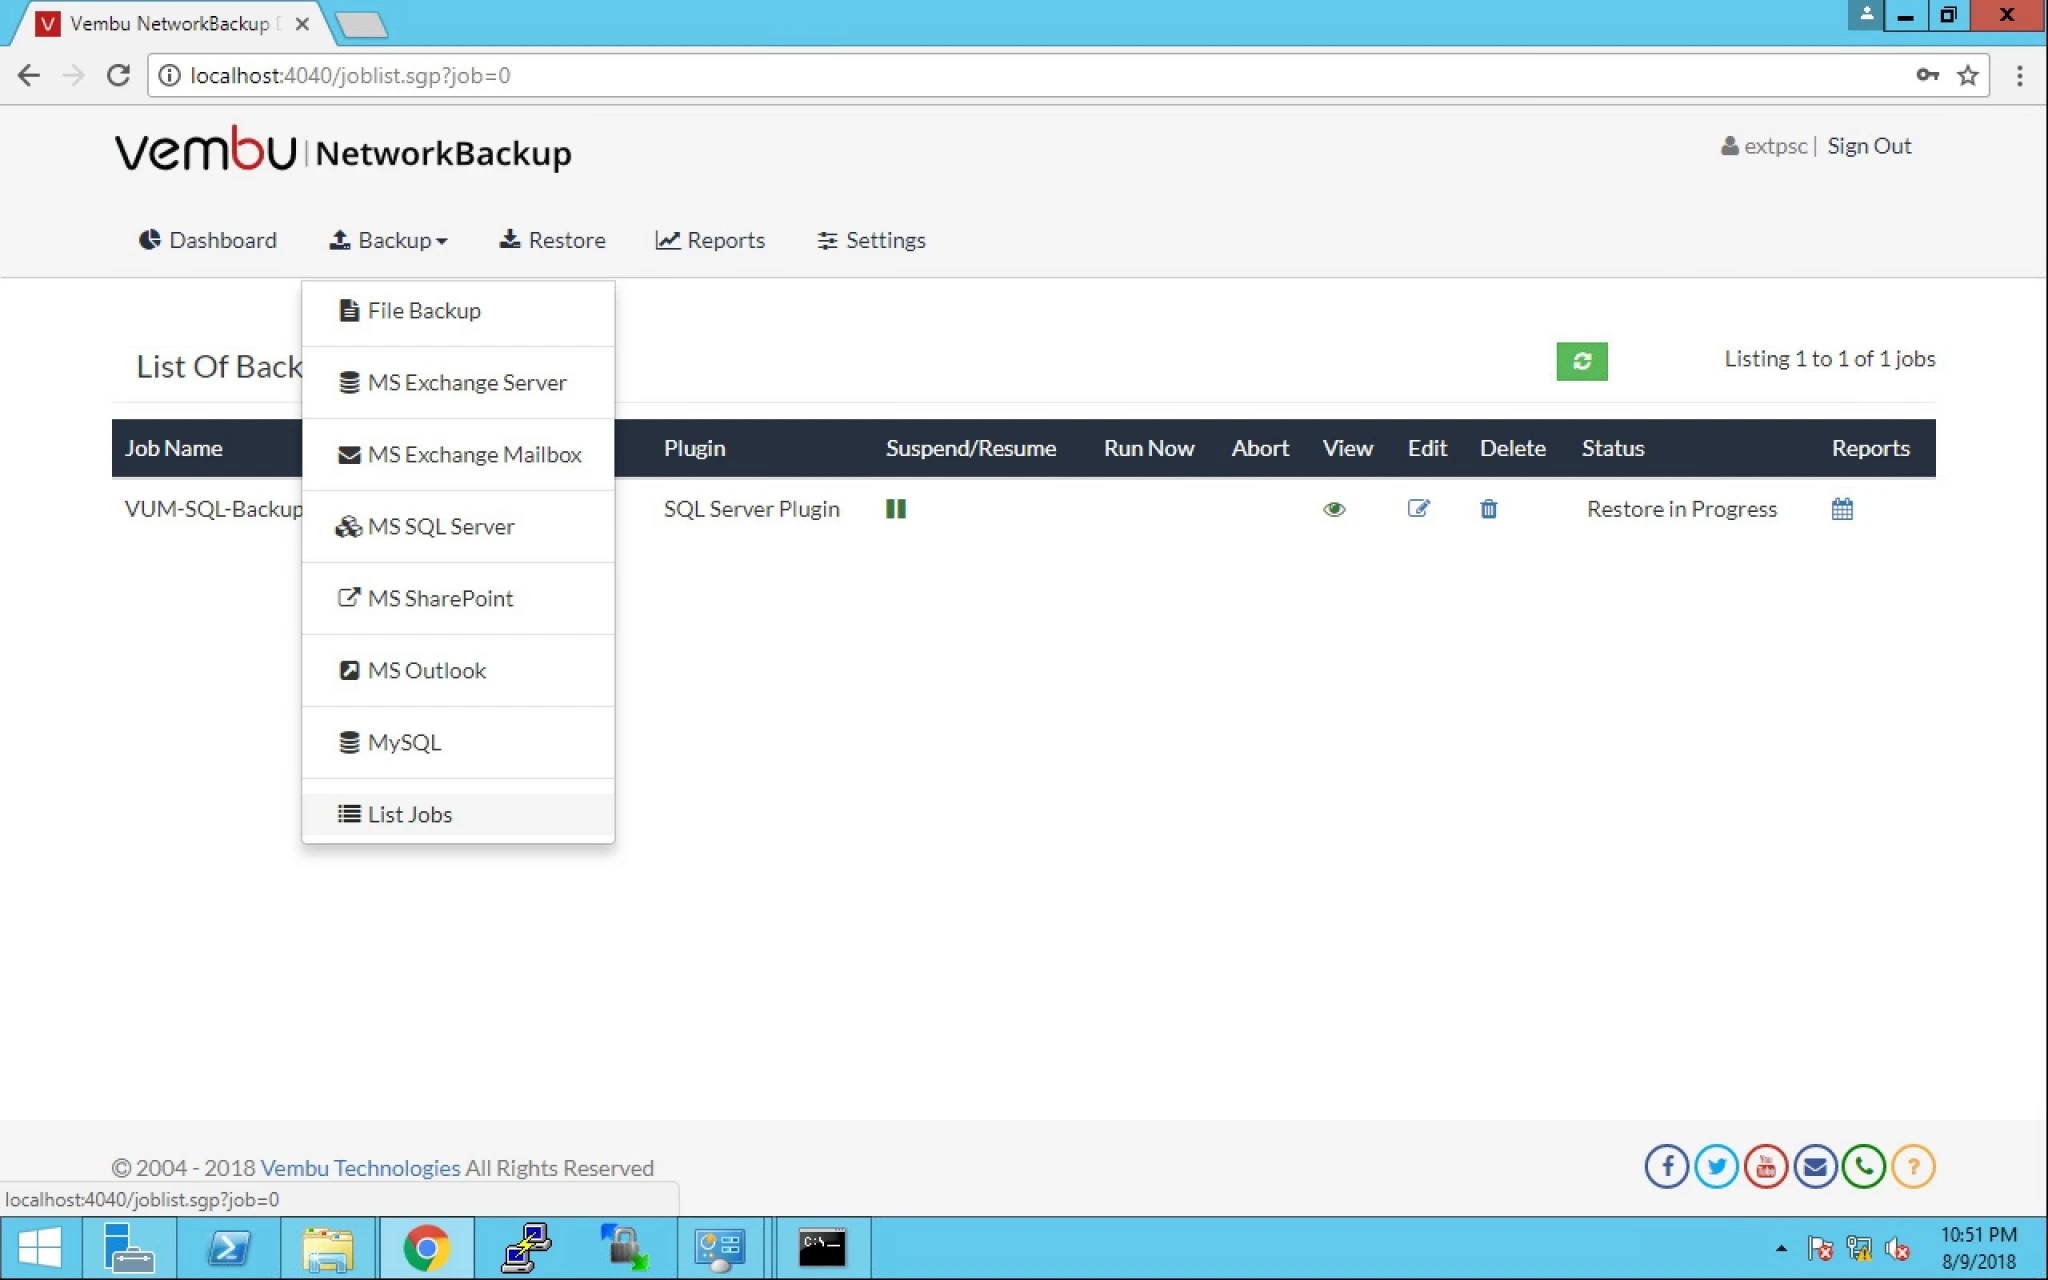
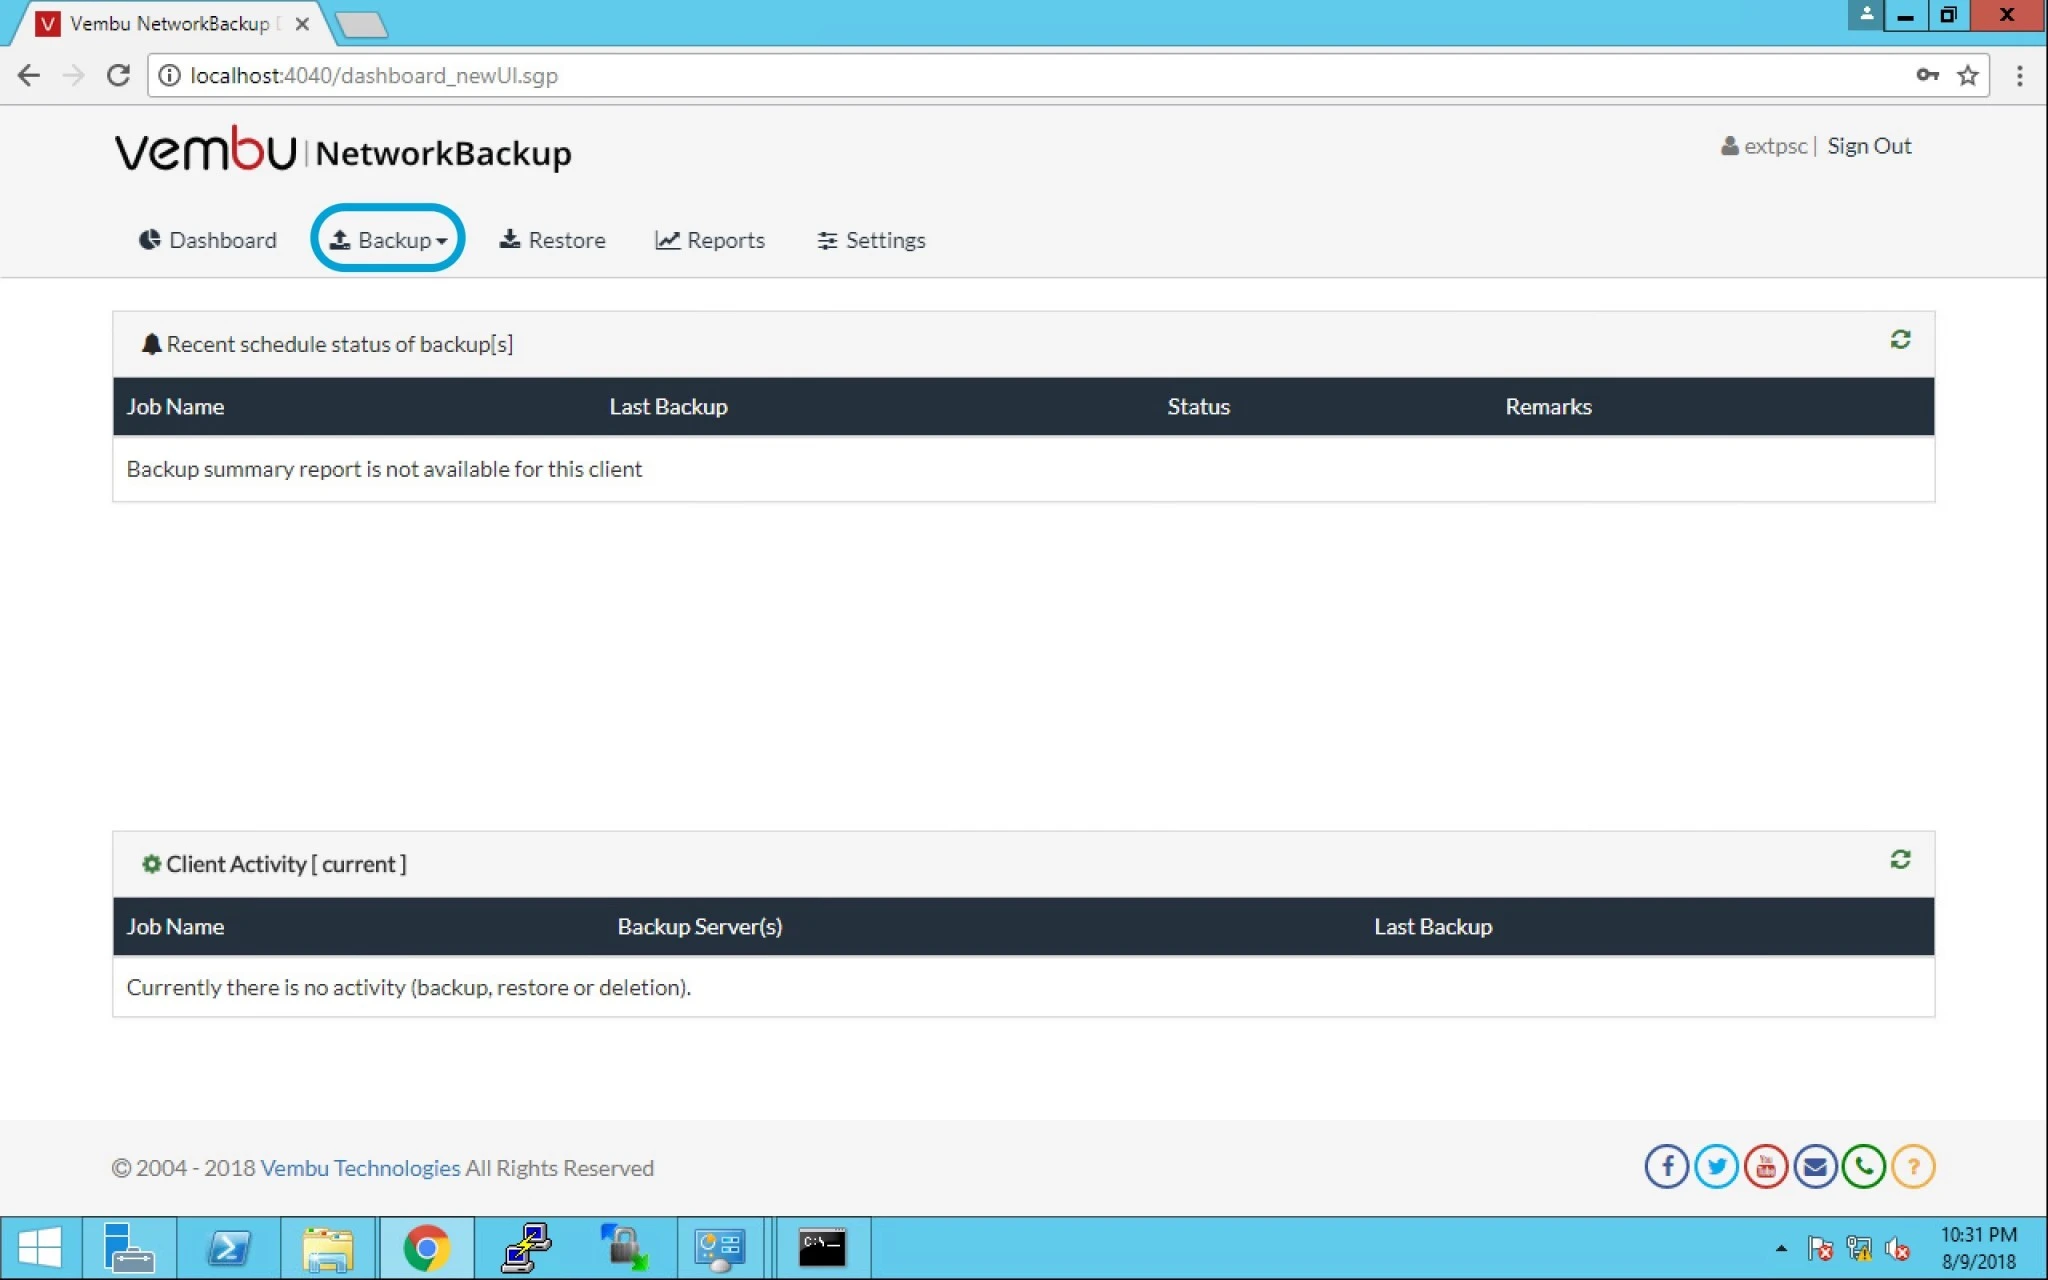
4.  Go to Backup tab as seen in the below image.


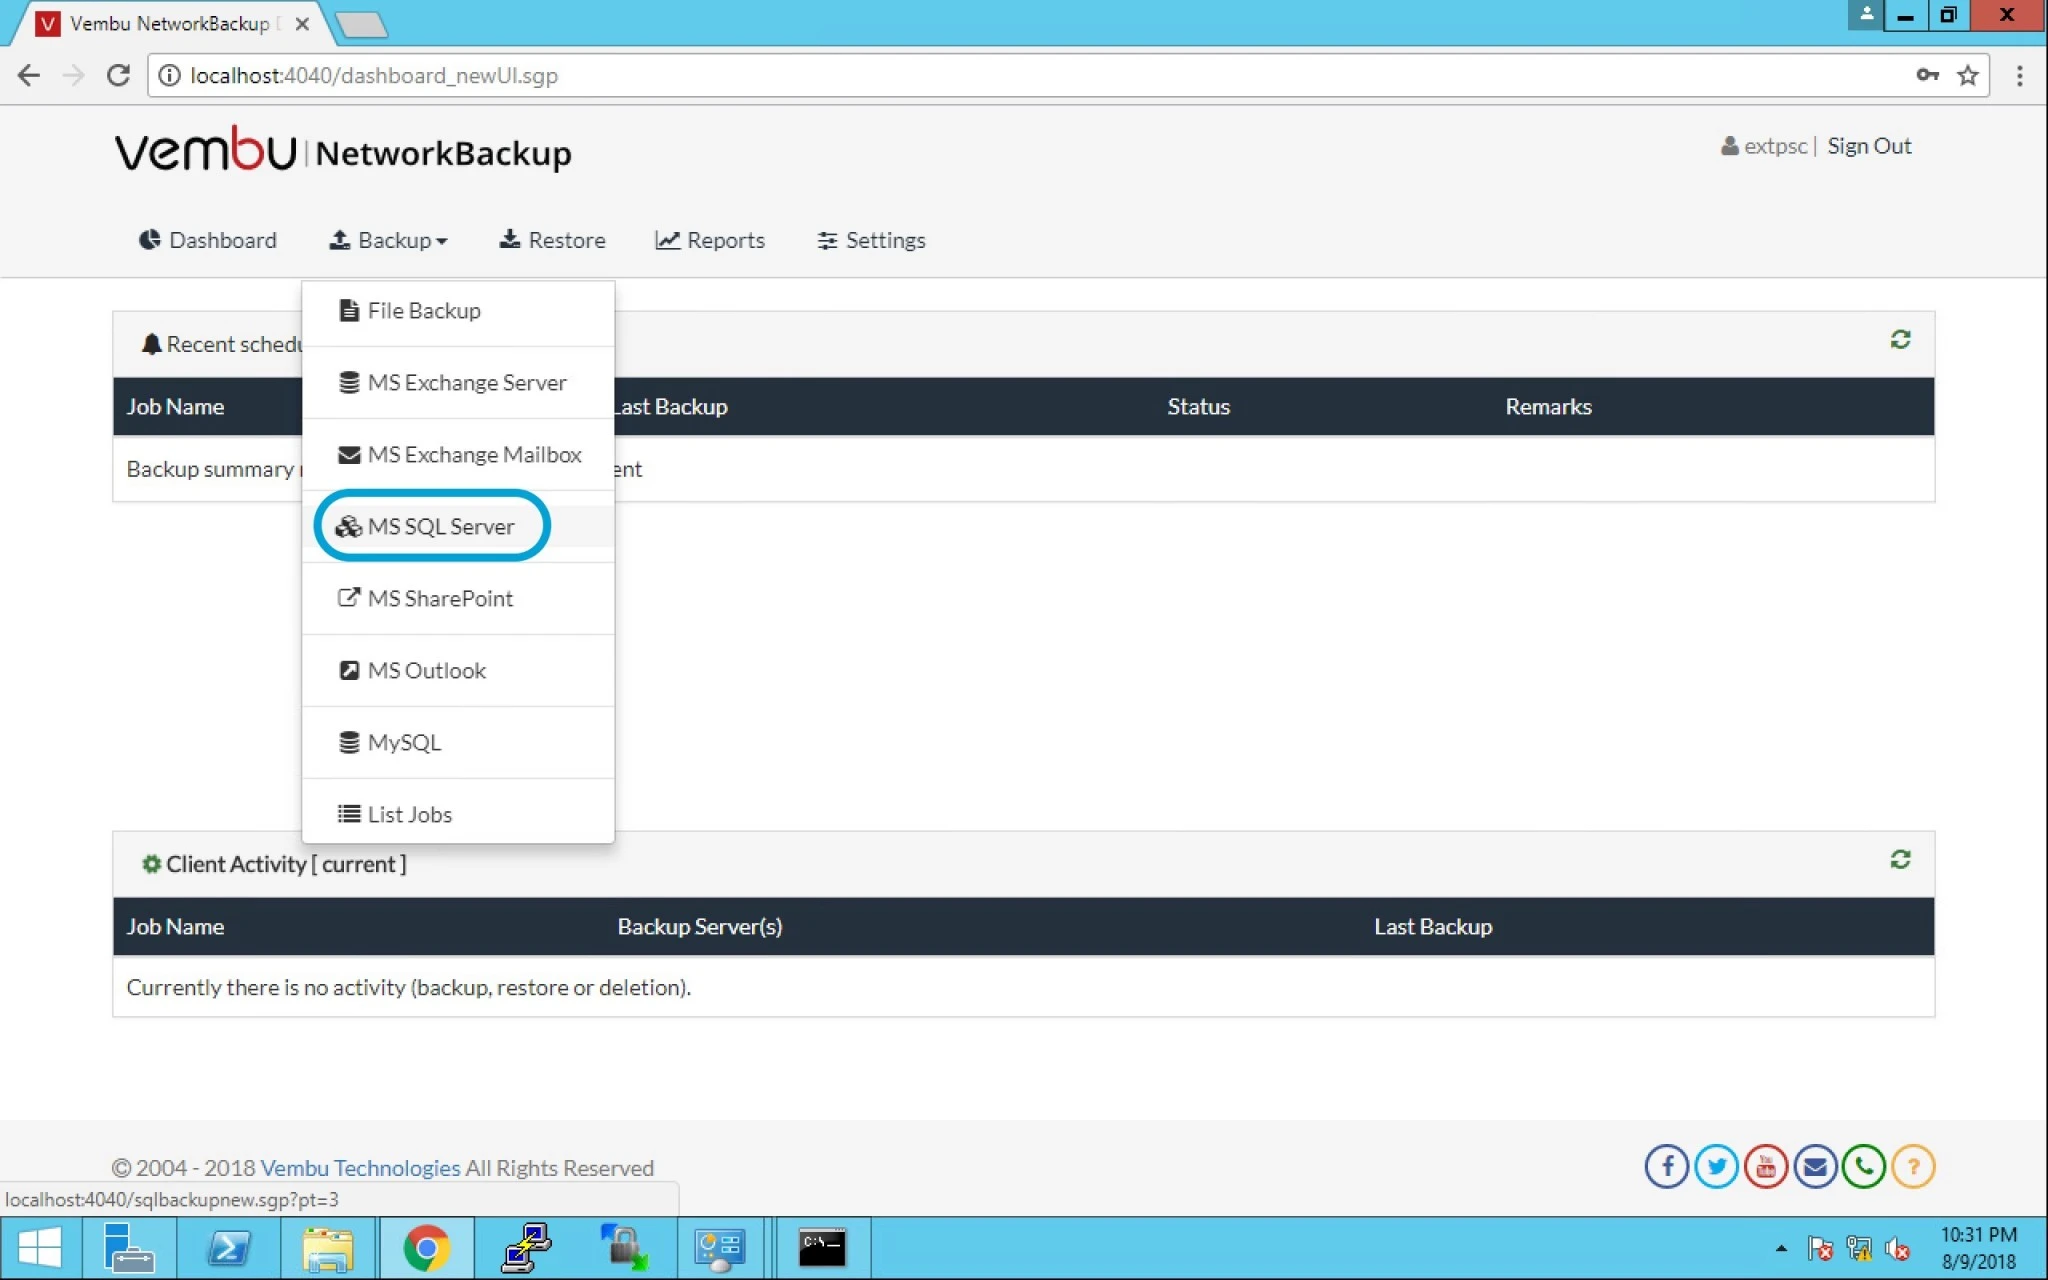
5. Now Click on the MS SQL Server option.


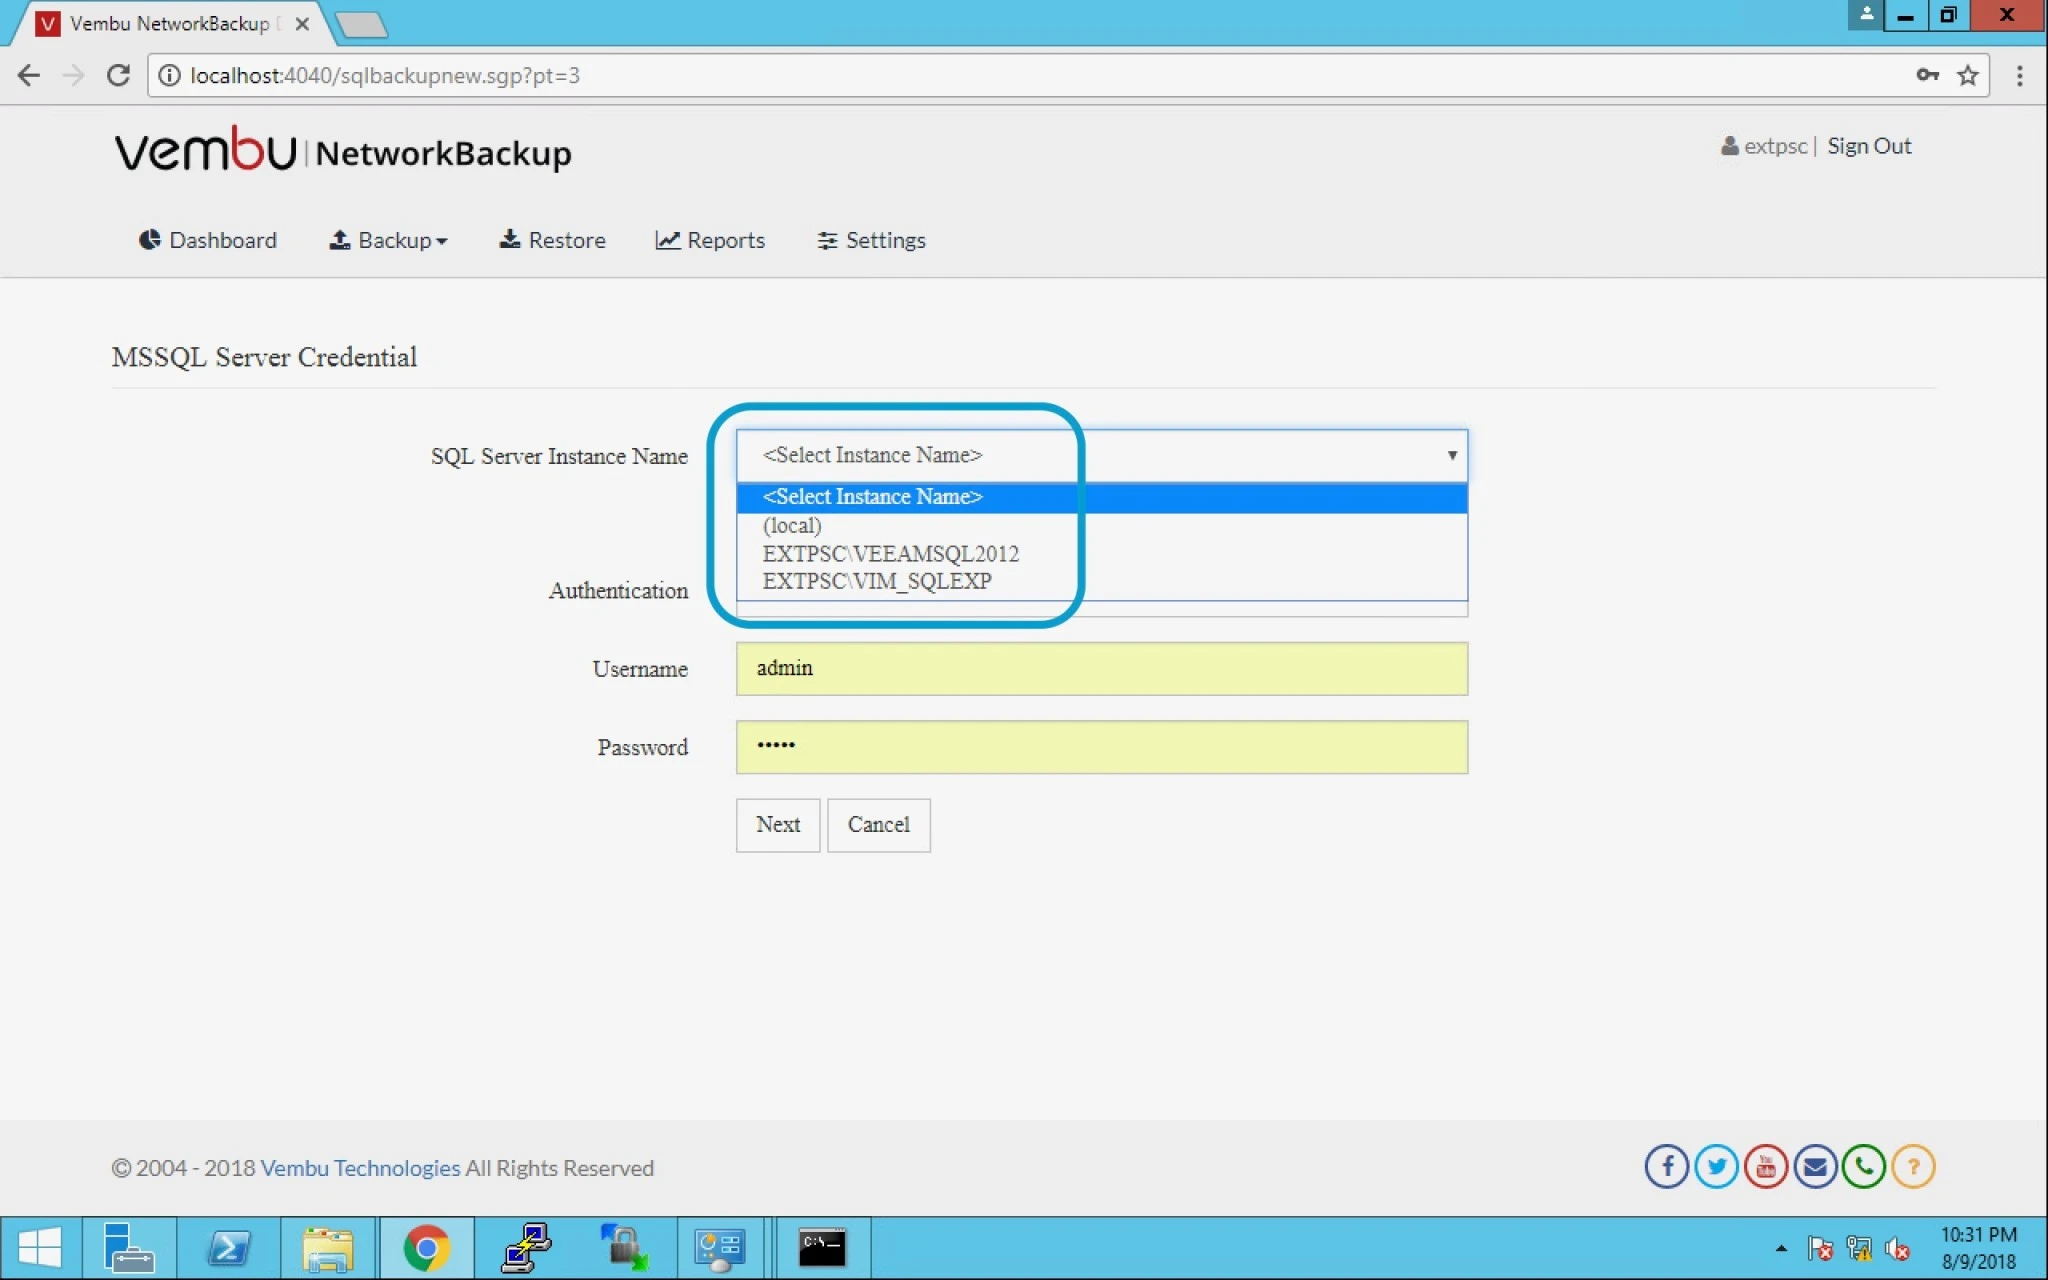
6. After this you can see below options:

SQL Server Instance name – you can select the database as per your requirement.


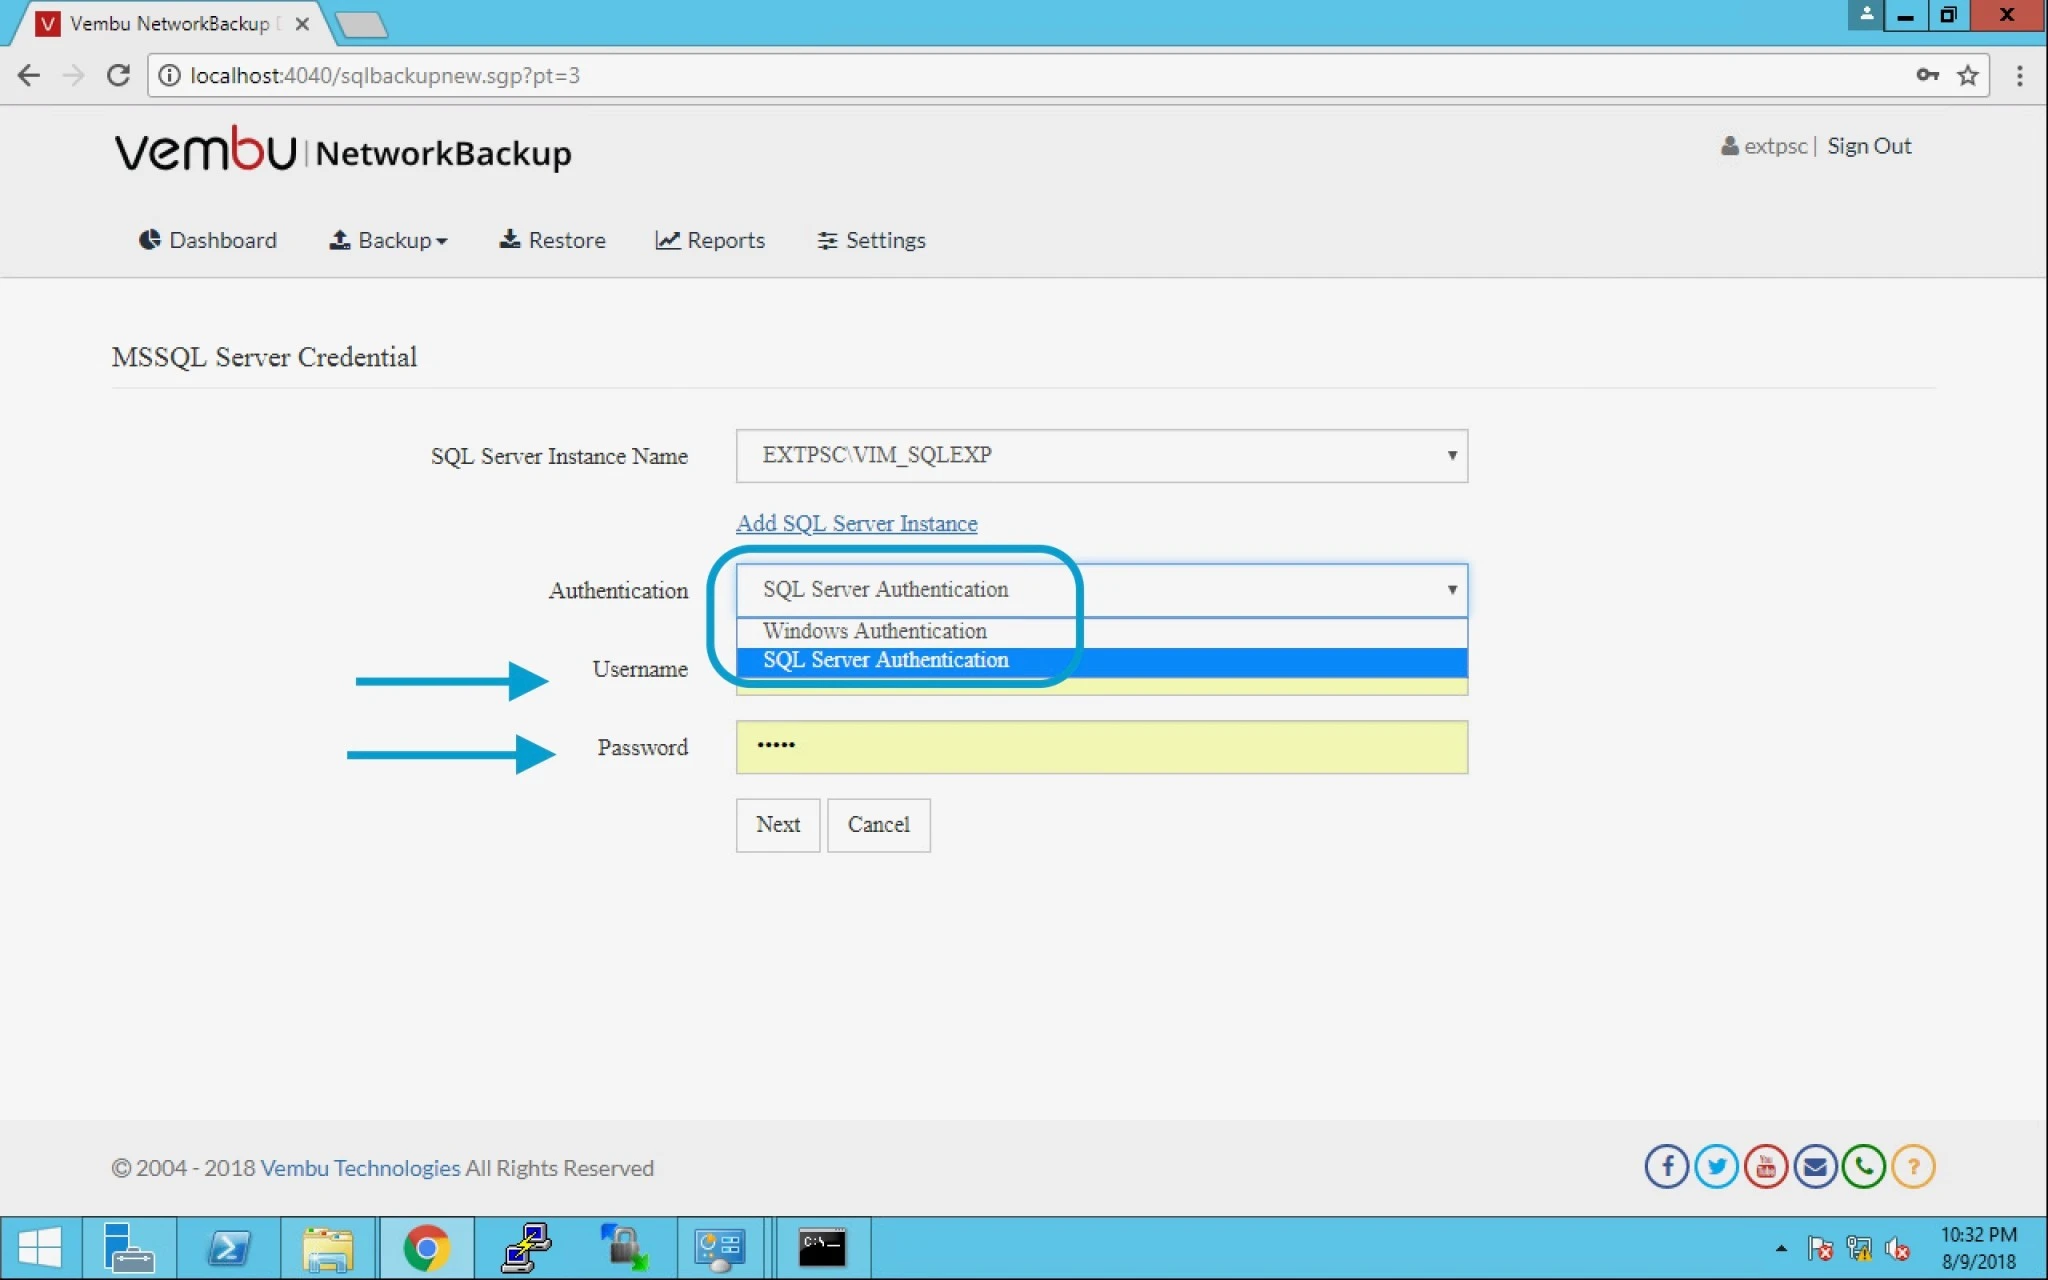
7.  Authentication – use Windows or SQL Server Authentication.

Provide username and Password. Click next.


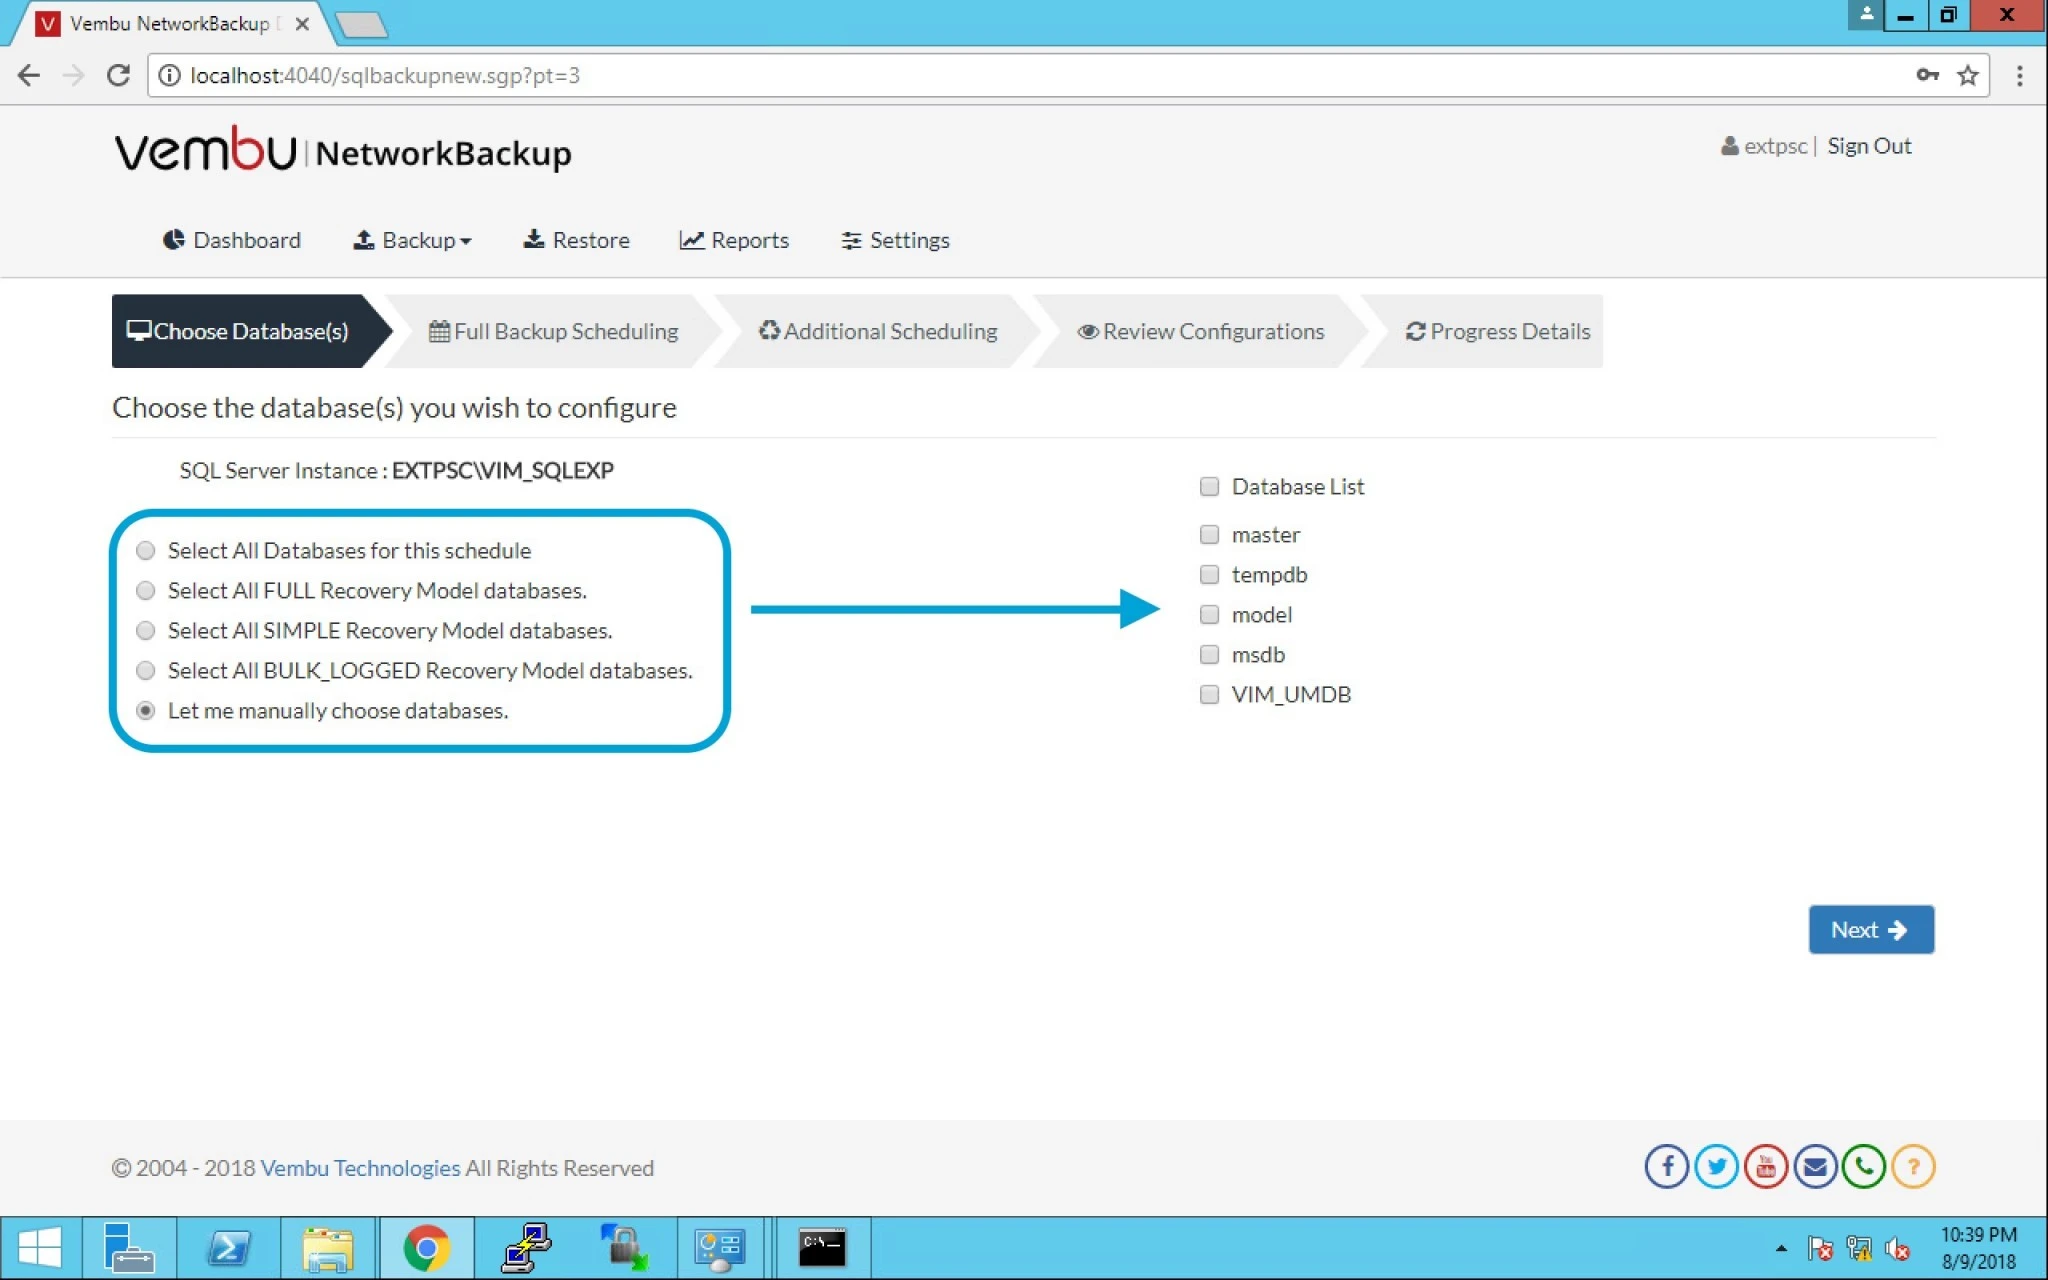
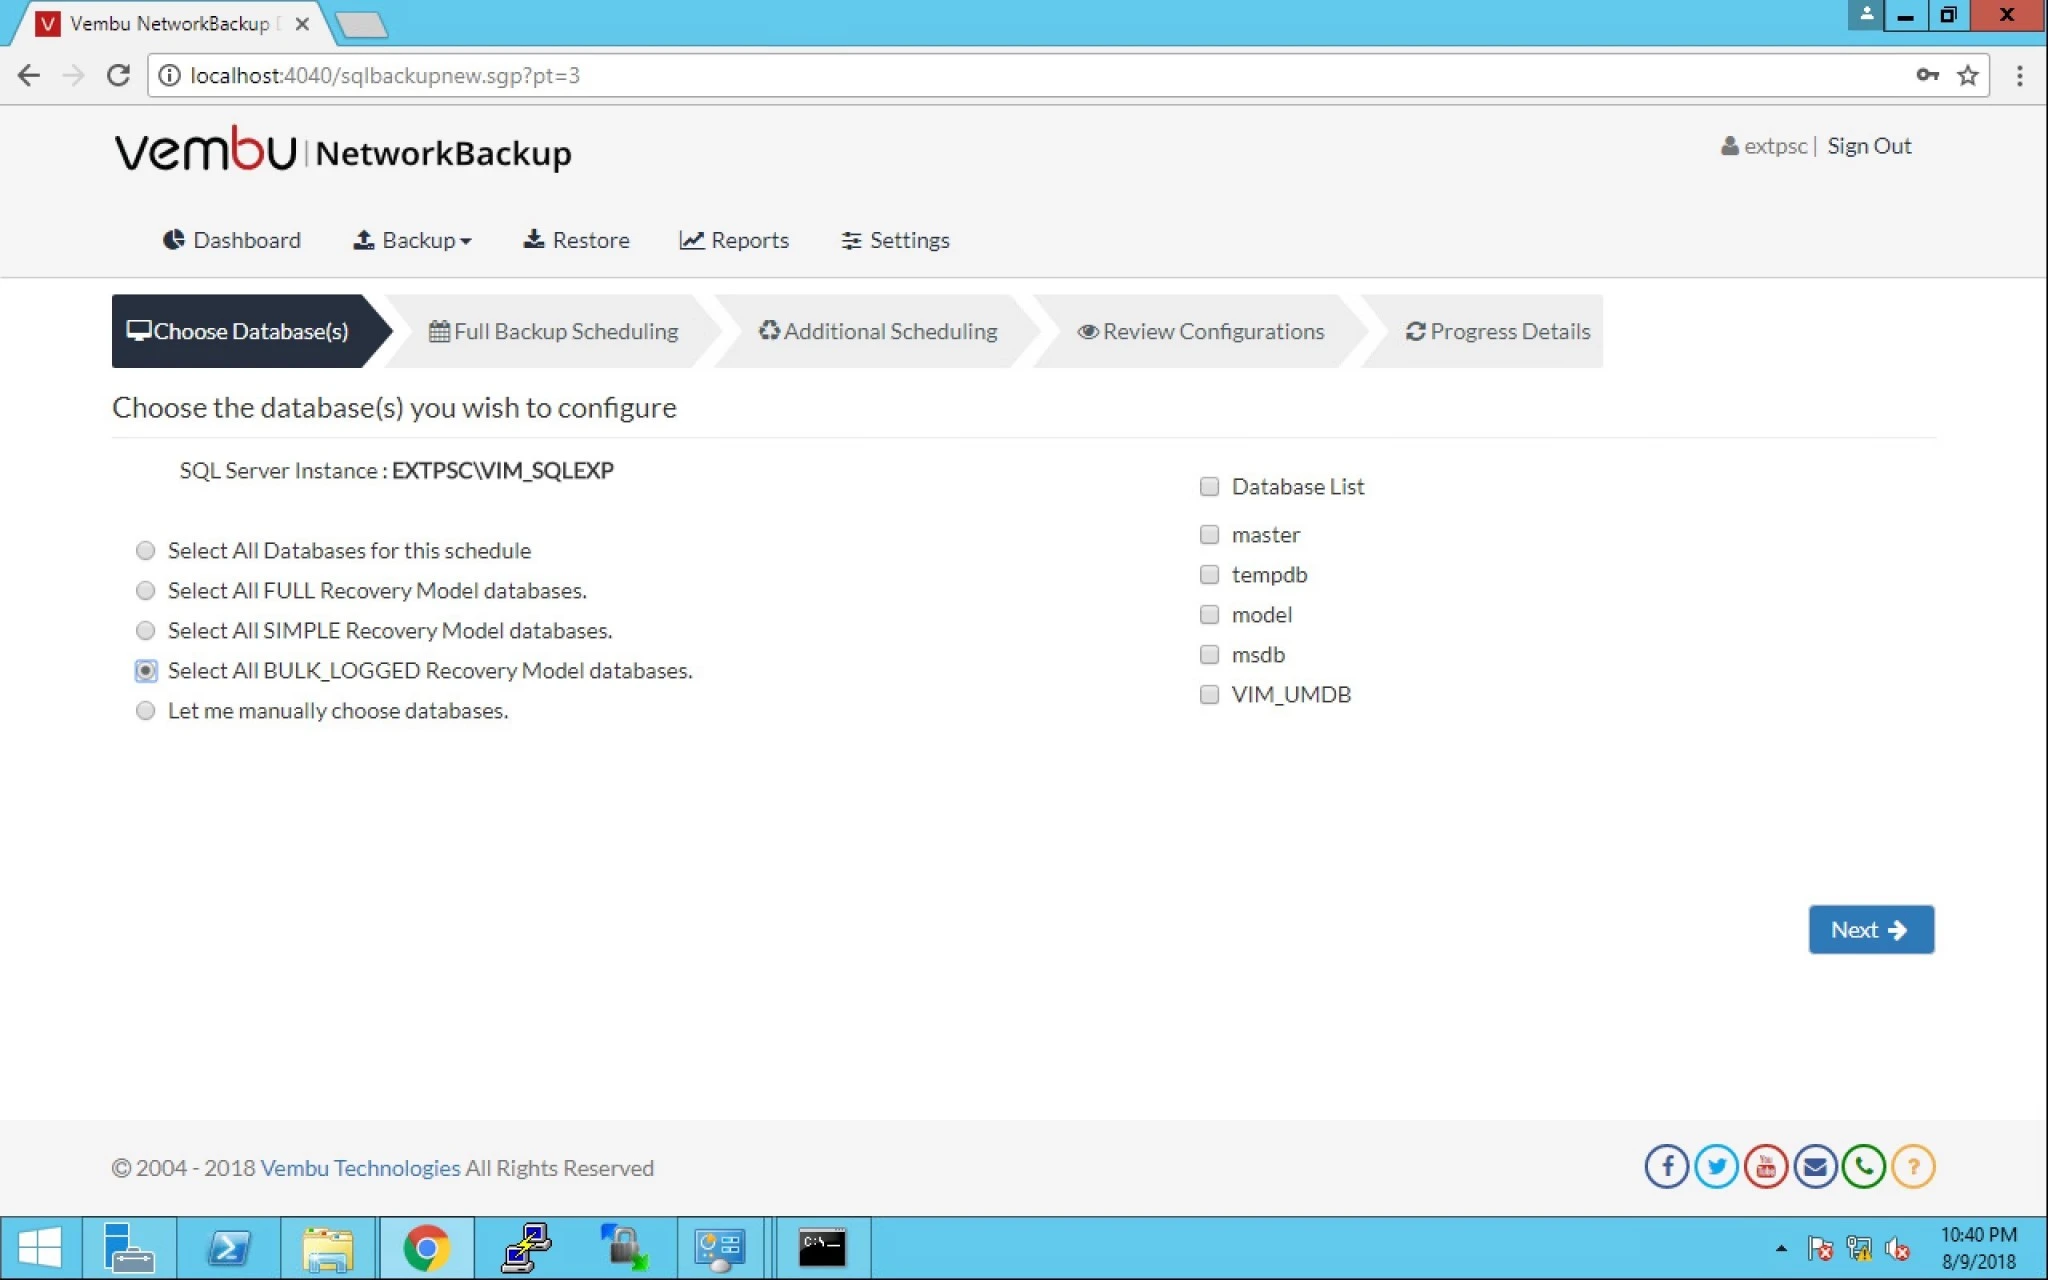
8. After choosing database, you can now select from the given below options to backup SQL instance.


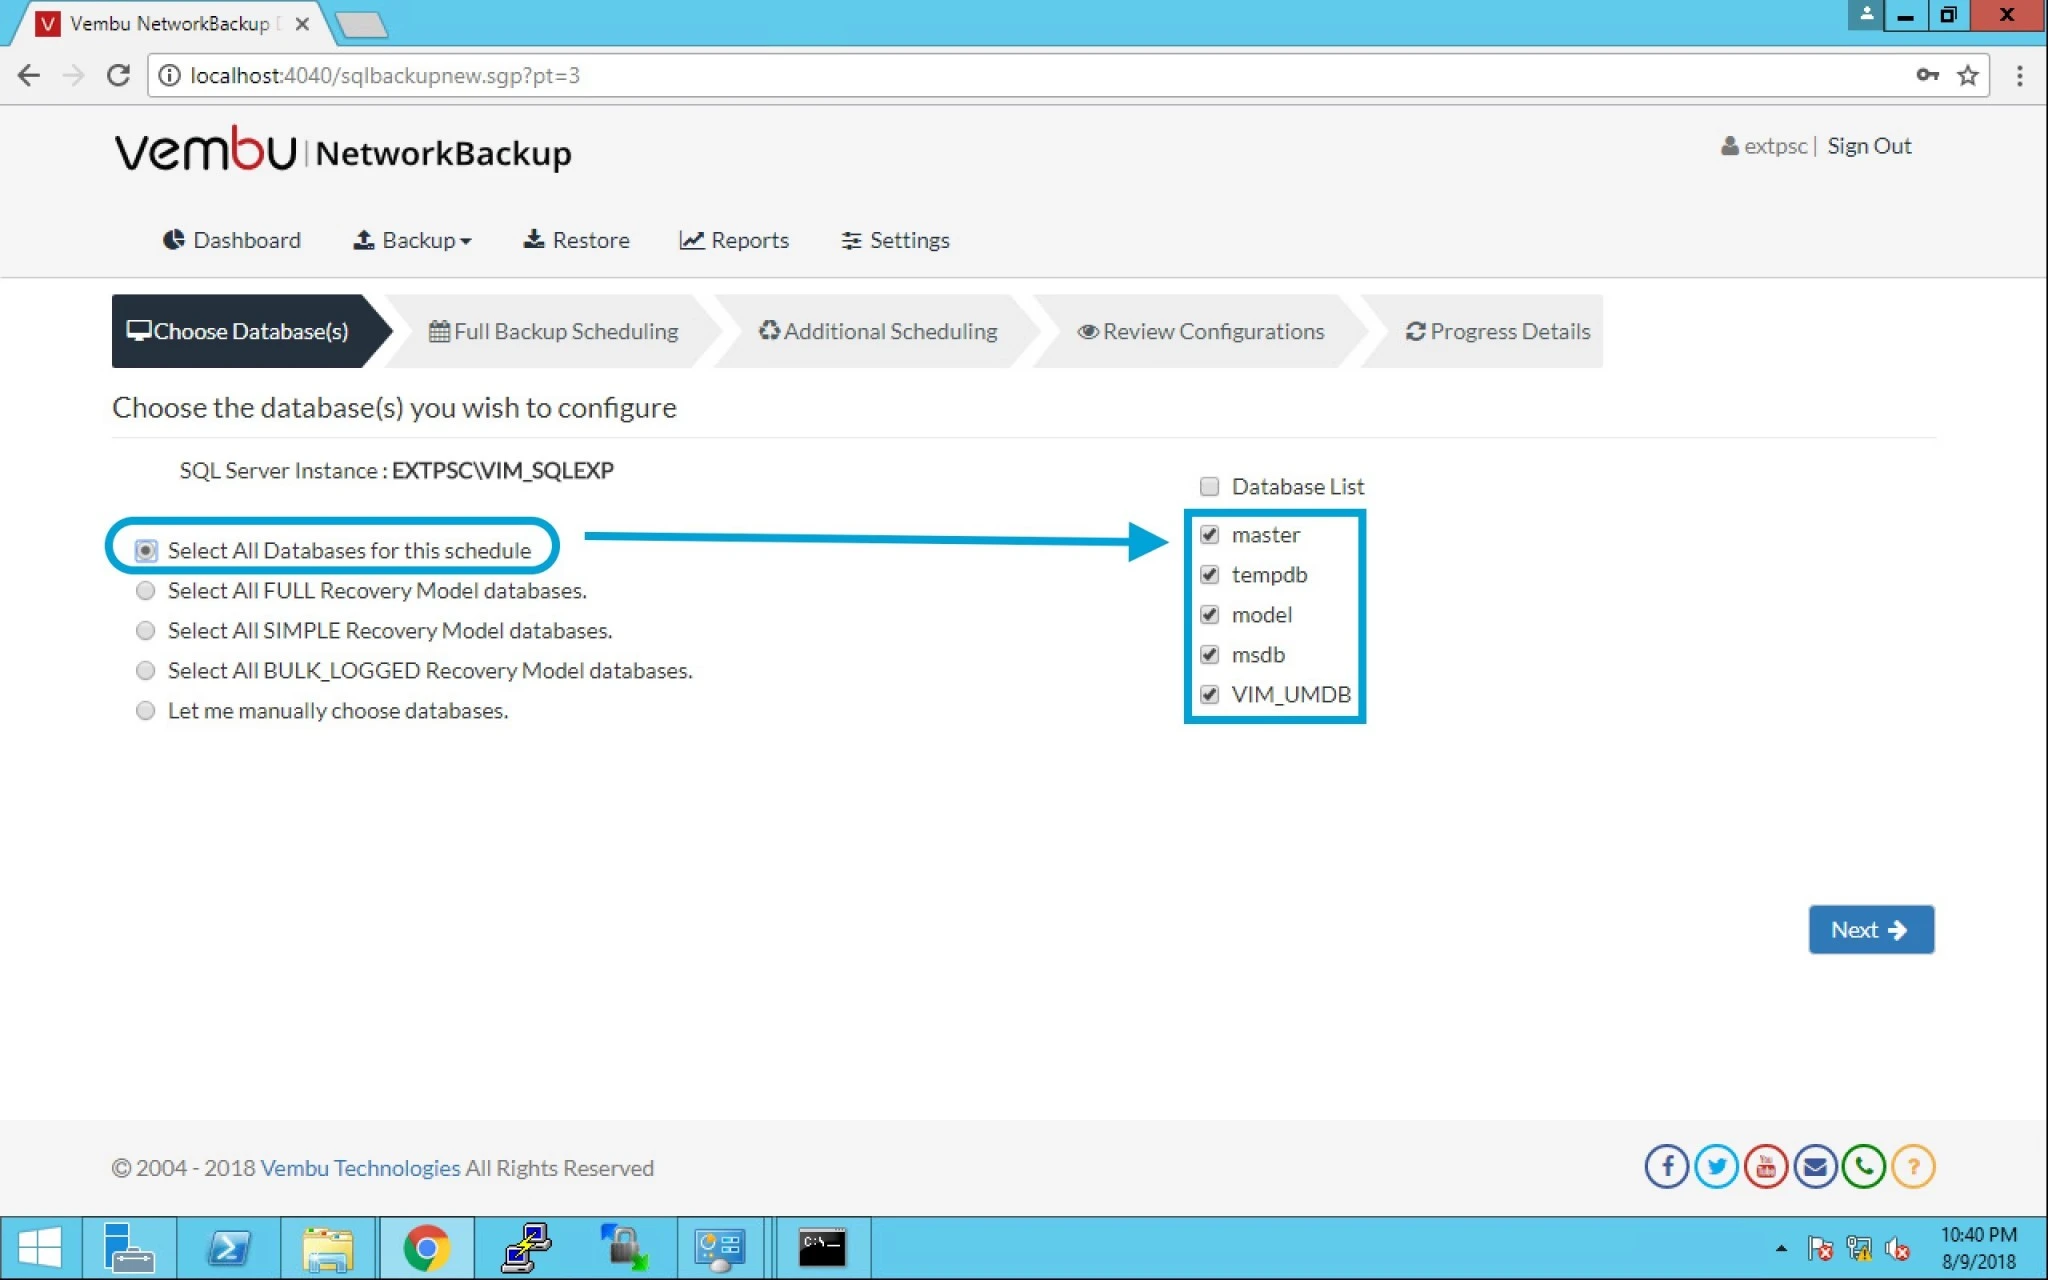
9. Lets assume we choose the first option then it will automatically select the table given on right hand side.


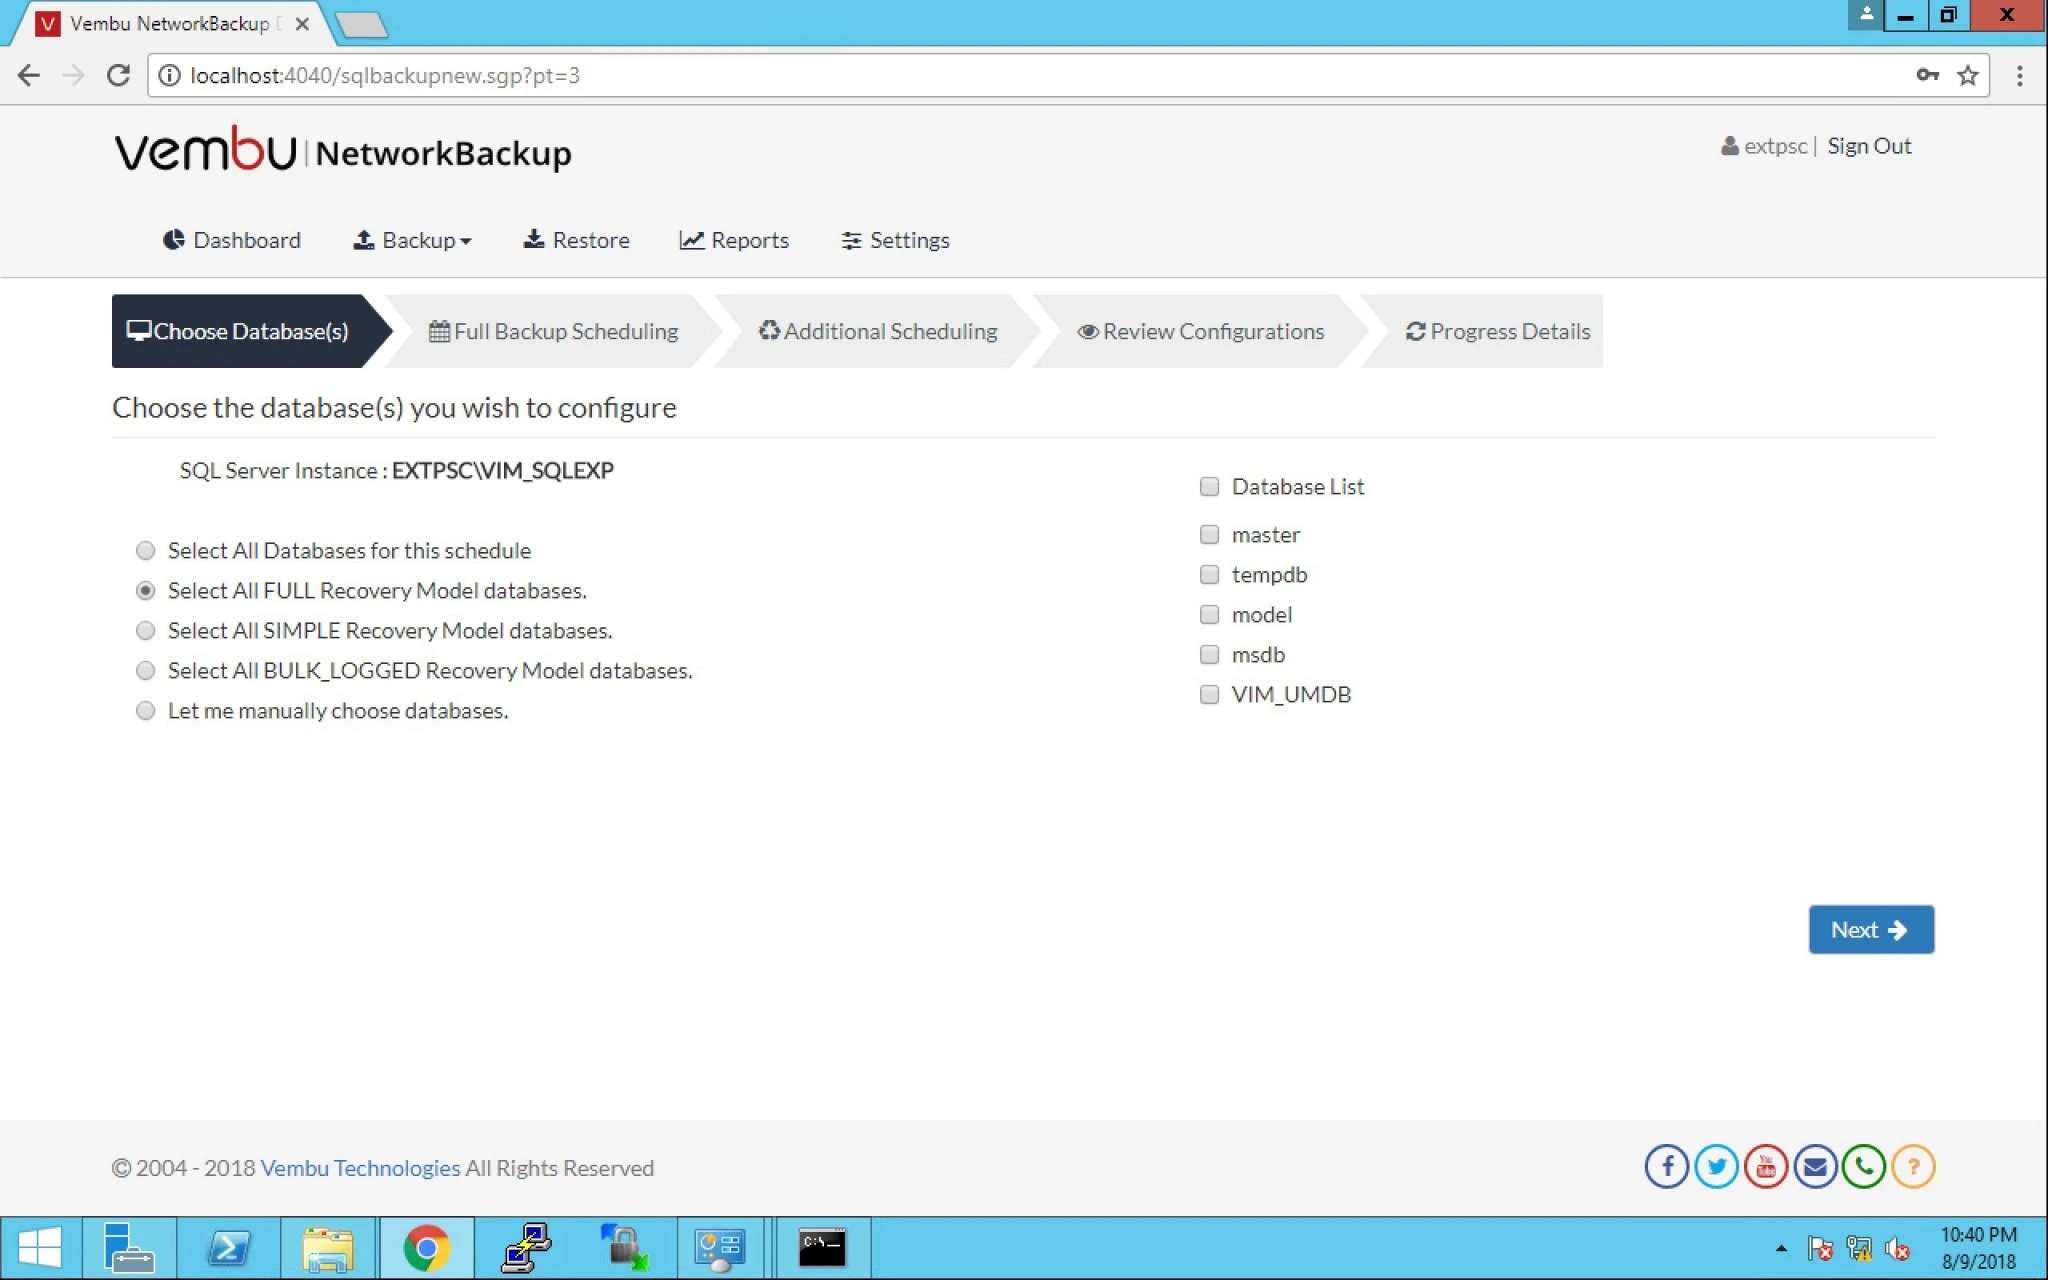
10. Similarly when we choose the second option “All FULL Recovery Model databases”, the R.H.S table isn’t selected automatically.


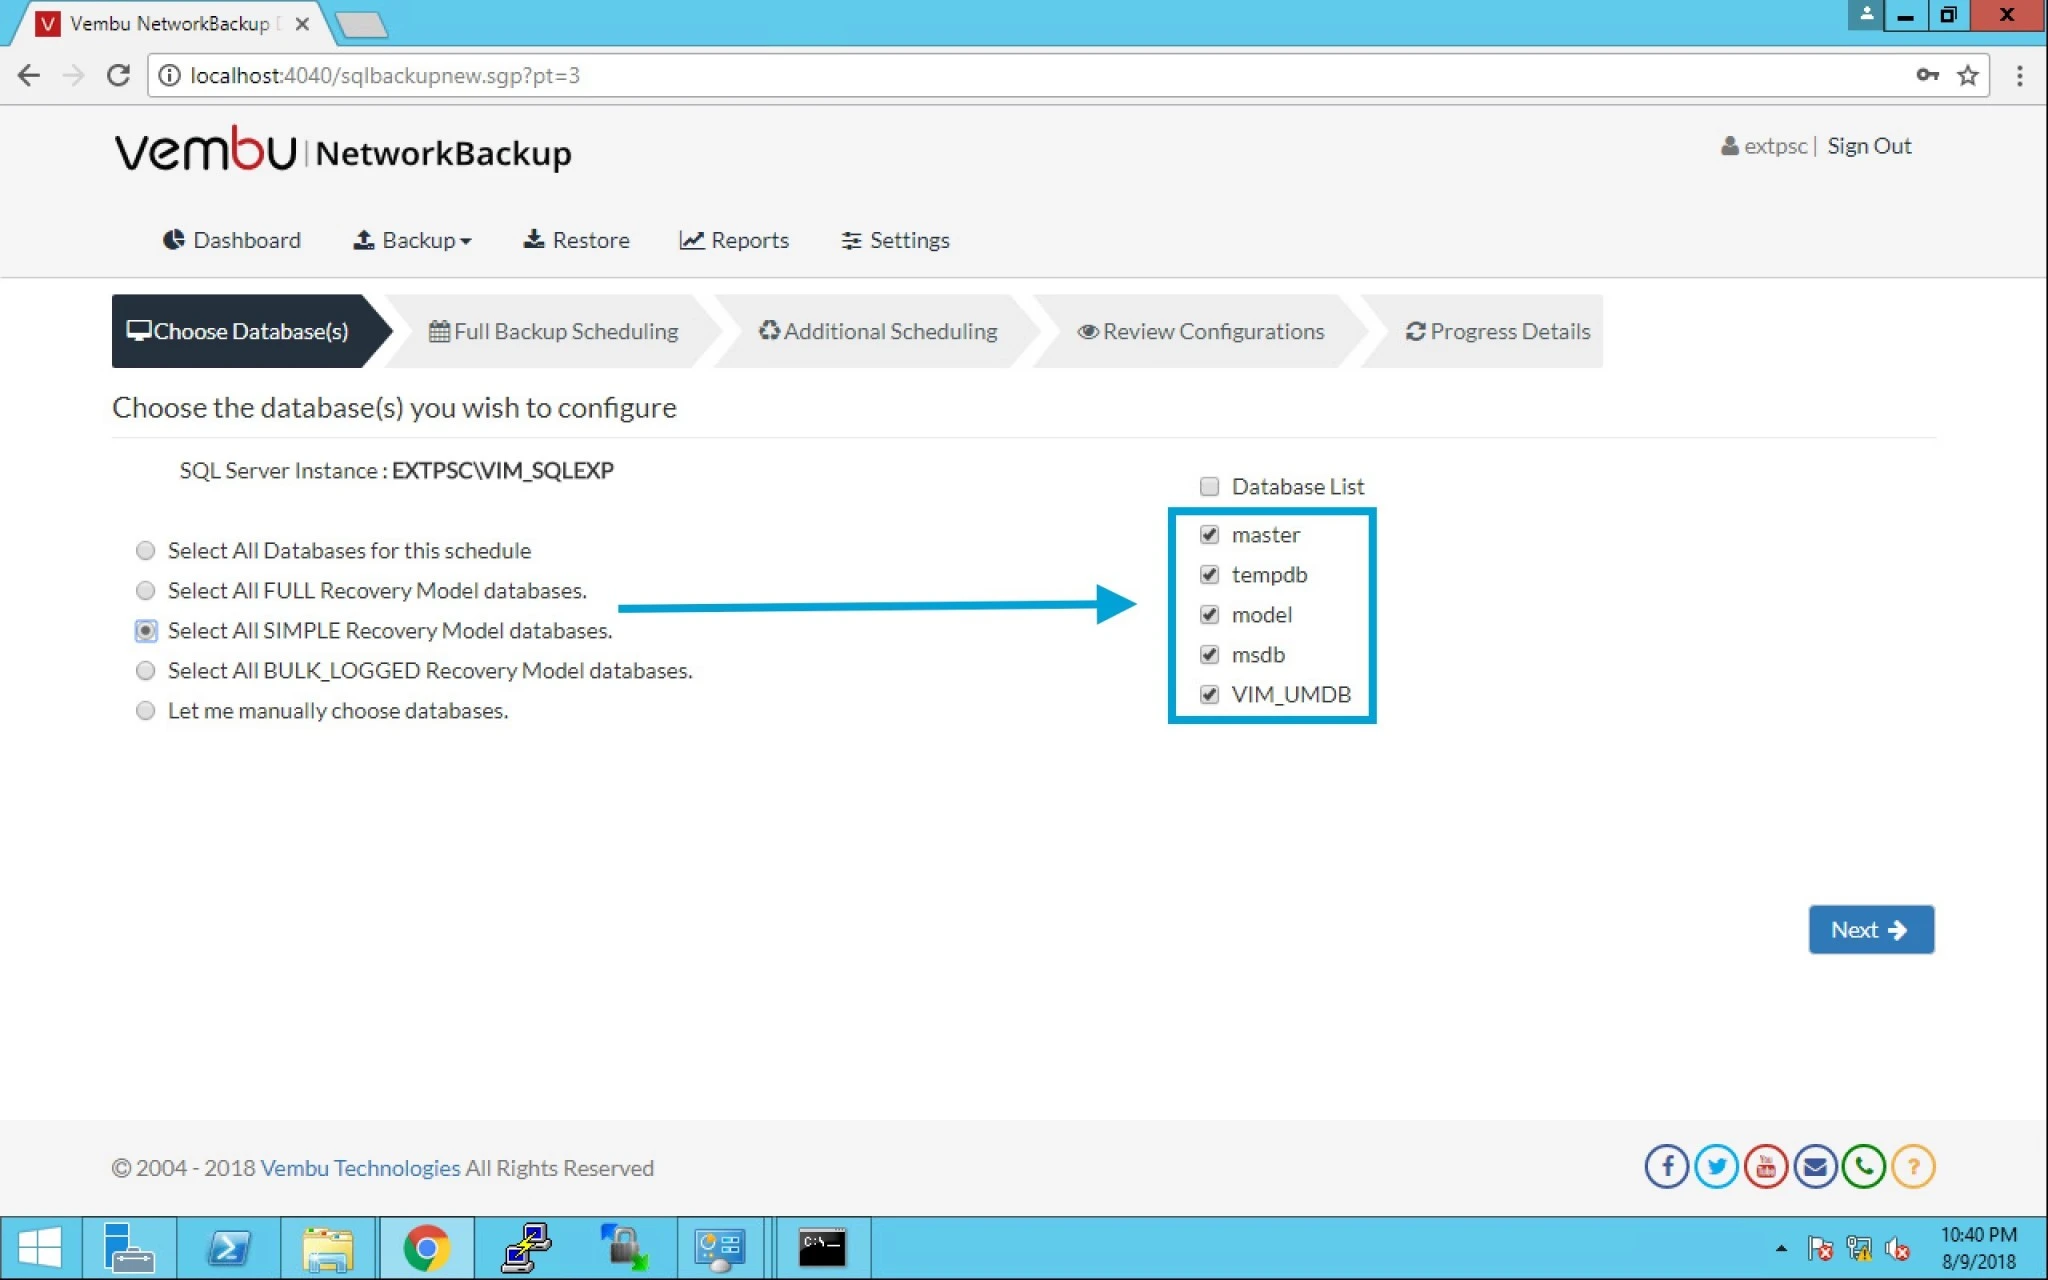
11.  When we go ahead and select the third option “All SIMPLE Recovery Model databases”, the R.H.S table is selected by default.


12. Select “All BULK_LOGGED Recovery Model databases” will not automatically select the R.H.S table.


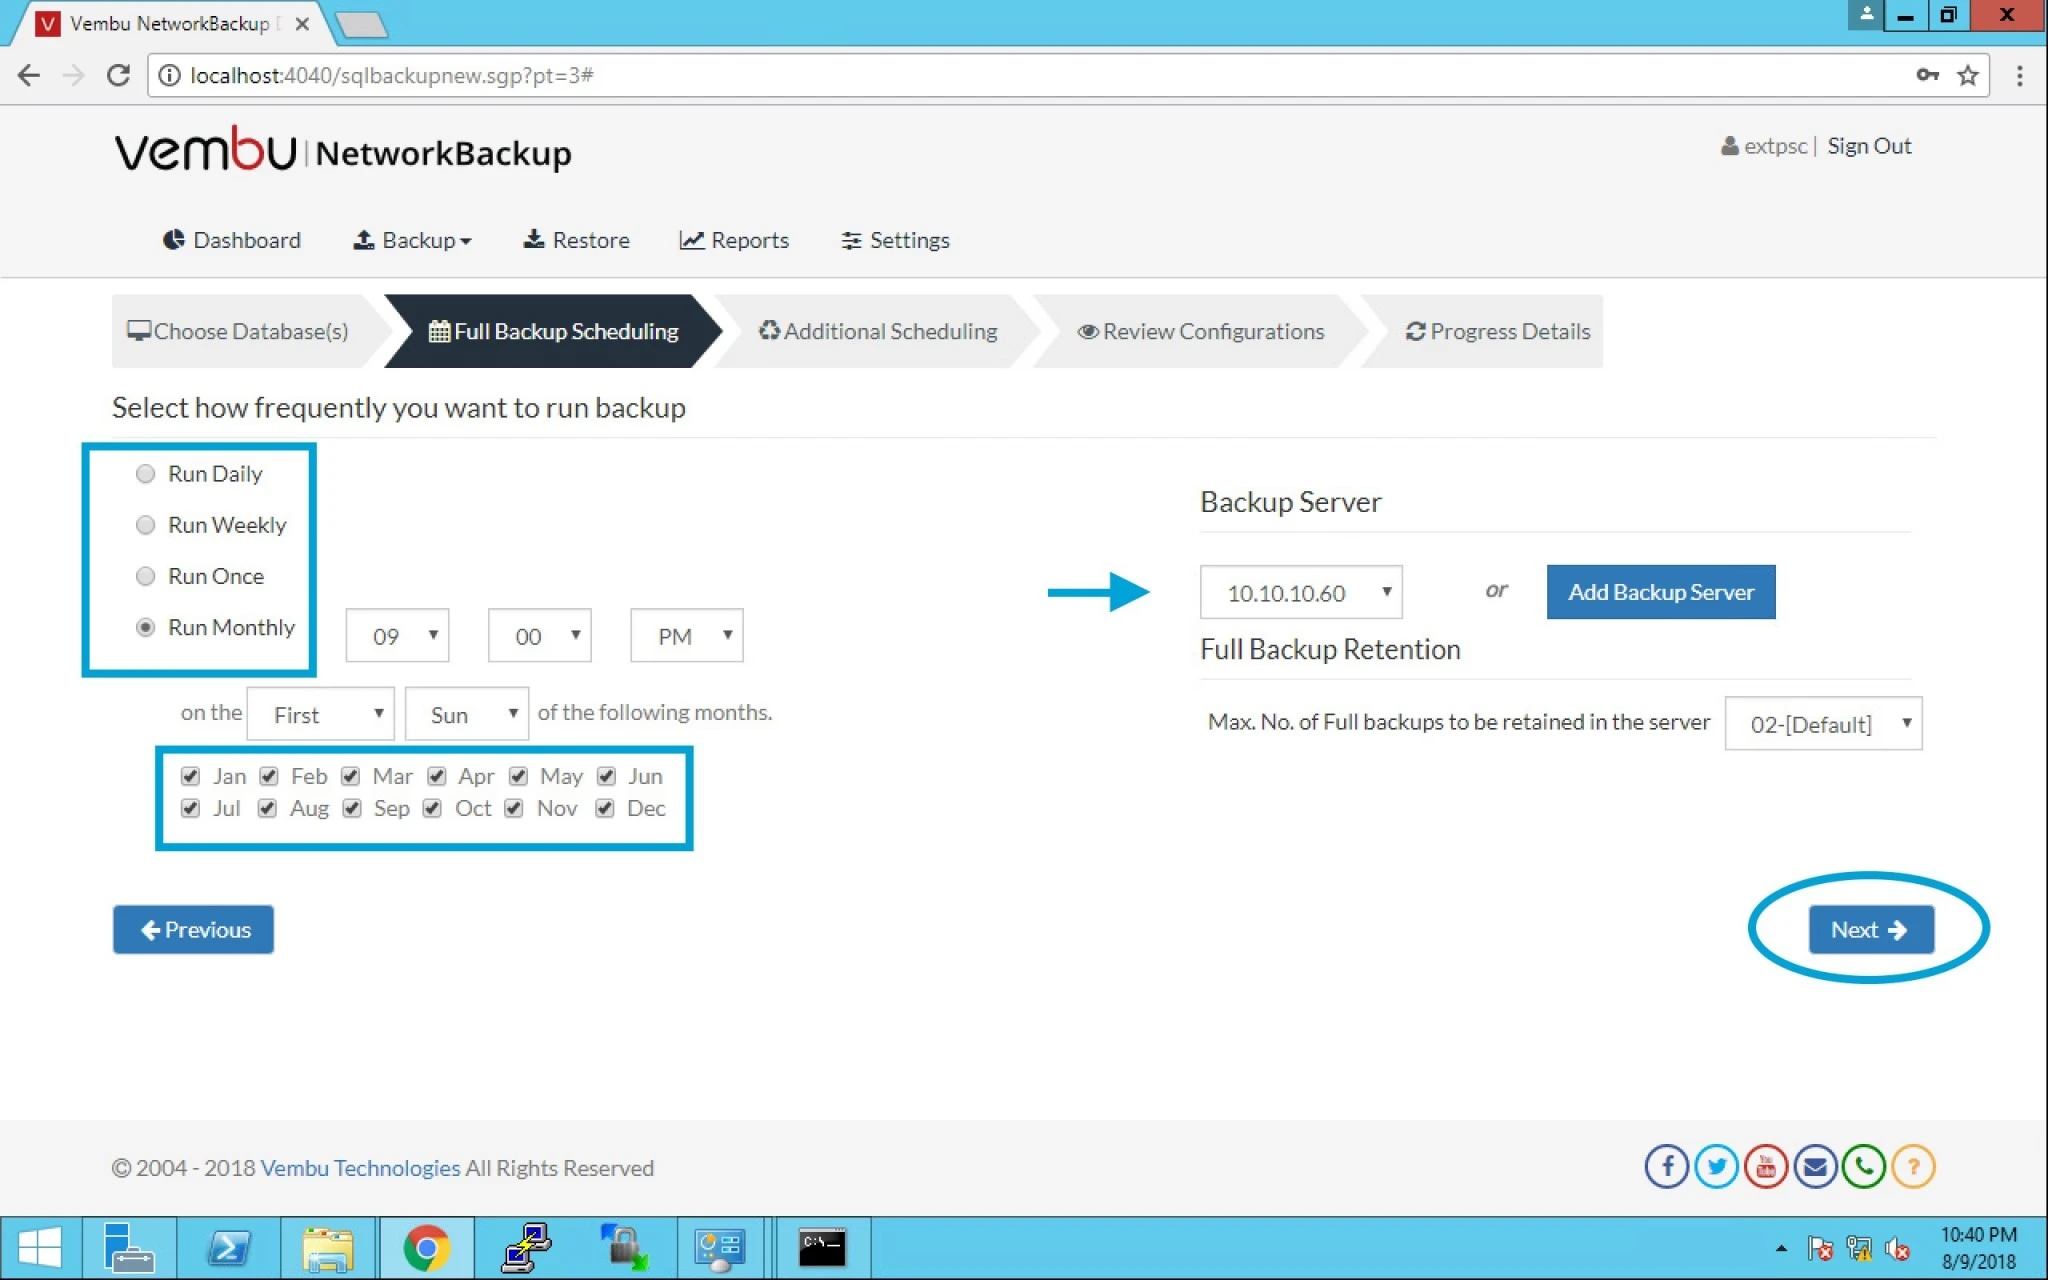
13.  In this option you can select the Frequency or when it will take backup like as given below:

a) Run Daily

b) Run Weekly

c) Run Once

d) Run Monthly

You can specify the time as well.


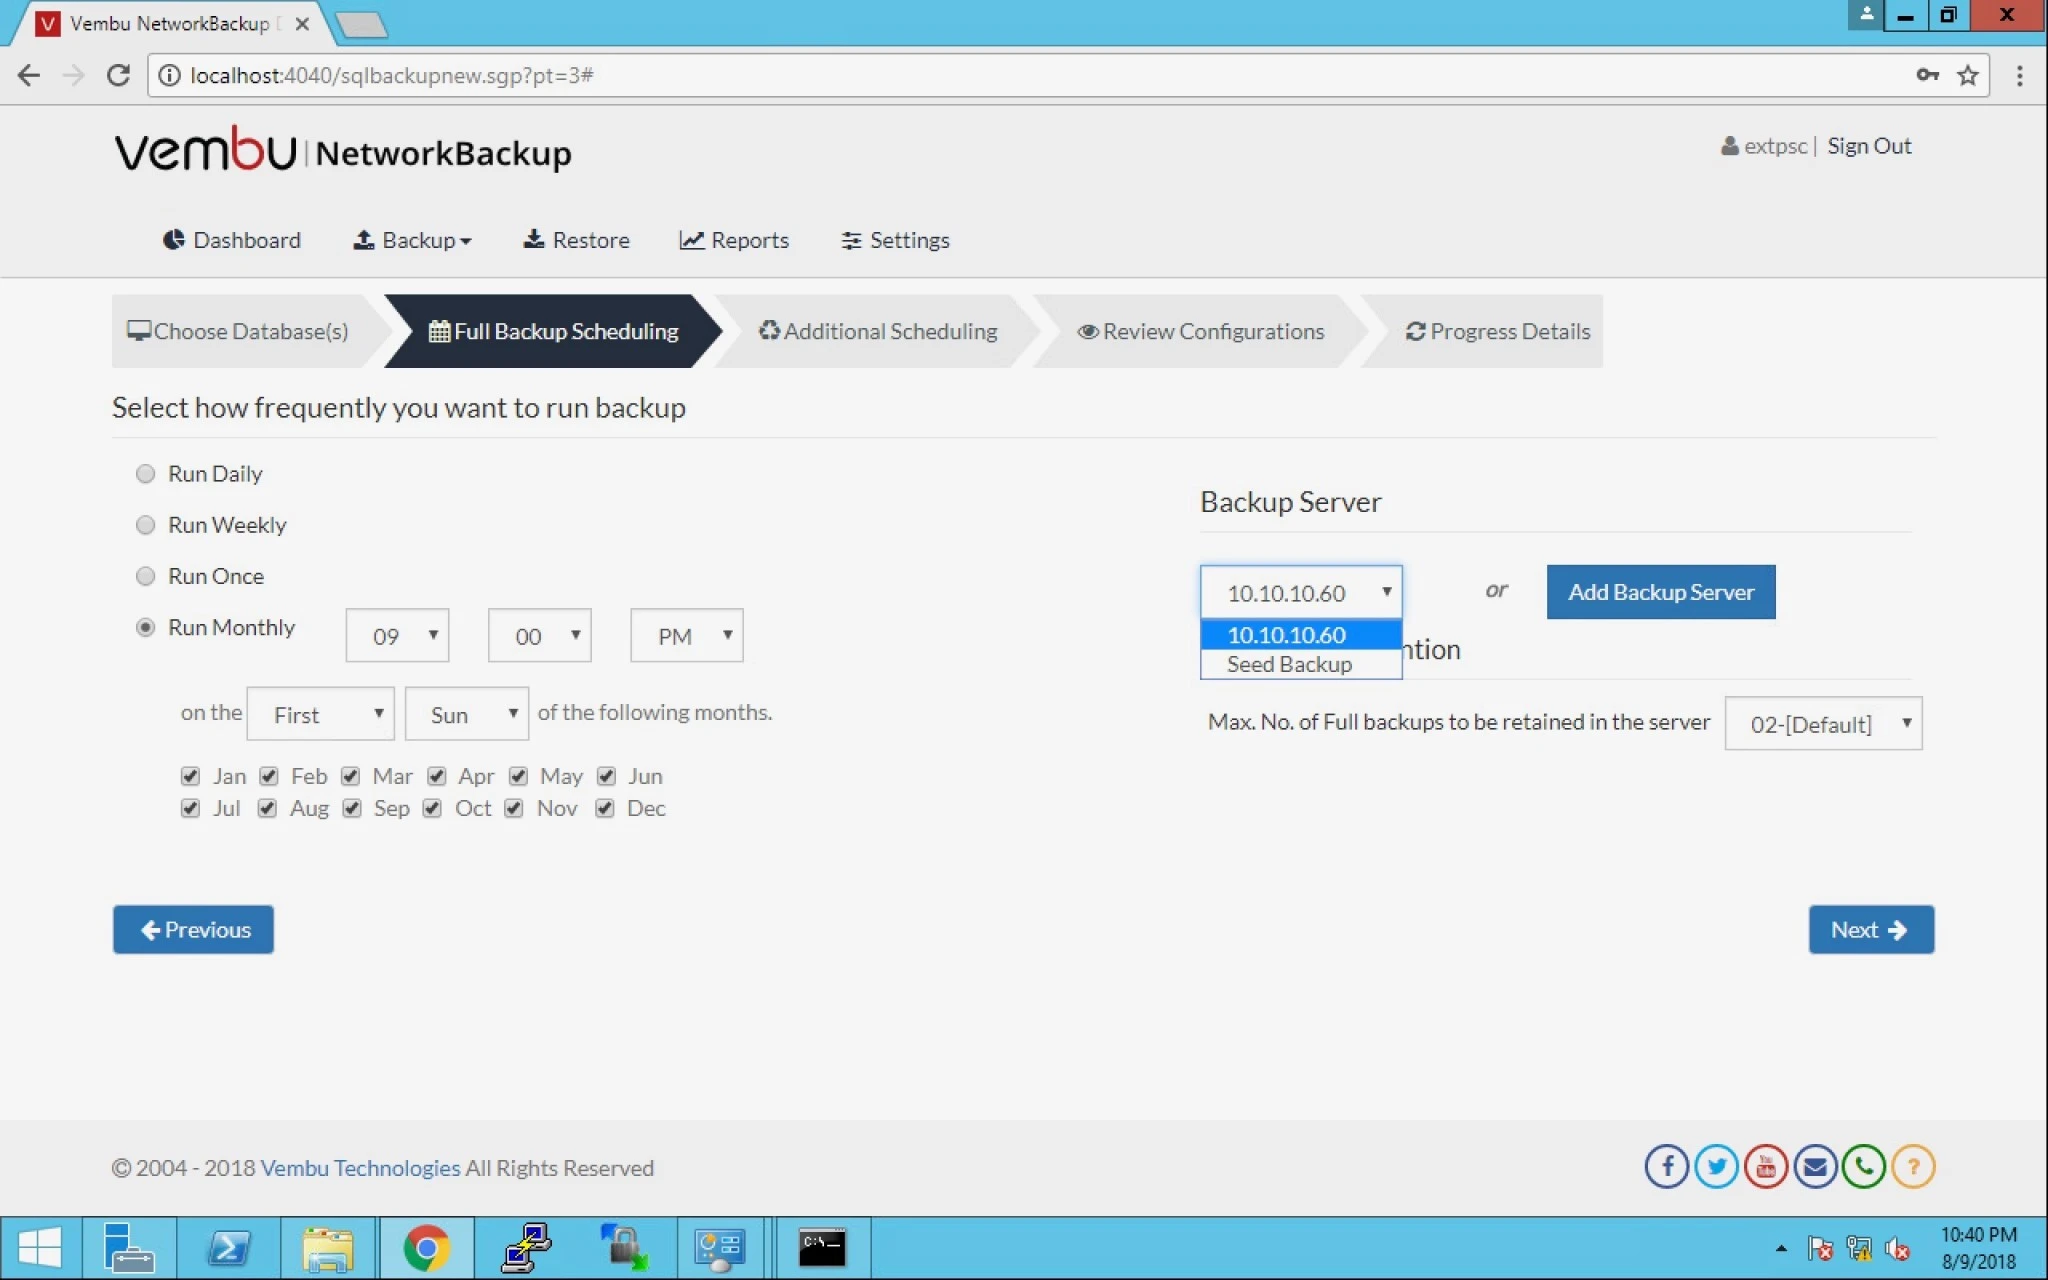
14. On the right hand side you can select Backup server or you have the option to add a backup server right here.


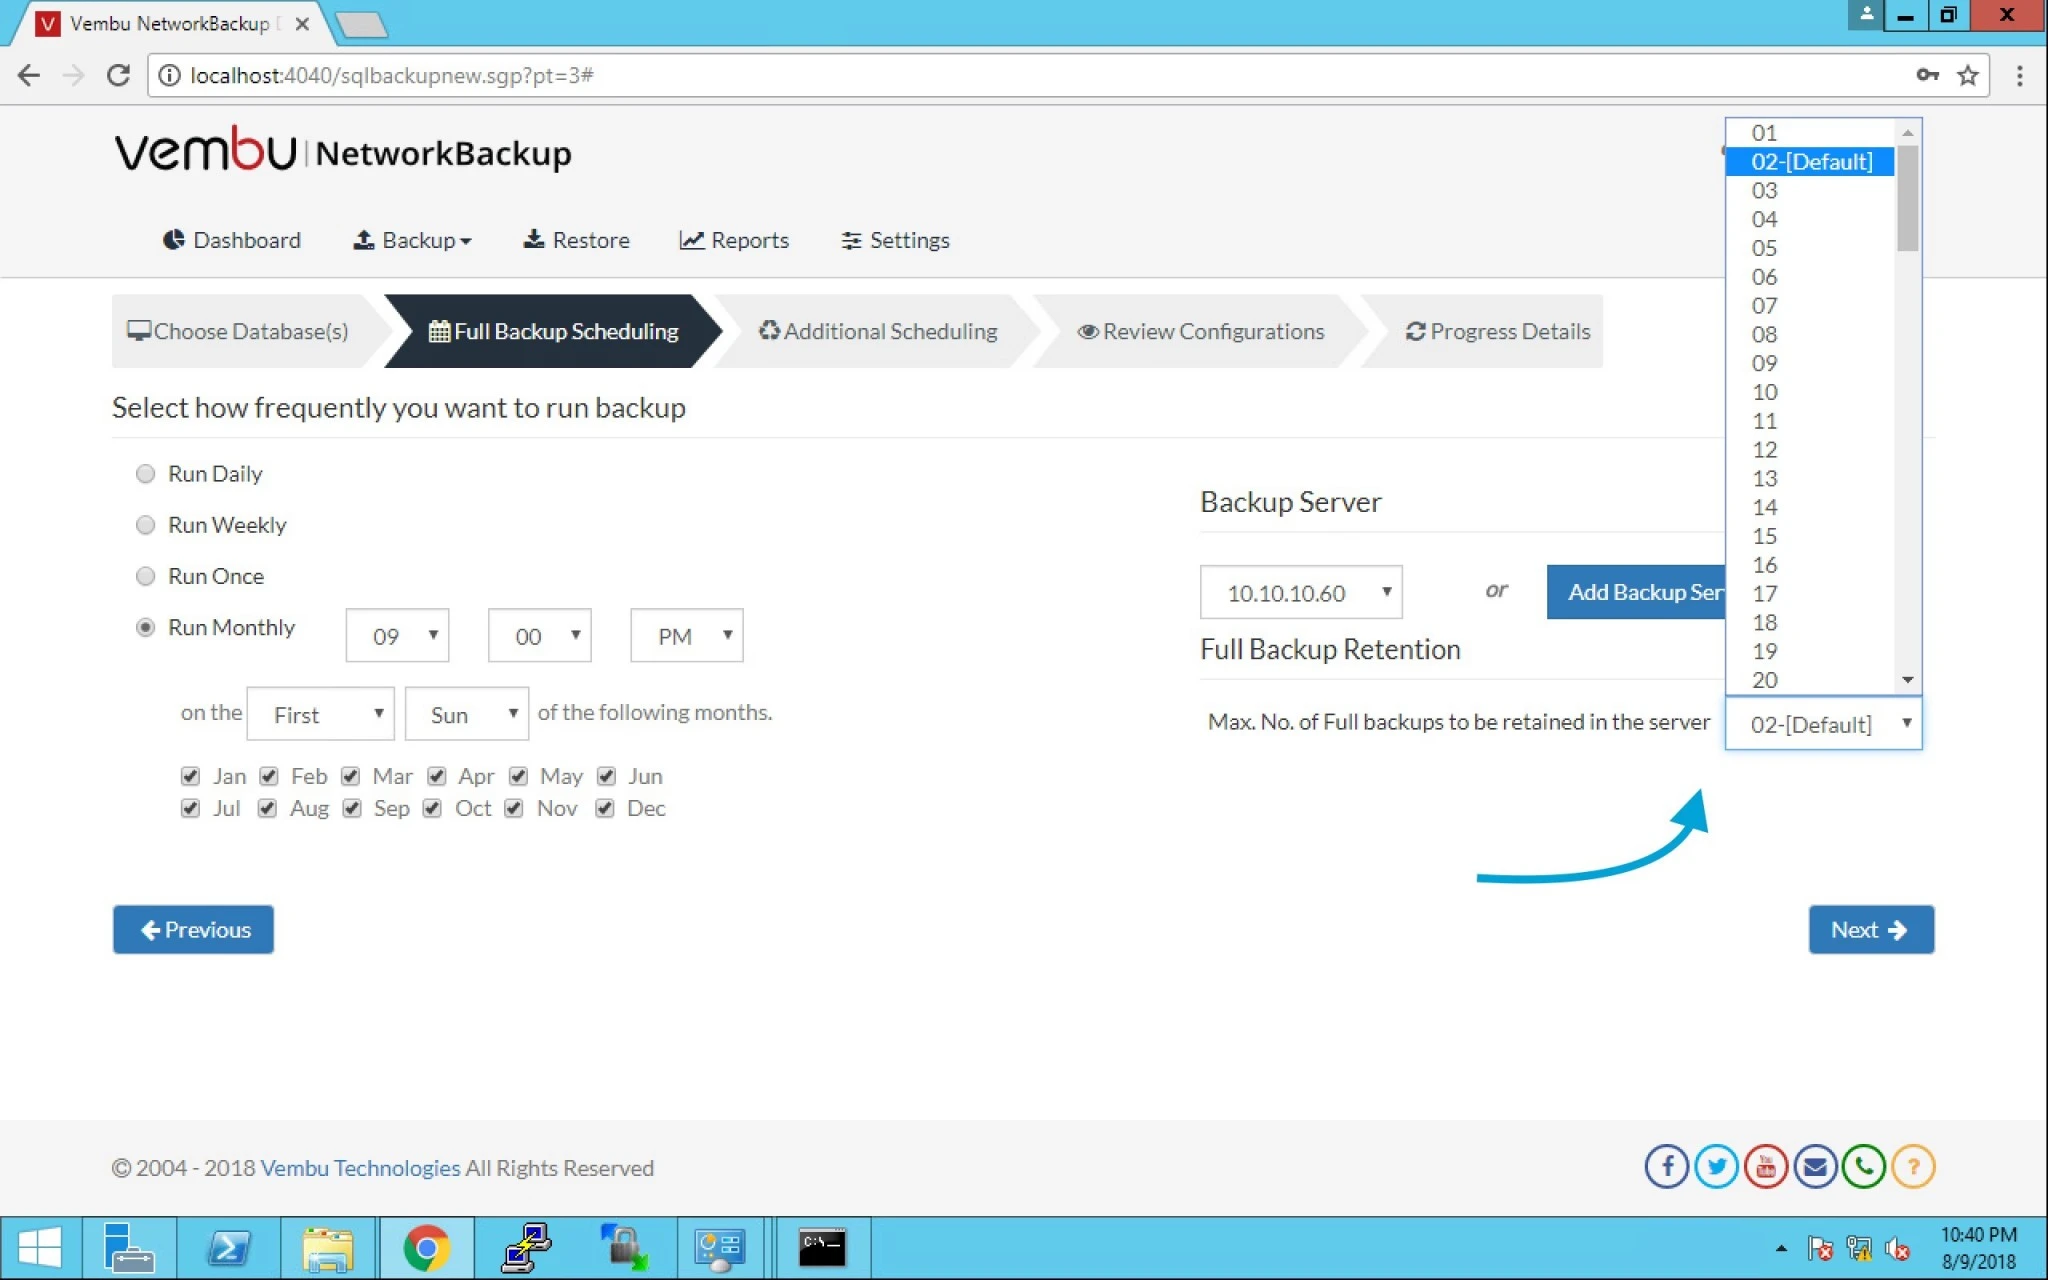
15. Here you can select Retention for this backup and click next.


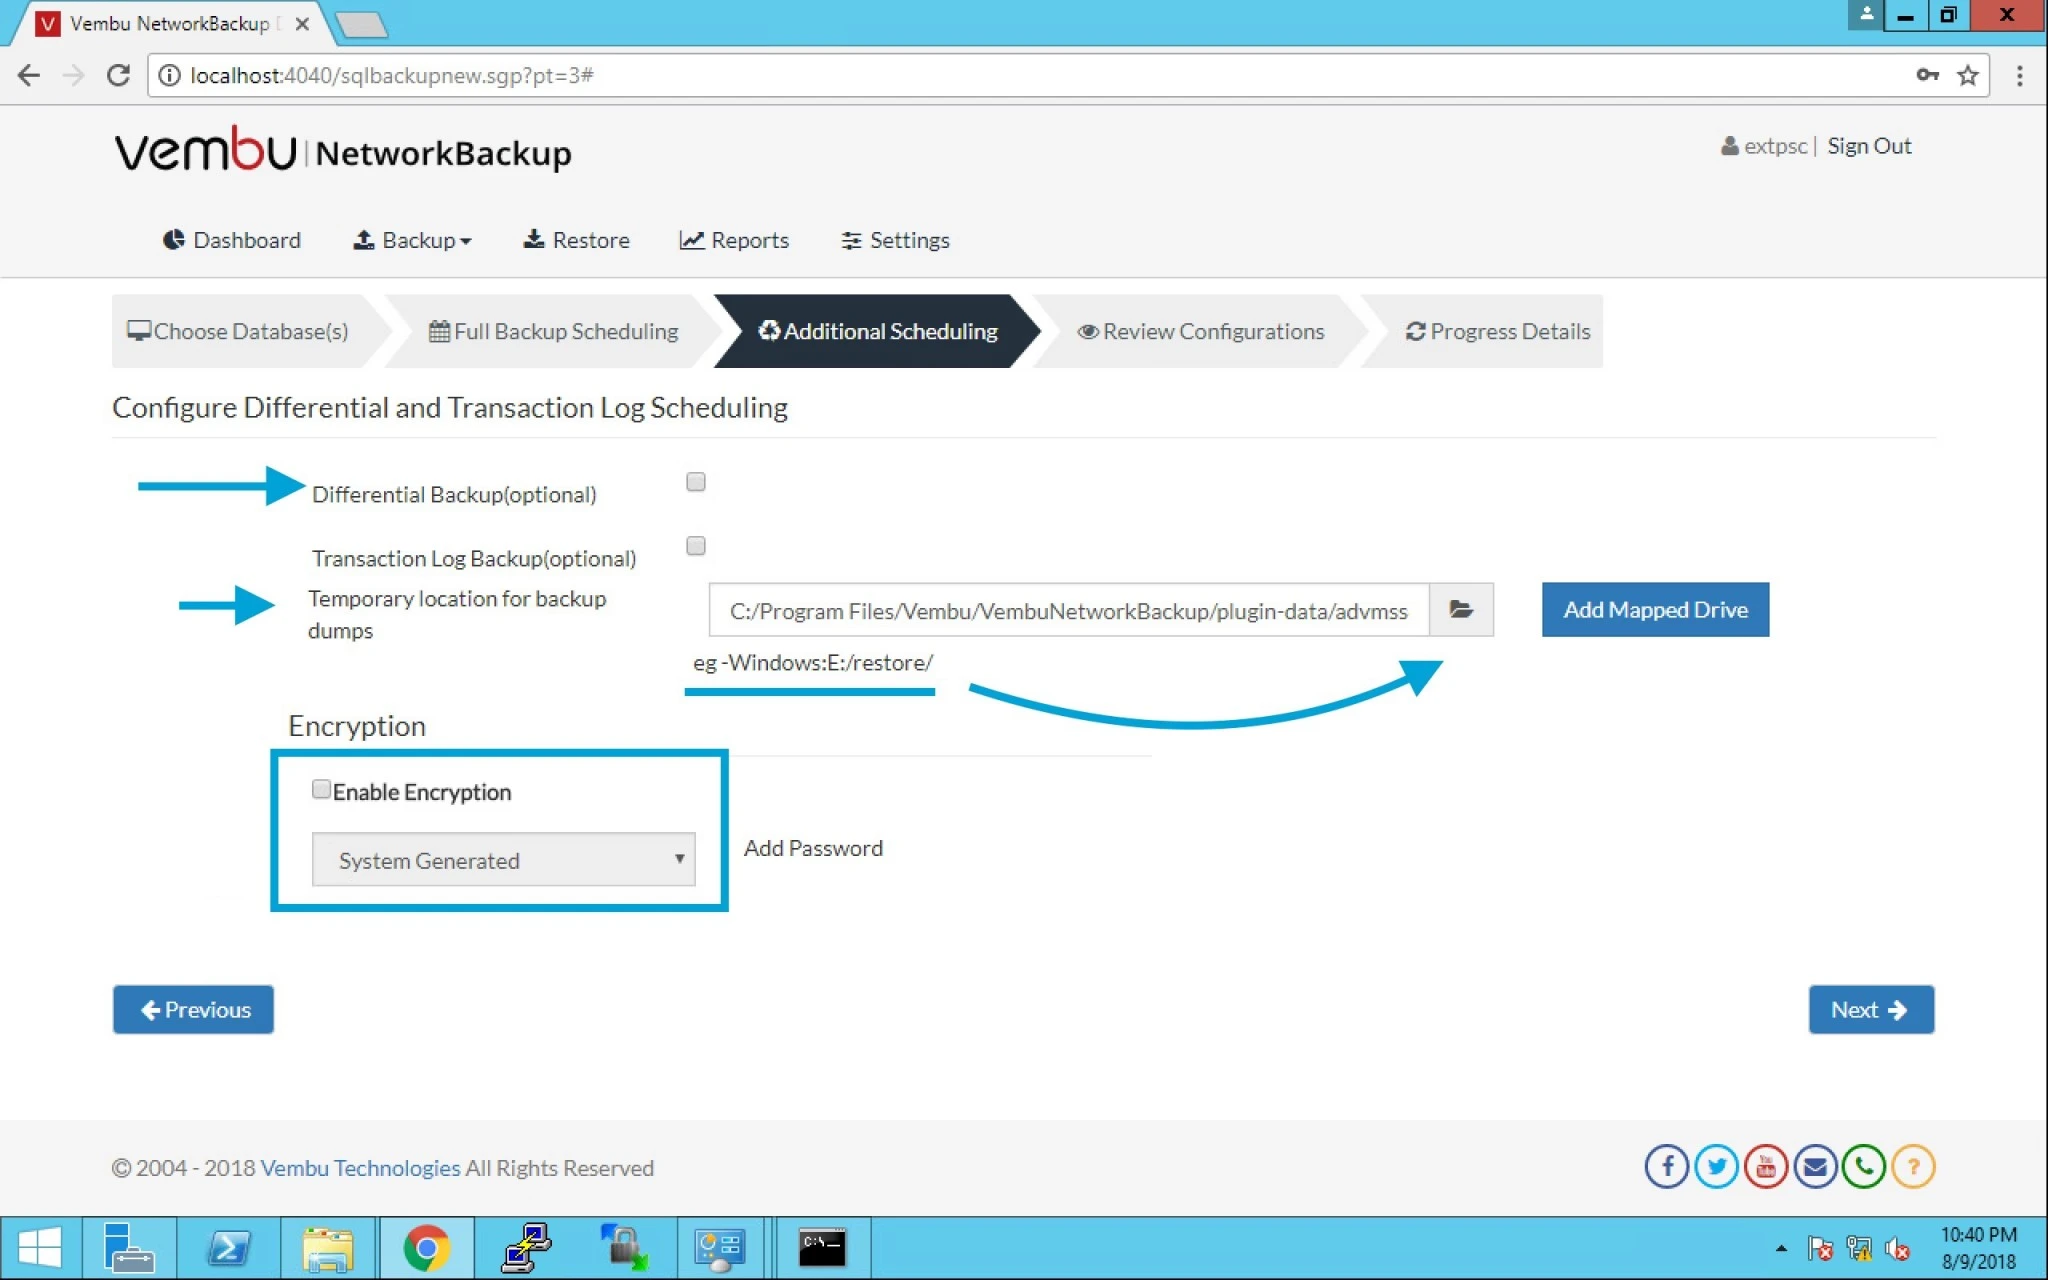
16. Here you have the options like Differential backup or Transaction Log Backup or even you can keep this in Temporary location.

Note: you can also select Encryption as per company policy or customer requirement.


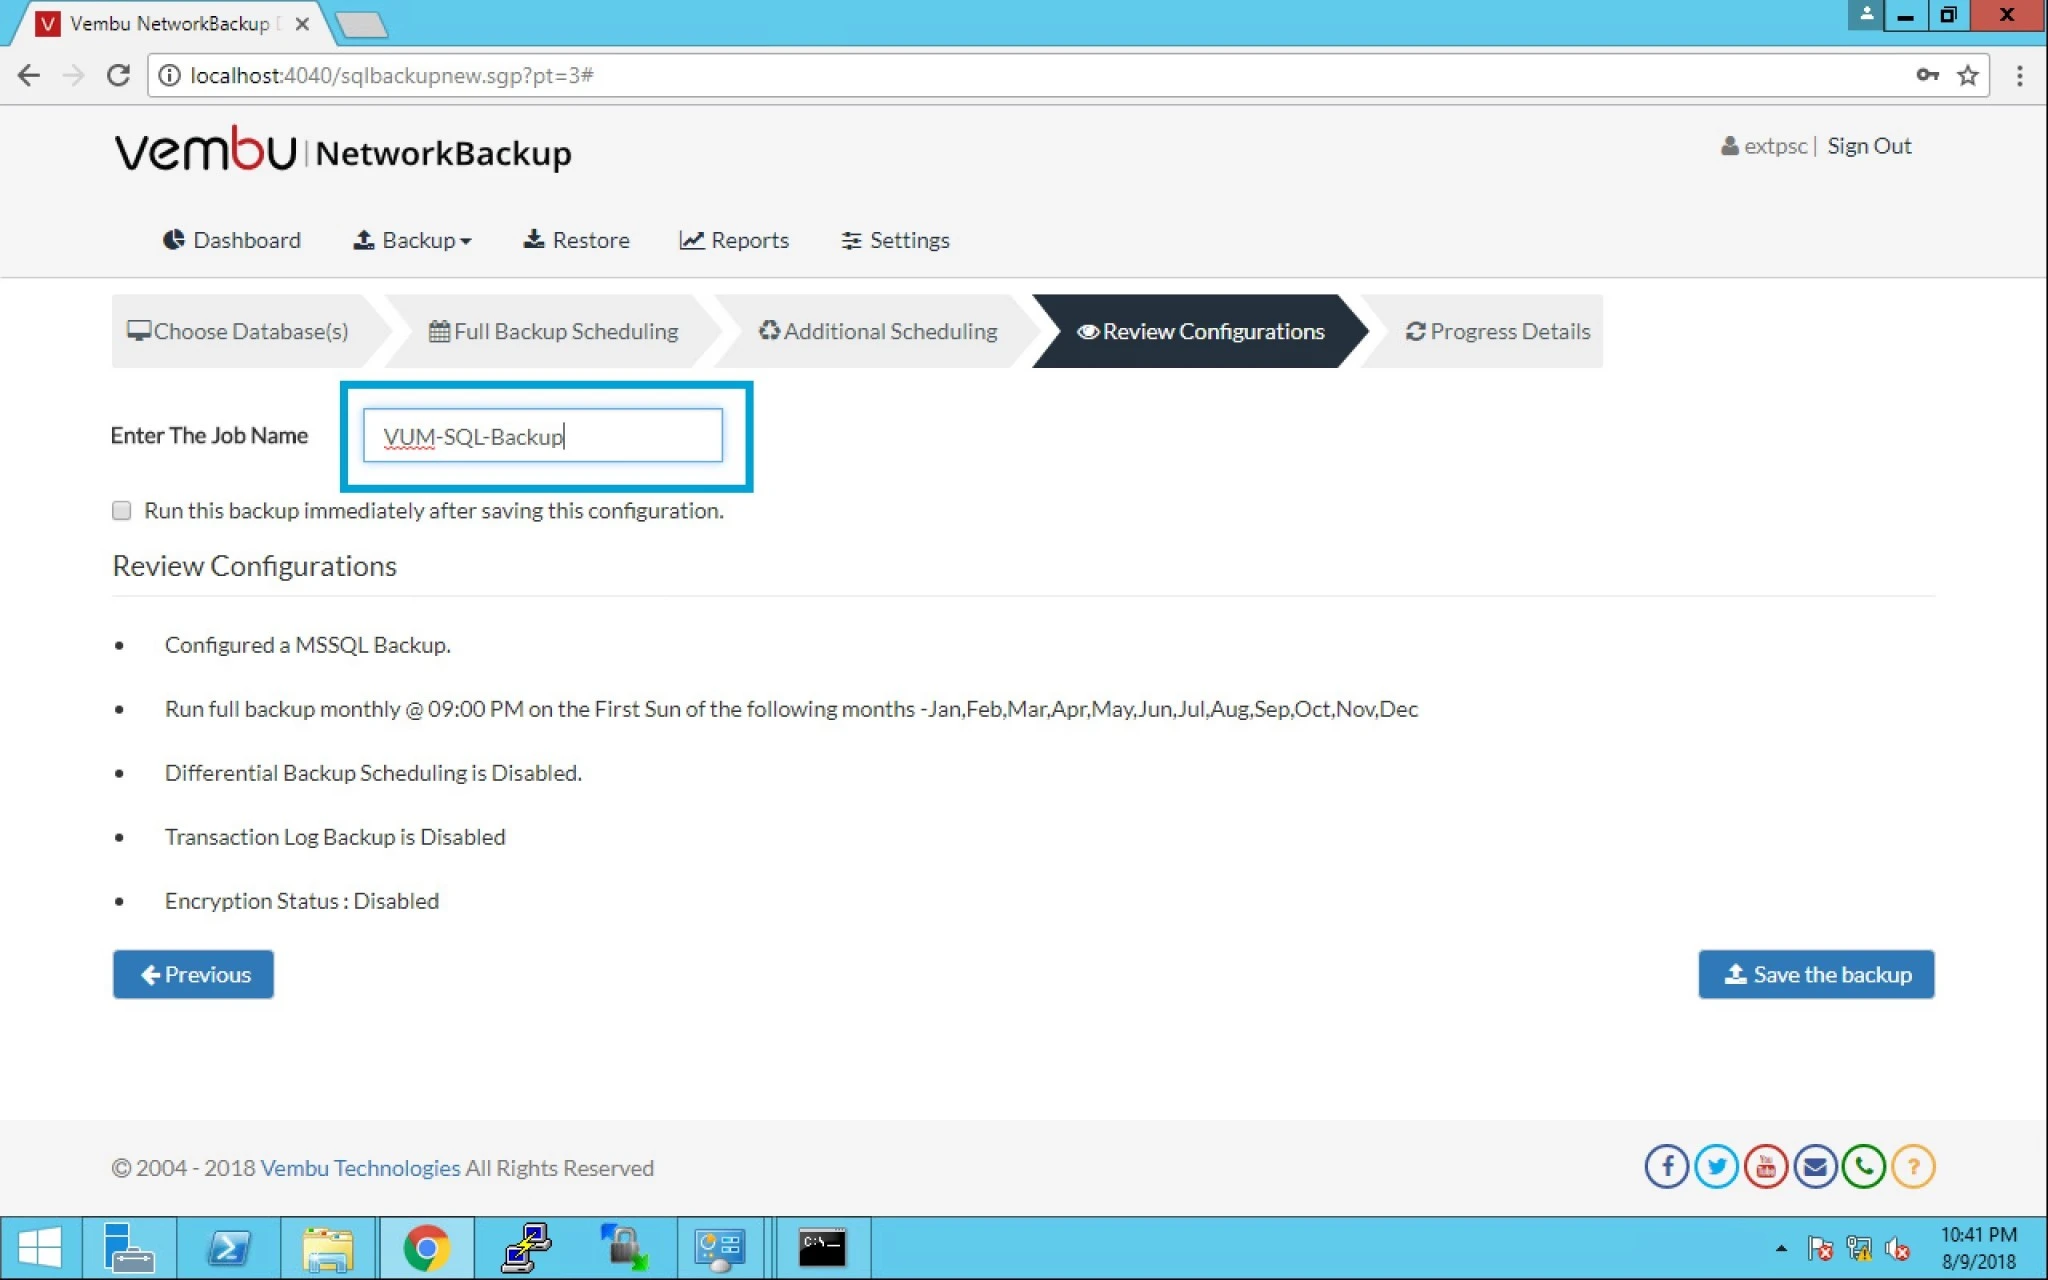
17. Enter your Job name and save the backup. Click next.


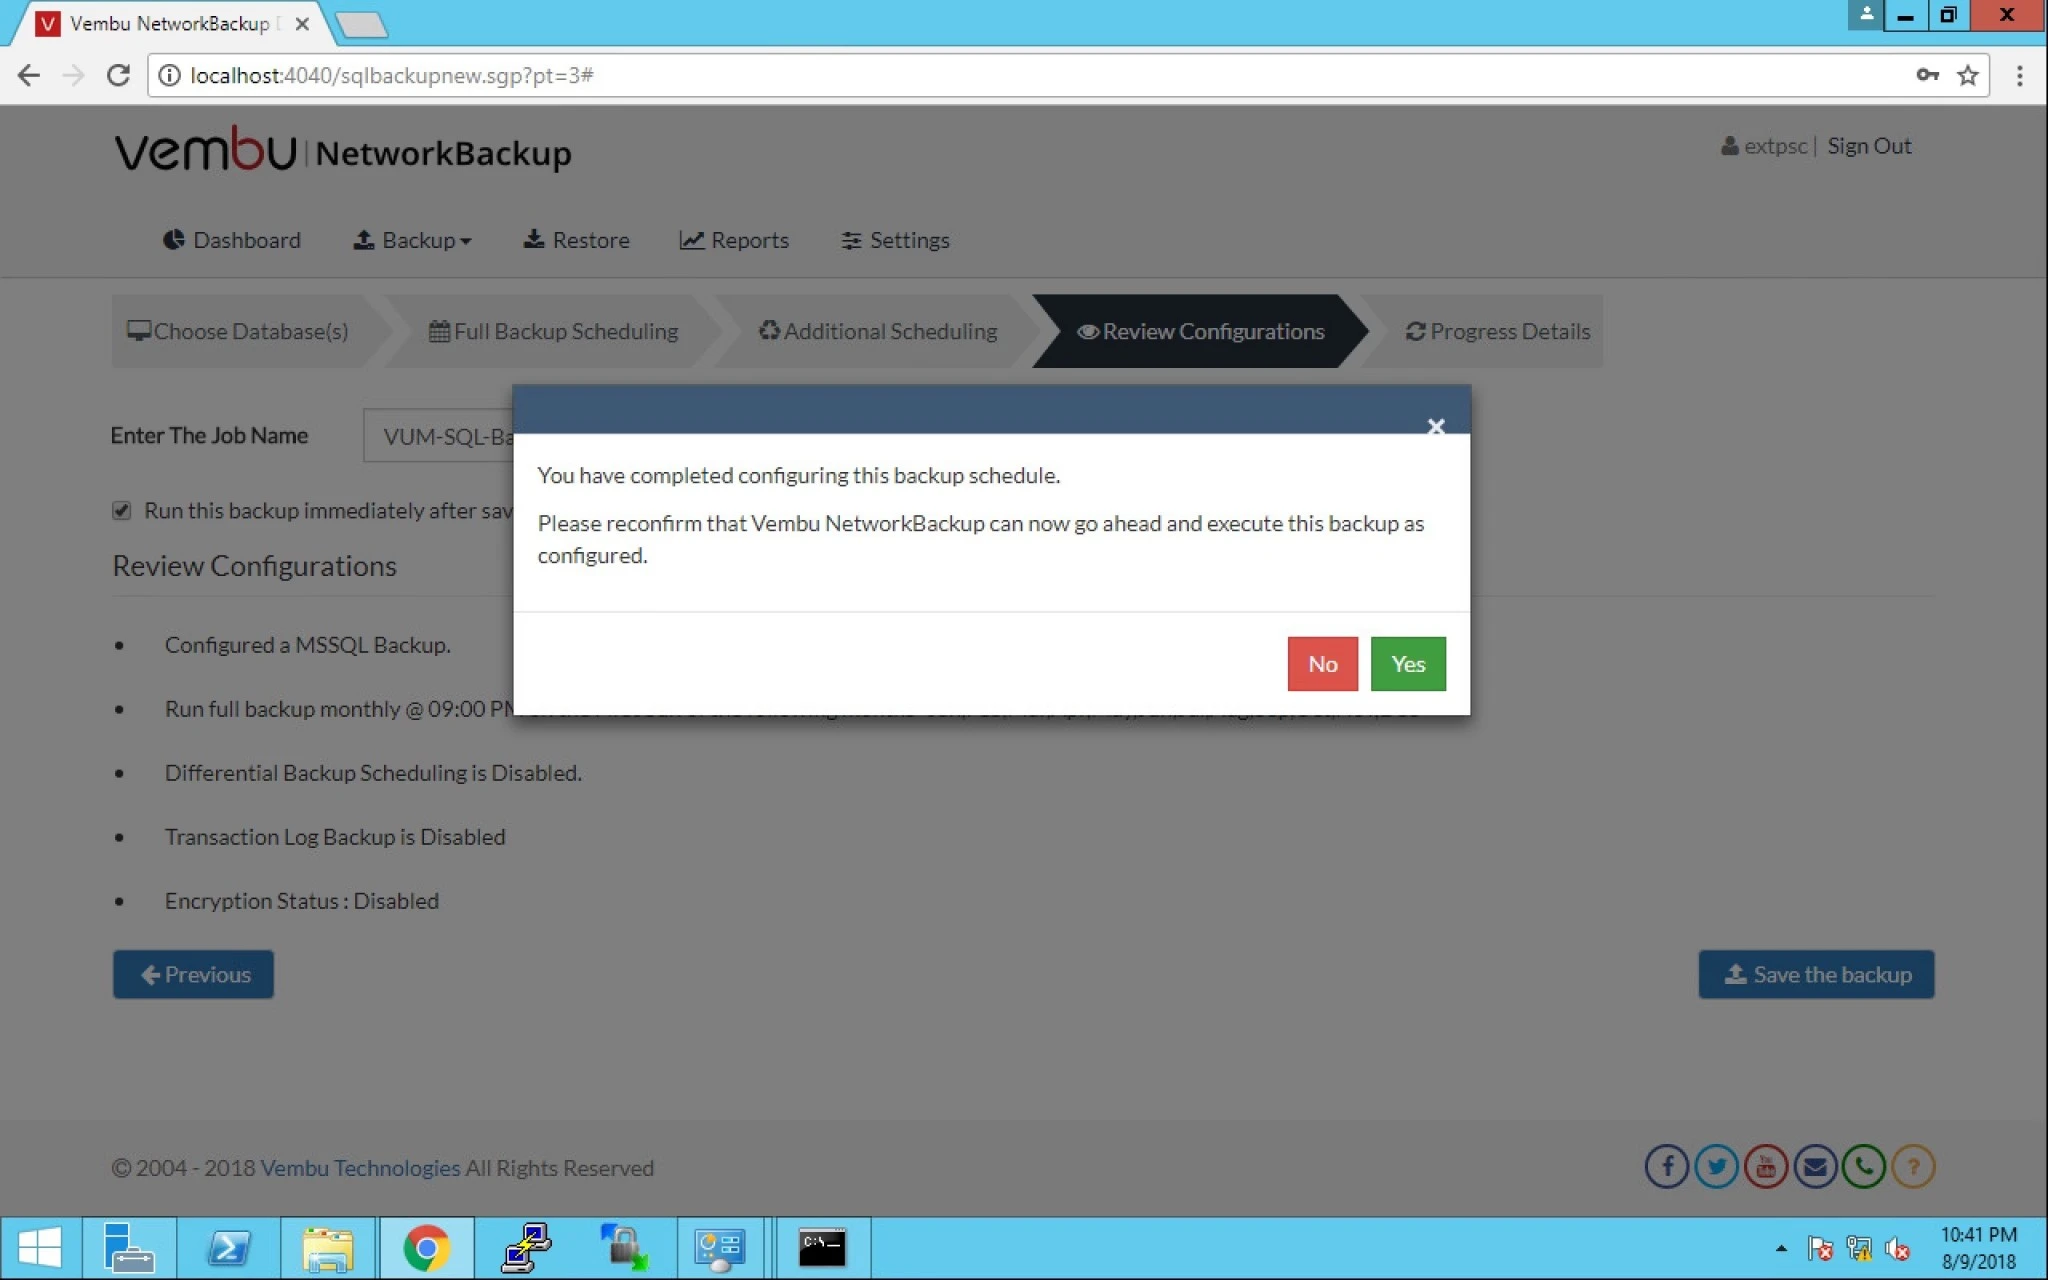
18. It will prompt you to reconfirm to go ahead and execute the backup configured.


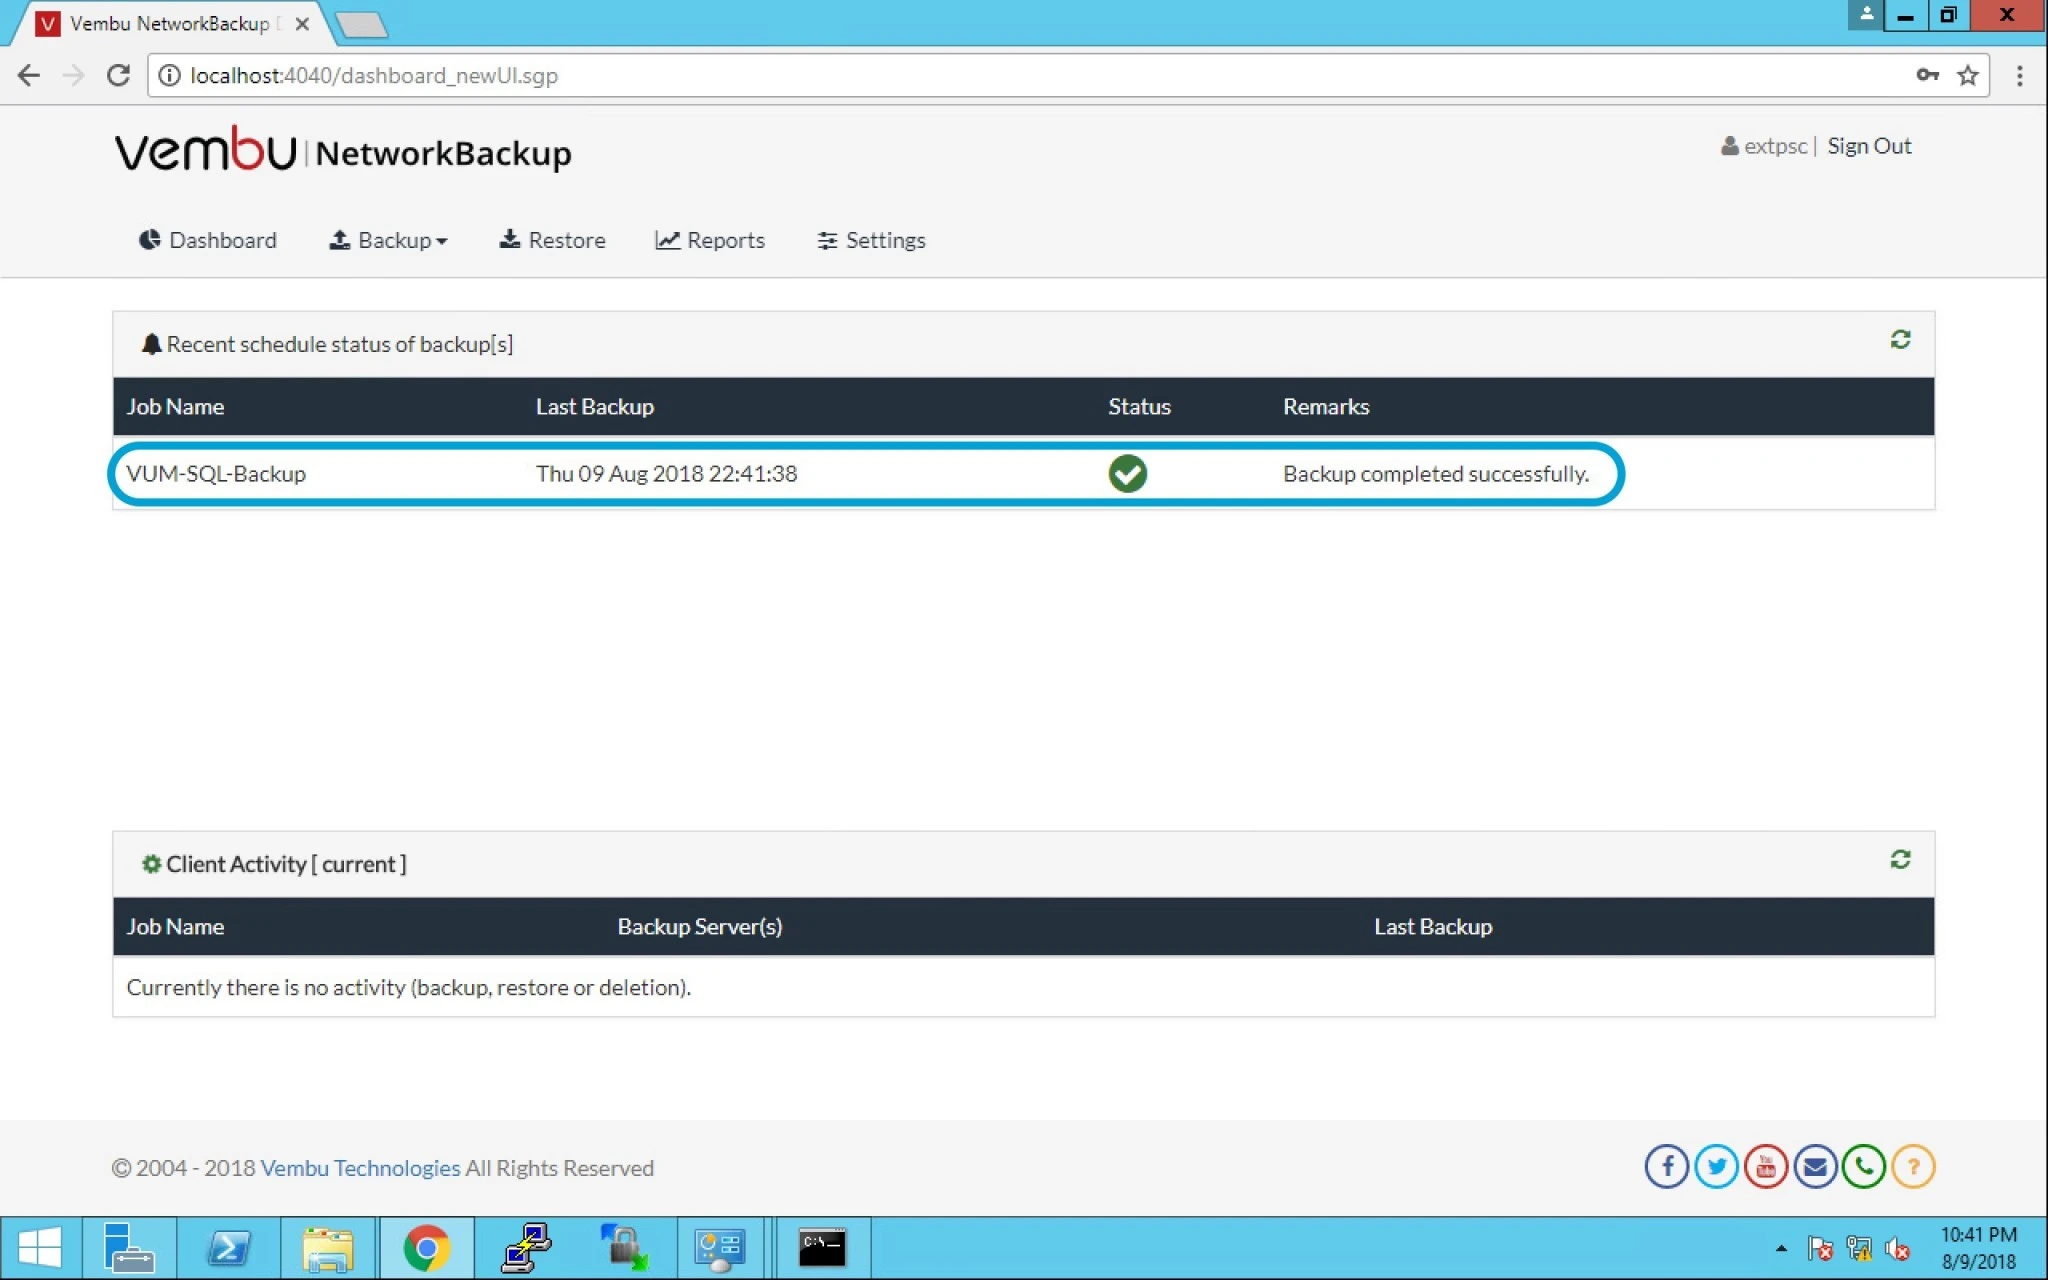
19. You can check the status under dashboard option for the backup executed successfully.


0

Vembu BDR Disaster Recovery Option

Topic Outline:

Disaster Recovery

Restore Options

Restore Time

Restore Report


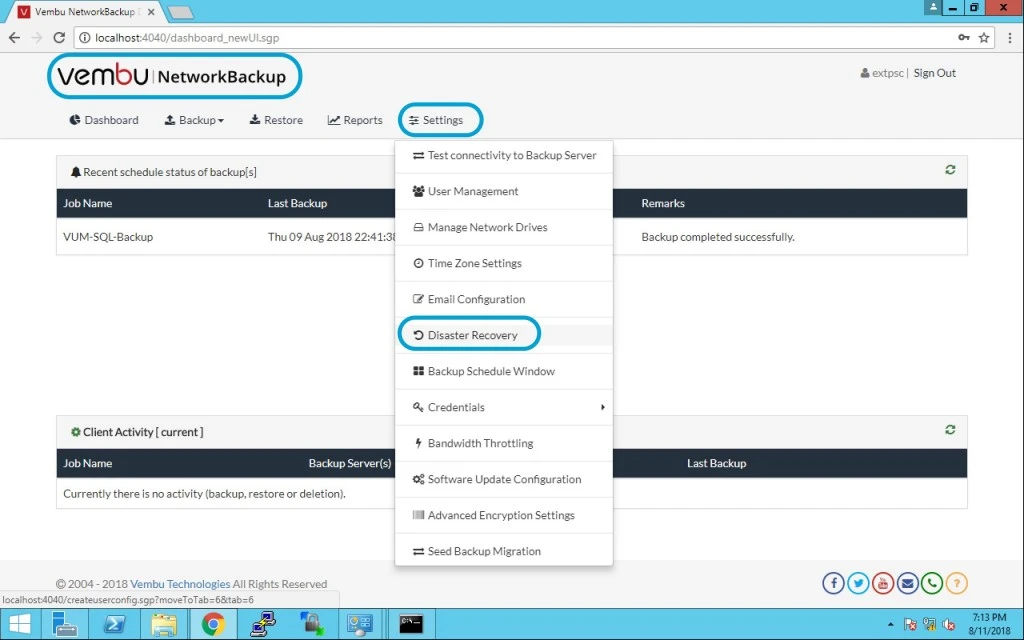
When there is a requirement for a client machine to reinstall a fresh Vembu NetworkBackup, in a case you loose all the configured backup jobs. In such a situation the Disaster recovery solutions is a life saving solution and that allows you to restore client configuration from backup servers.

Lets assume you have a client data which is relocated to another machine where resuming backup jobs will be required.

Note: If the backup job is encrypted or password protected, then the user will be required to provide the secured key or password by editing the backup job before resuming it.


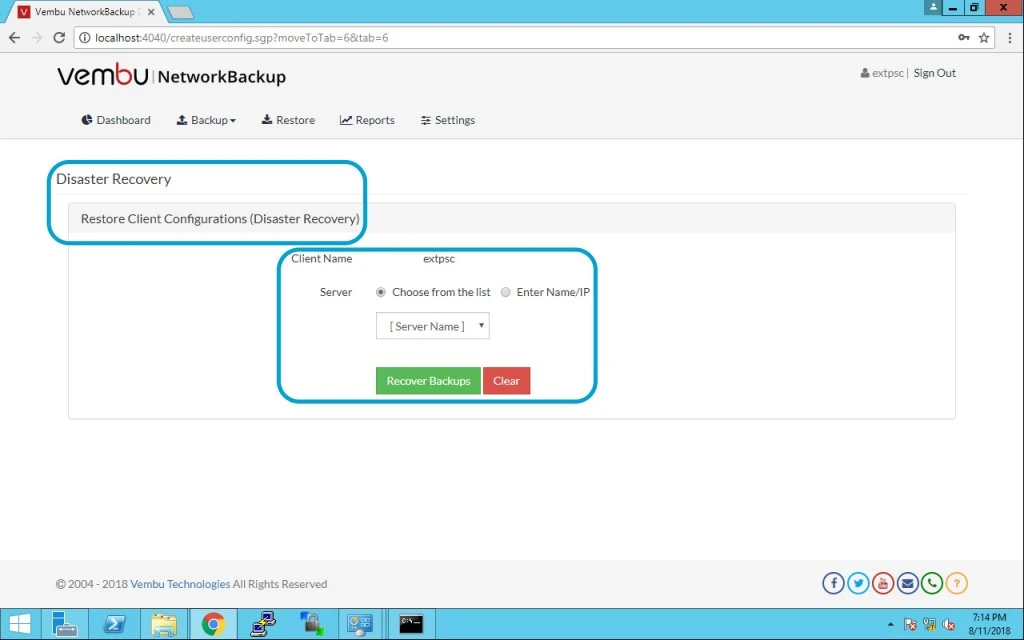
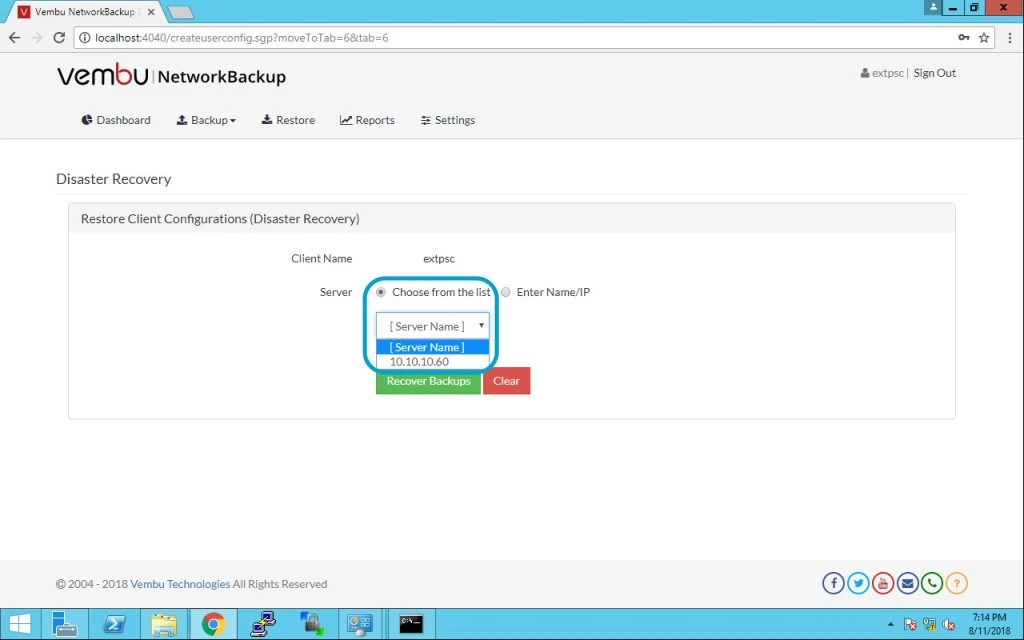
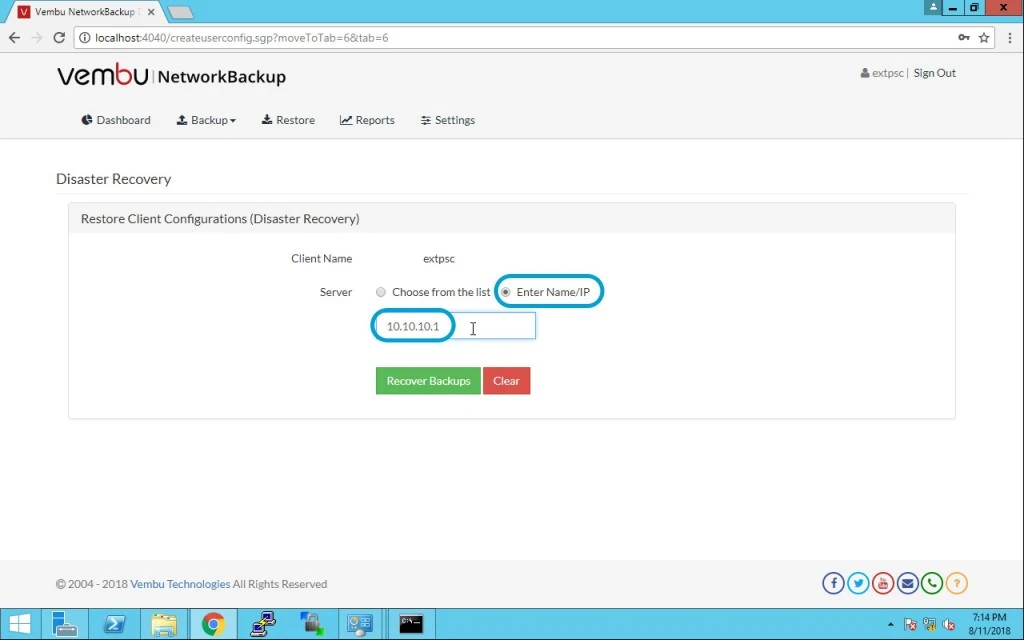
Choose servers

  • User can either choose servers from the list of added servers or provide a server IP


  • Note: Before doing this disaster recovery task it should be well tested and functioning perfectly via test connectivity.


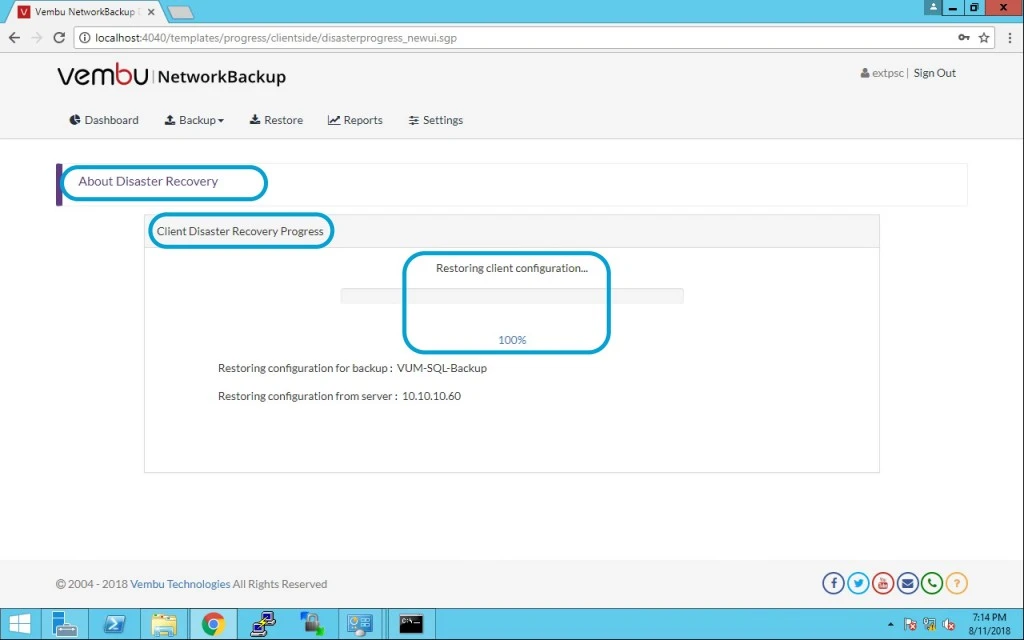
Here you can see the progress and percentage for completion.(Note: In my case this is fast and done in seconds)


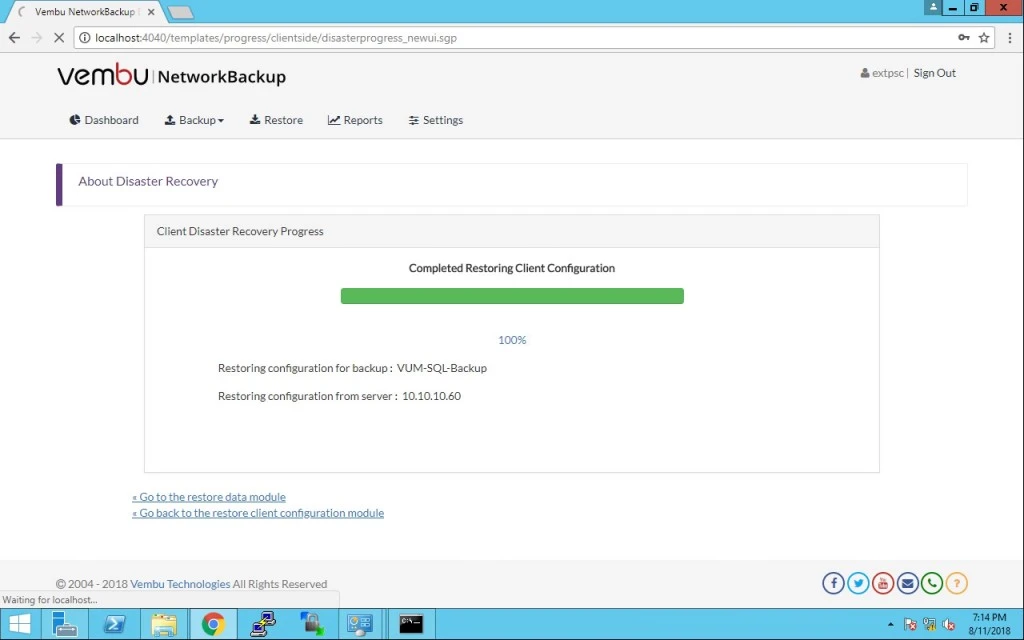
After completion of this restore job you can see below status.


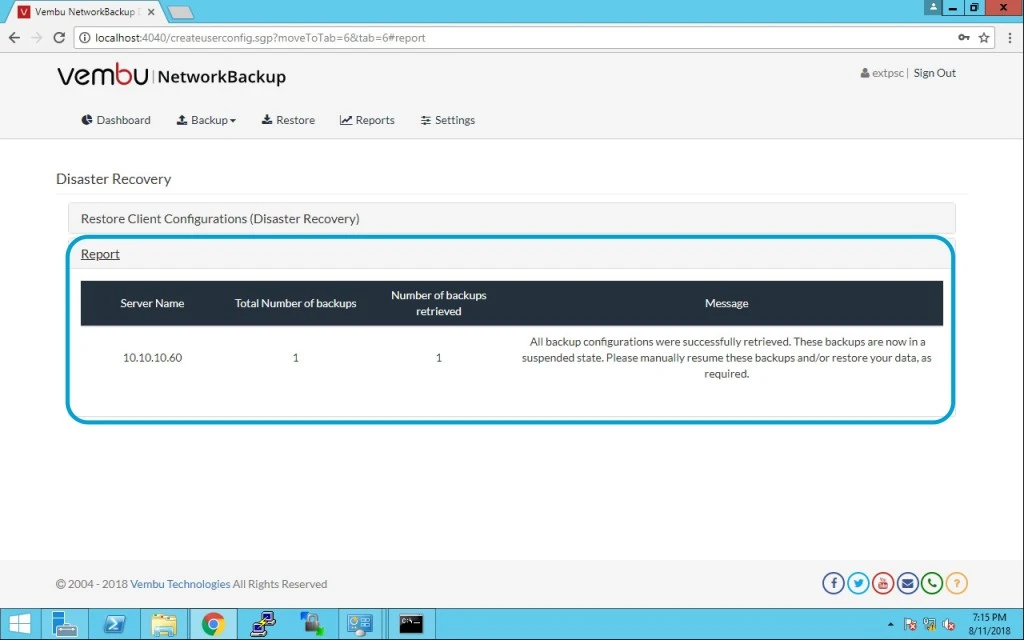
Once restore completes successfully, you will be redirected to reports page with the report for successful restore completion. Here you can see all the reports for disaster recovery.

0

How to failover vm via Vembu BDR

Topic Outline: 

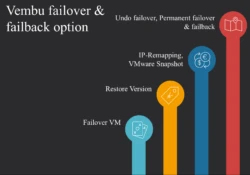
 Failover VM Restore Version vCenter tasksLet suppose you are doing some work on your VM and suddenly it crash, now if you have Vembu BDR protection then you can use Vembu replica failover process which helps you to recover the replicated VMs at target host or other location in case of disaster. Using Vembu VMBackup, your critical VMs can be replicated from one VMware ESXi host to another. So, in case of system crash or software failure, you can instantly failover the VMs to the required recovery point at target host.

Background:

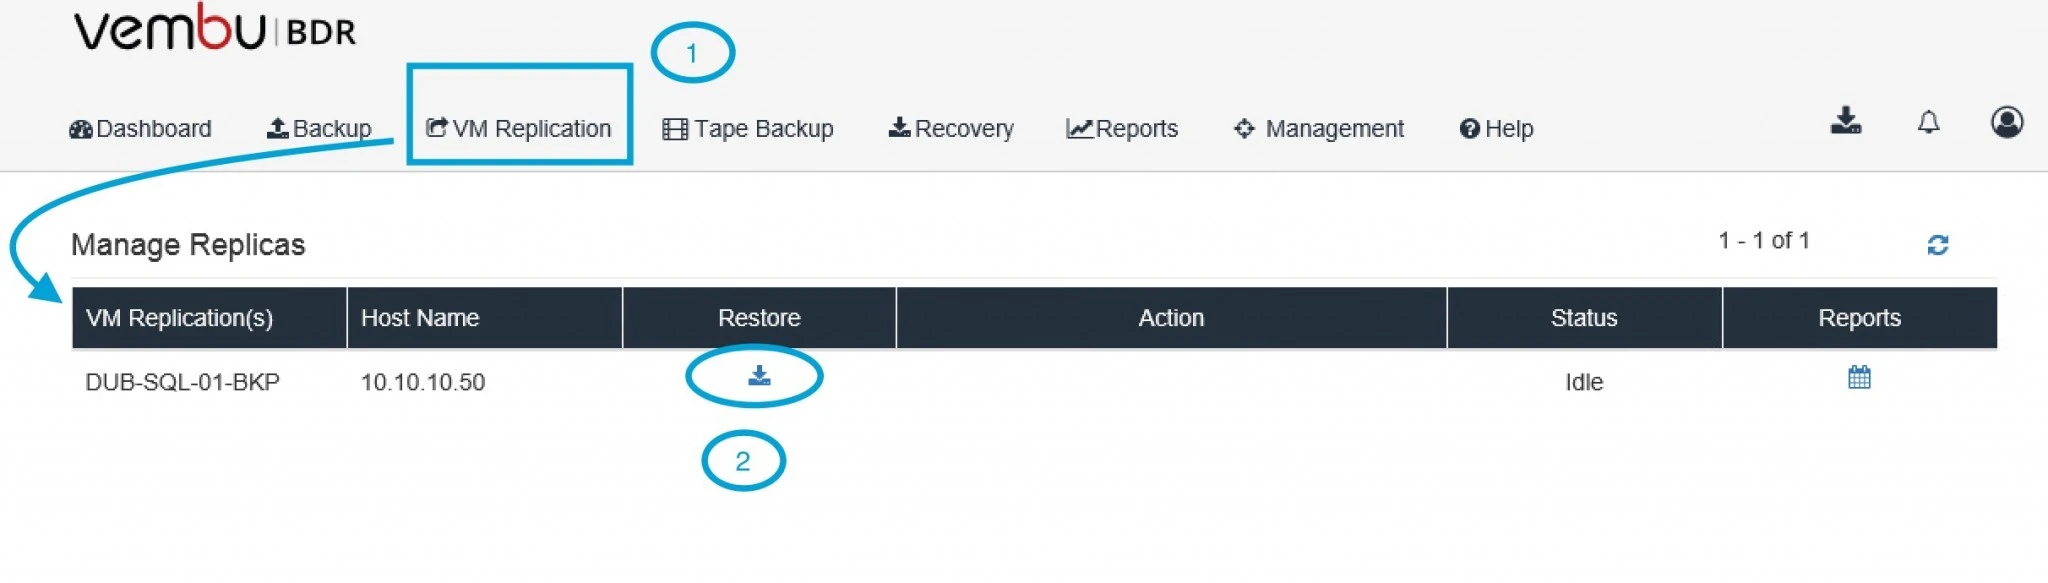
When you will use Vembu BDR failover process in this process it will create a VM and to the replica VMs from the source VM for a while when the source VM is temporarily not available due to corruption or system crash. During that time this VM act as Main or Production VM.If the VM replication is configured with Network and IP-Remapping, the replica VM will run with the configured Network & IP configurations during the failover process. If Network & IP-ReMapping options were not configured during VM replication configuration, then IT admins need to manually assign Network and IP after failover process.Now if you want to recover to a specific point then you can also choose from available recovery points, and it is also possible to failover group of replica VMs which are actually dependant on one another that are available in the configuration.Now it will use VMware snapshot option and data created after failover will be maintained as delta file (vmware temp files) which will be committed/reverted later based on the user choice or requirement.Now Let see how to failover one vm and test the options.First login into Vembu BDR and go to VM Replication option > under that you can see number of VMs now choose one VM or multiple VMs as per your requirement and click on restore option mentioned in point 2.
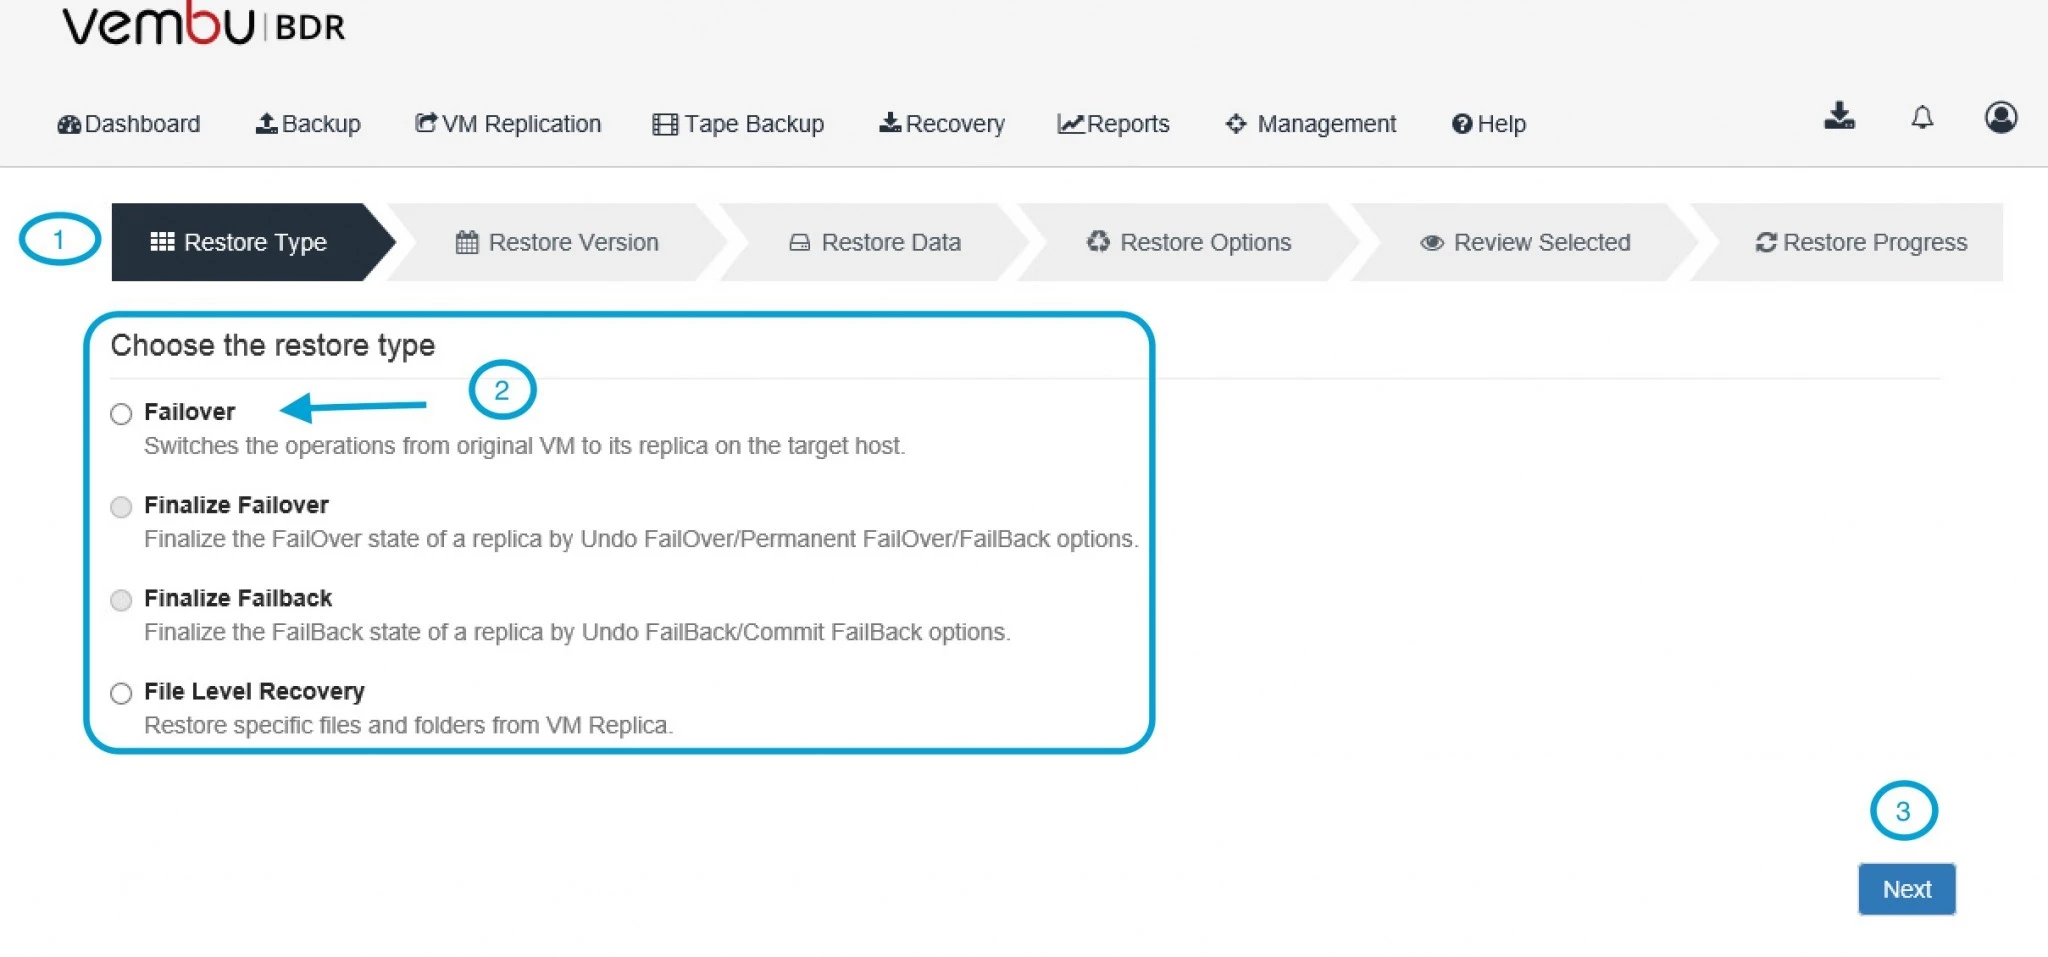
 After that click on Failover option. here only two options are highlighted 1. Failover and 2. File Level Recovery (click here).
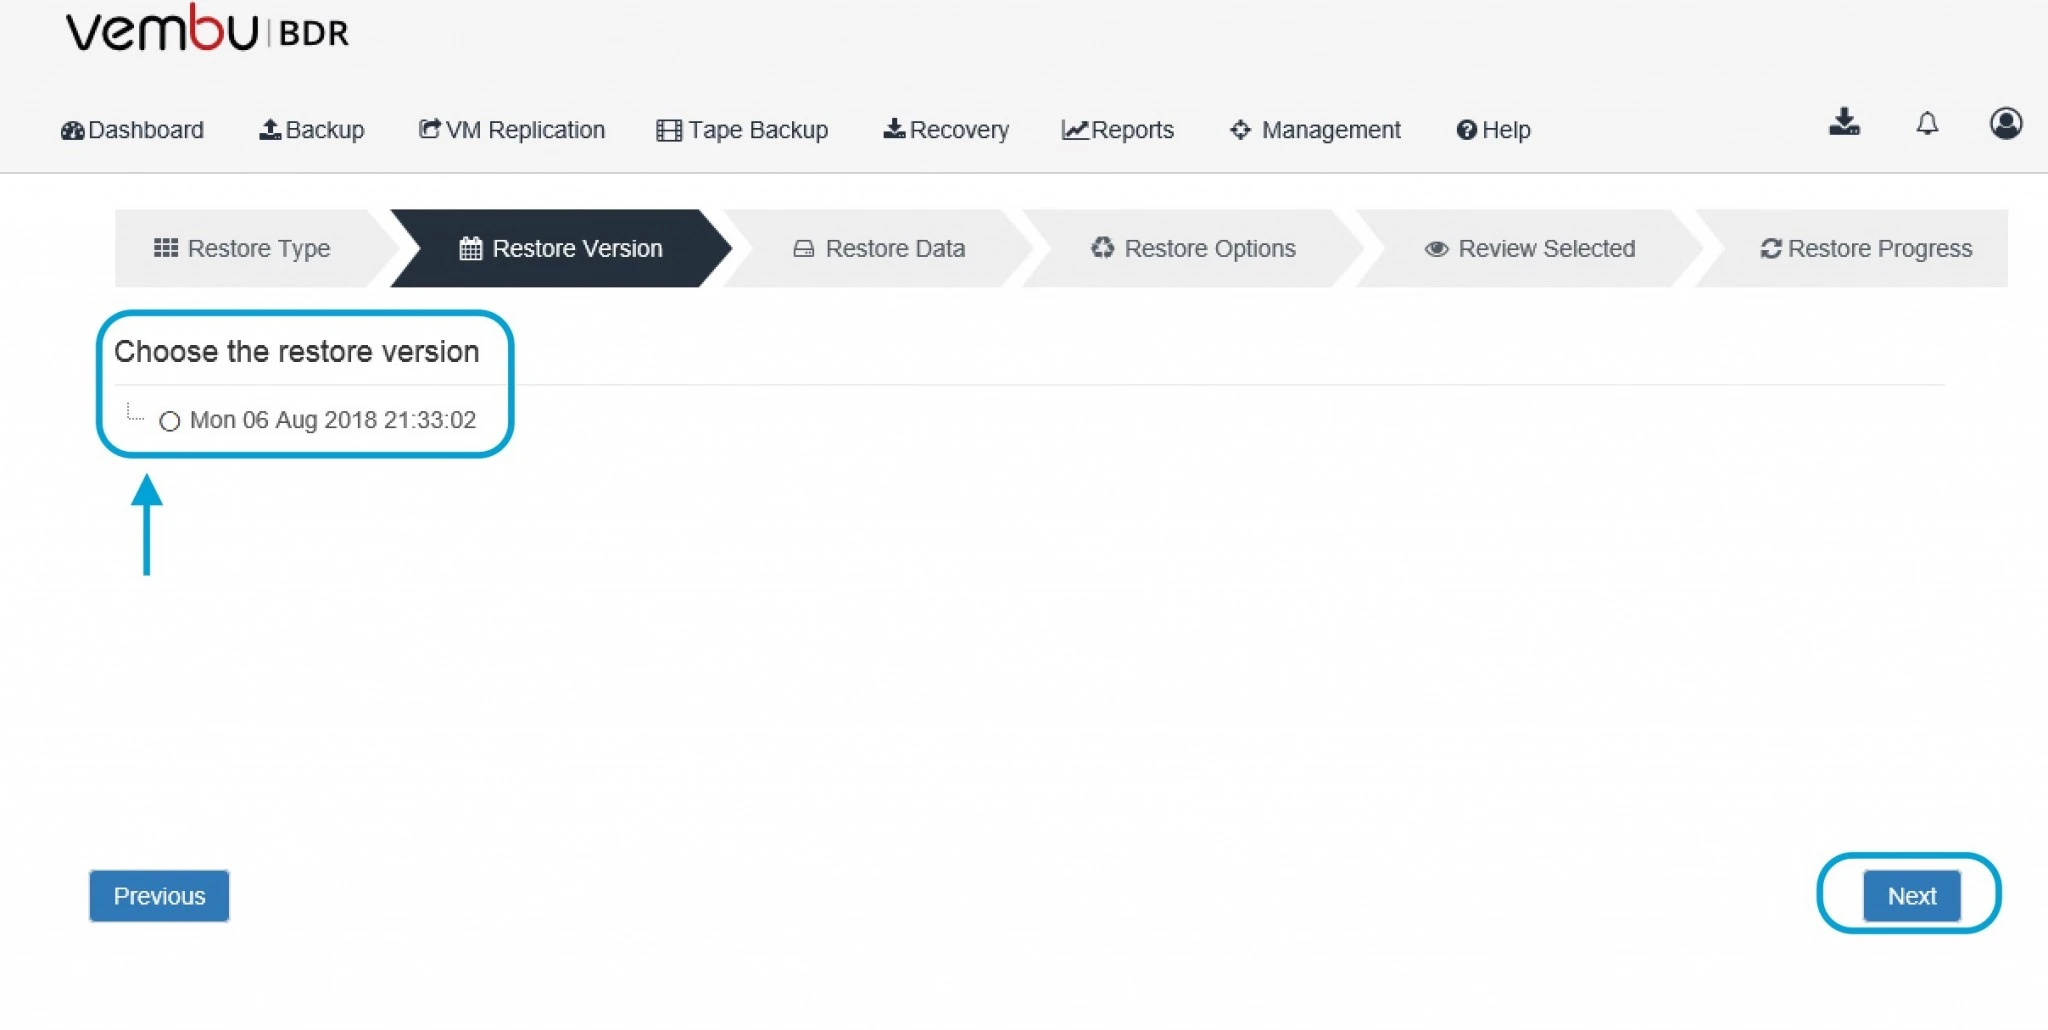
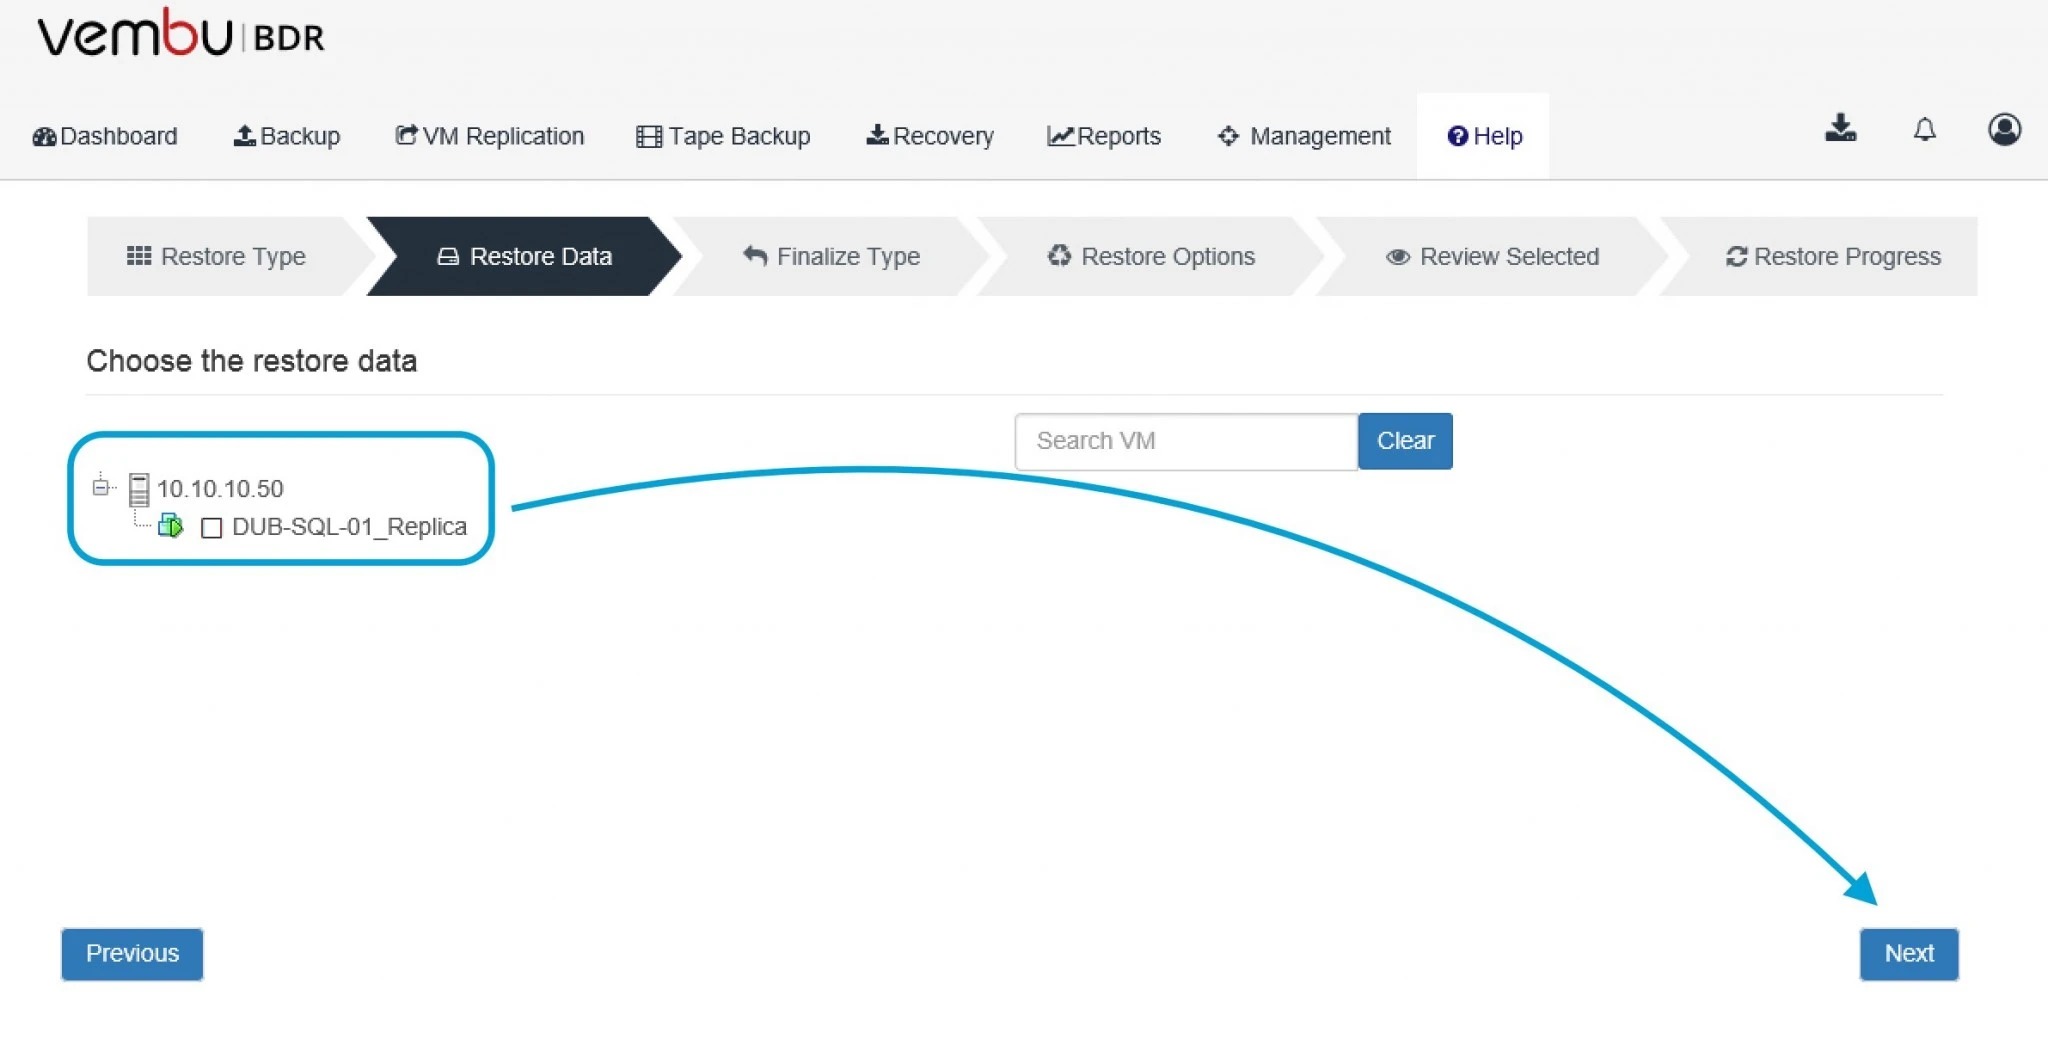
 Now at this point you can select restore version and click next.
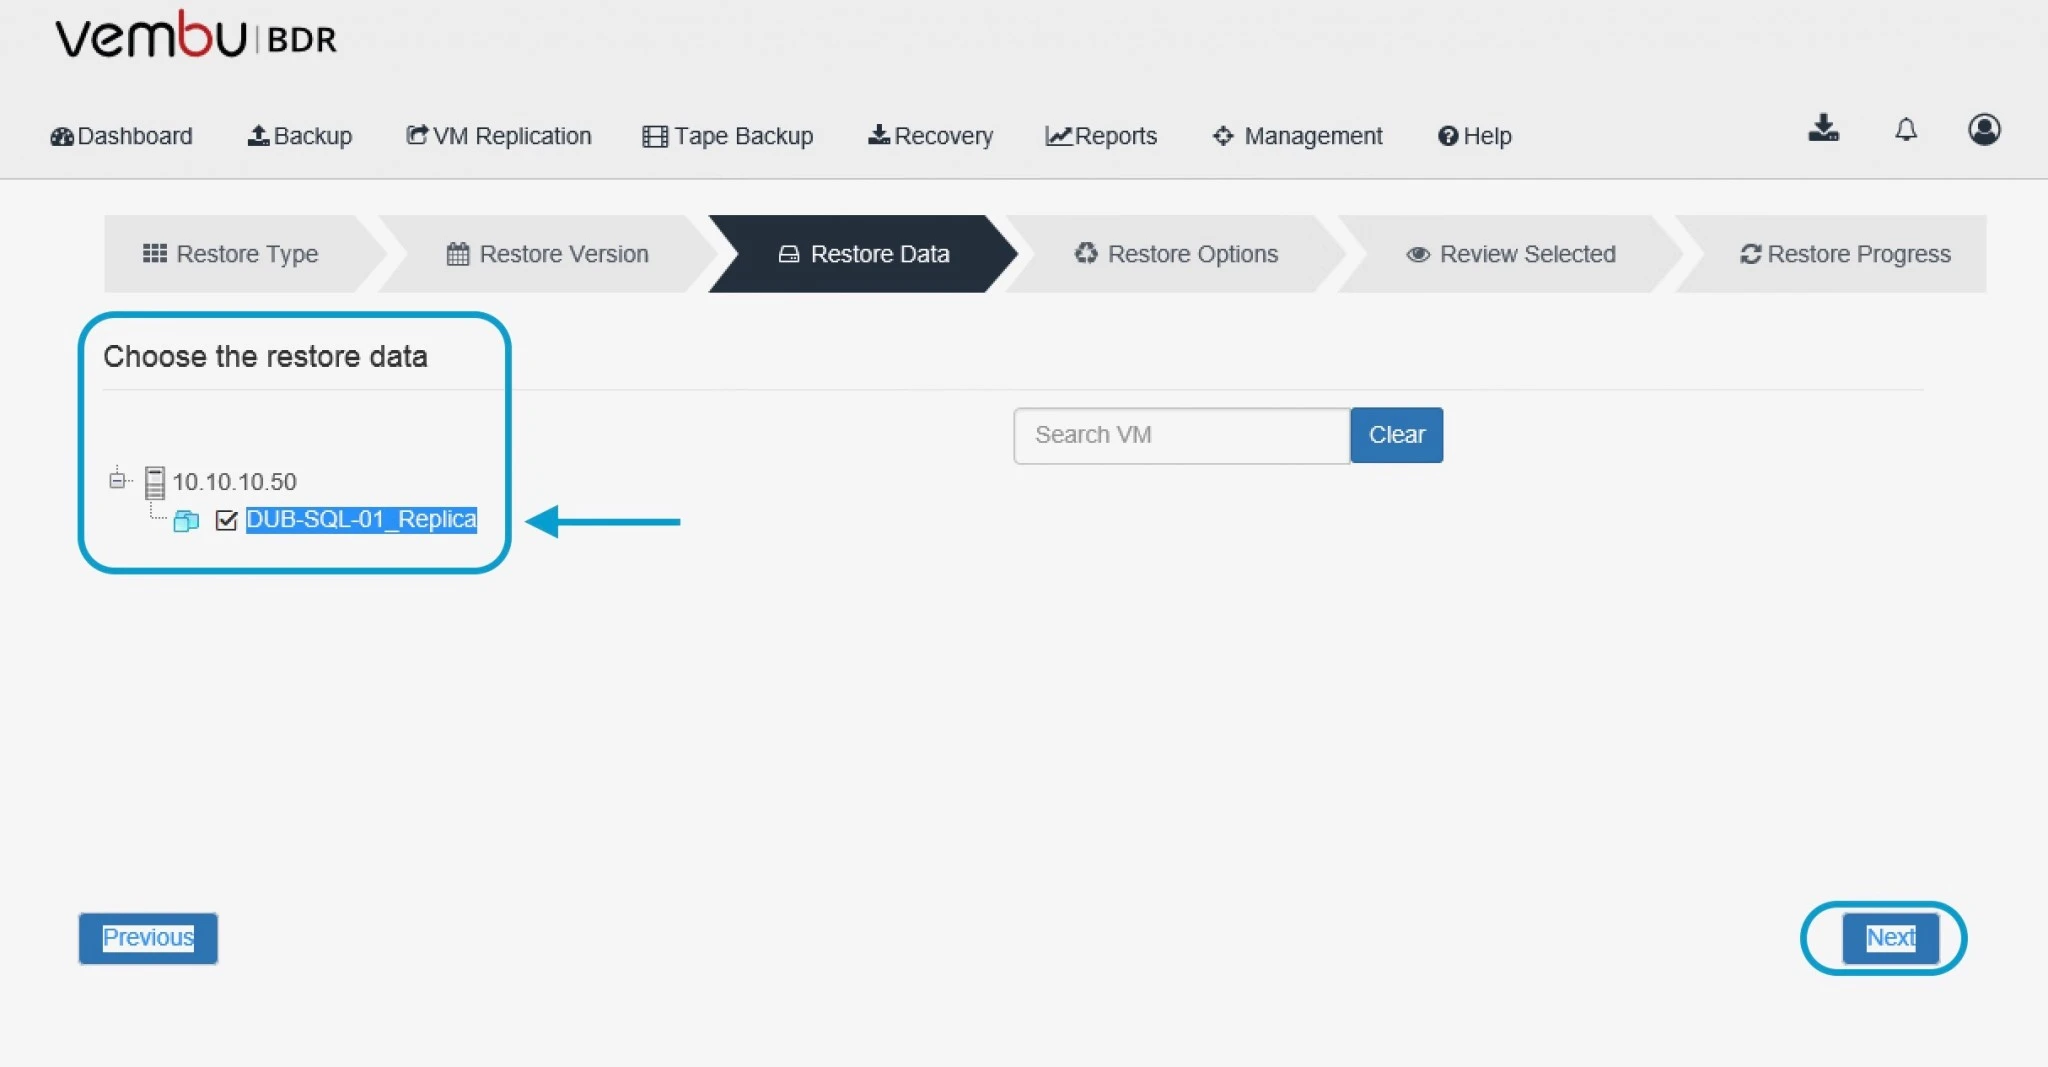
After this choose the restore data and select the VM from the list of replicated VMs and proceed next.
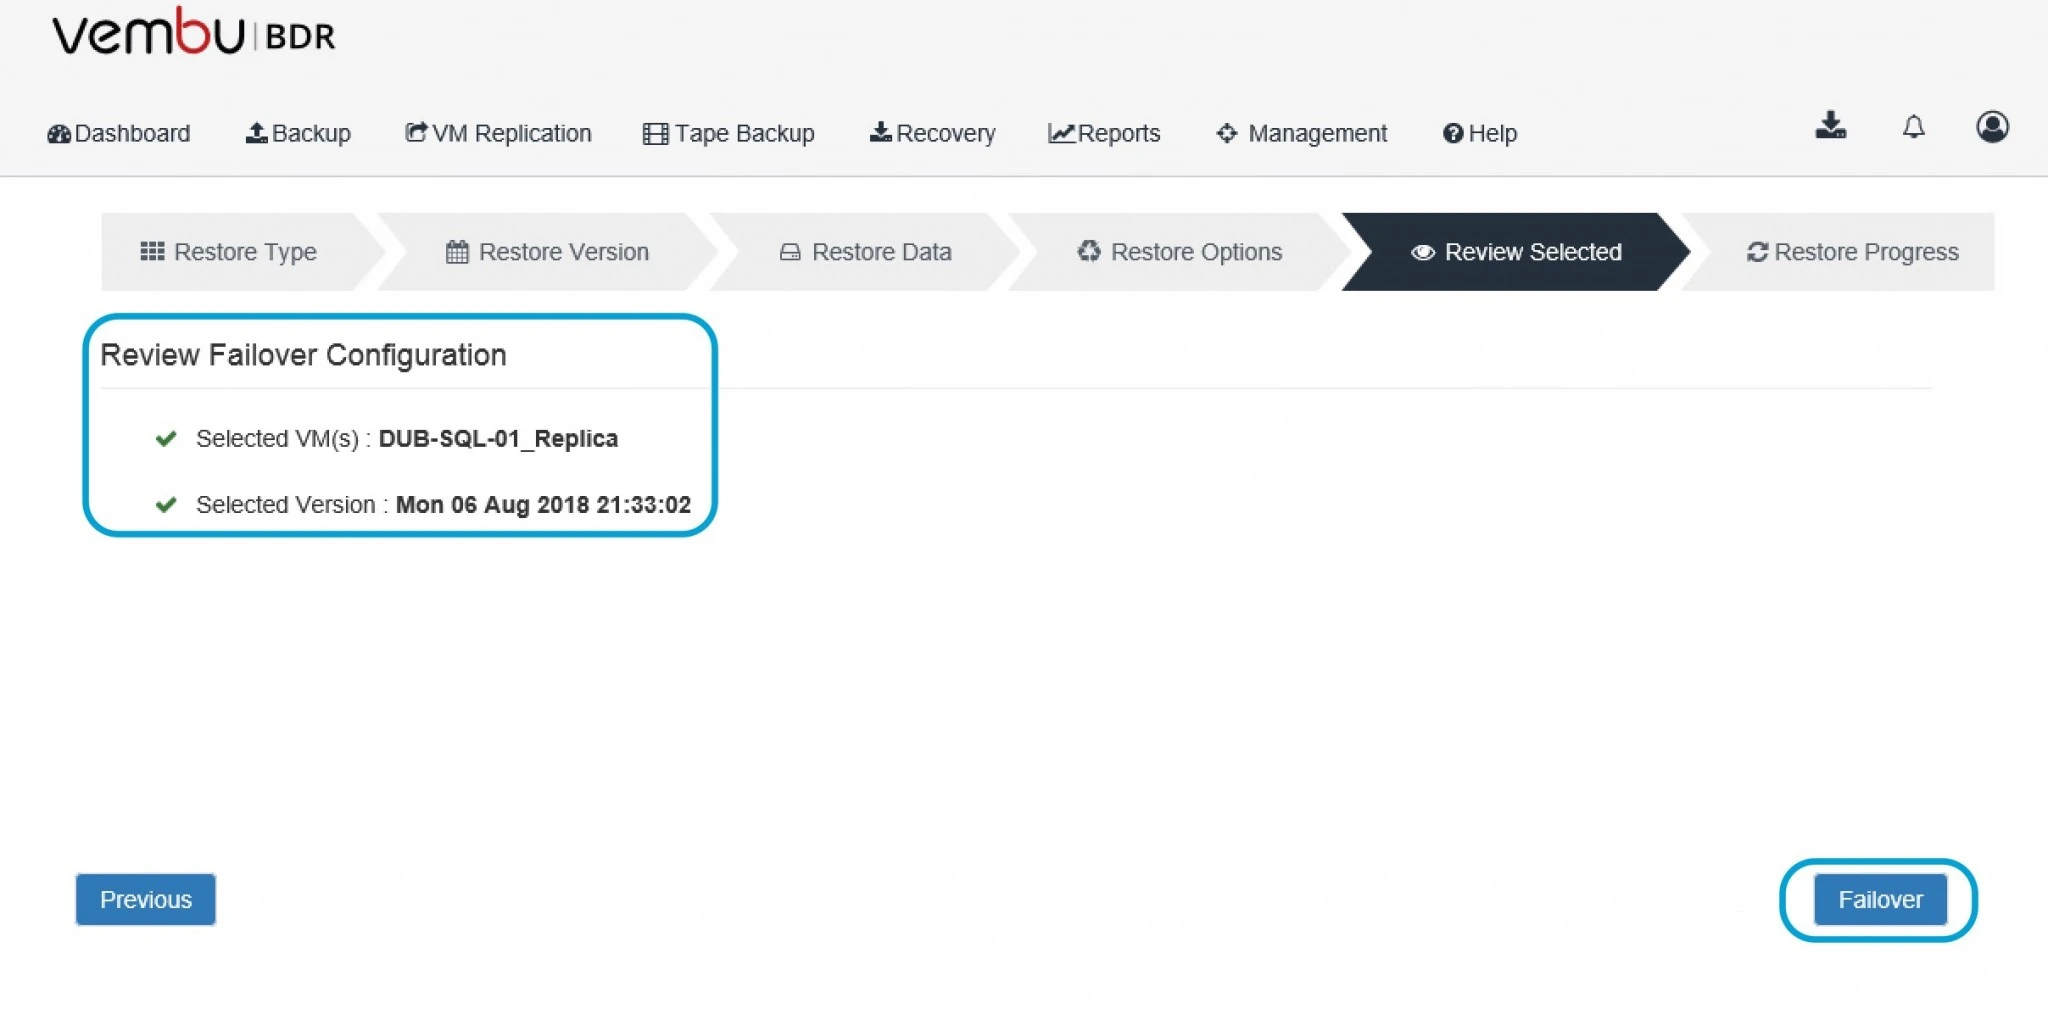
At this point review your Failover configuration settings and click the option Failover
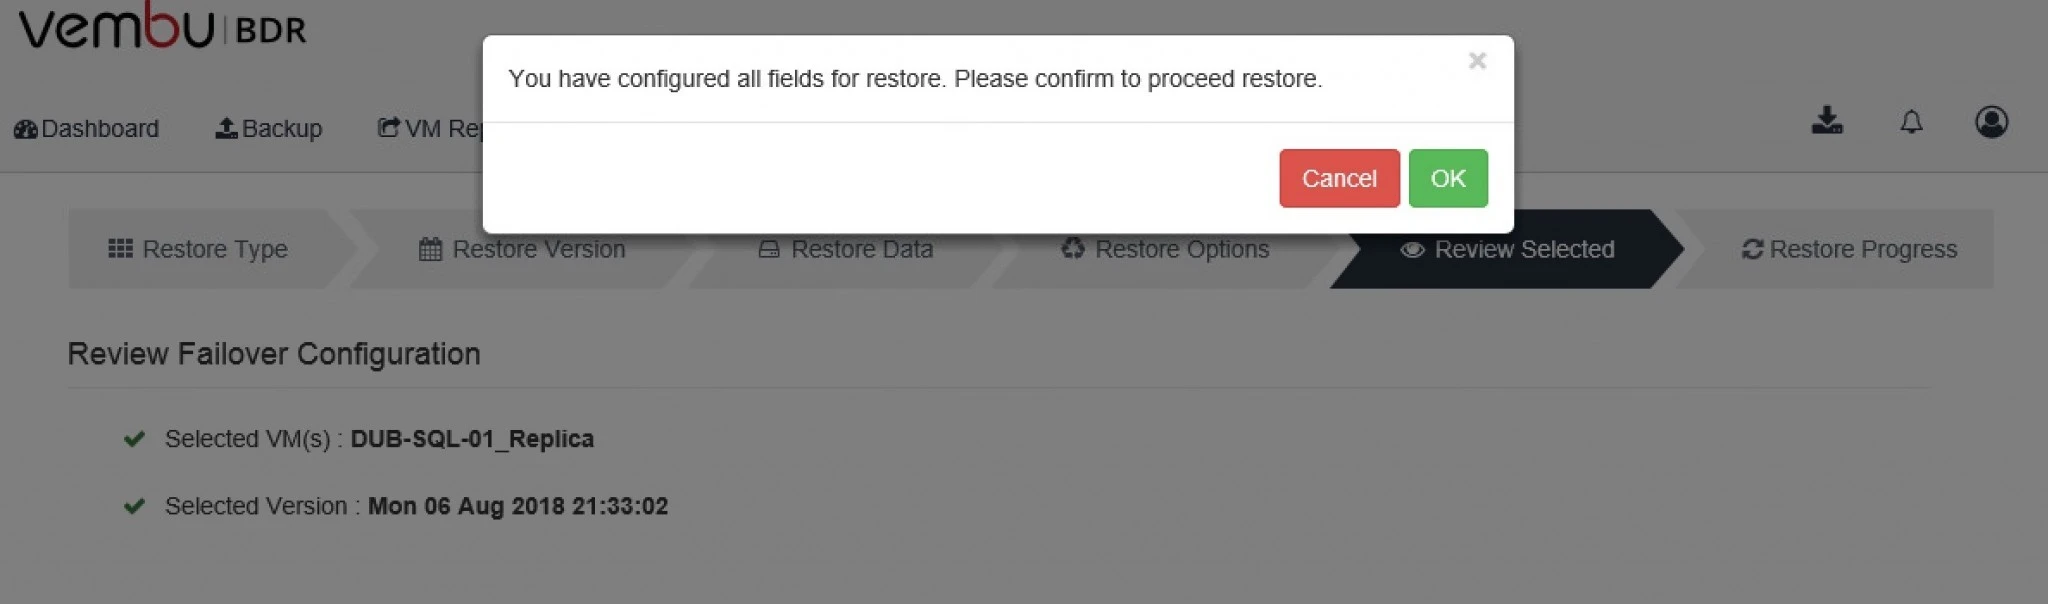
Click ok to proceed further.
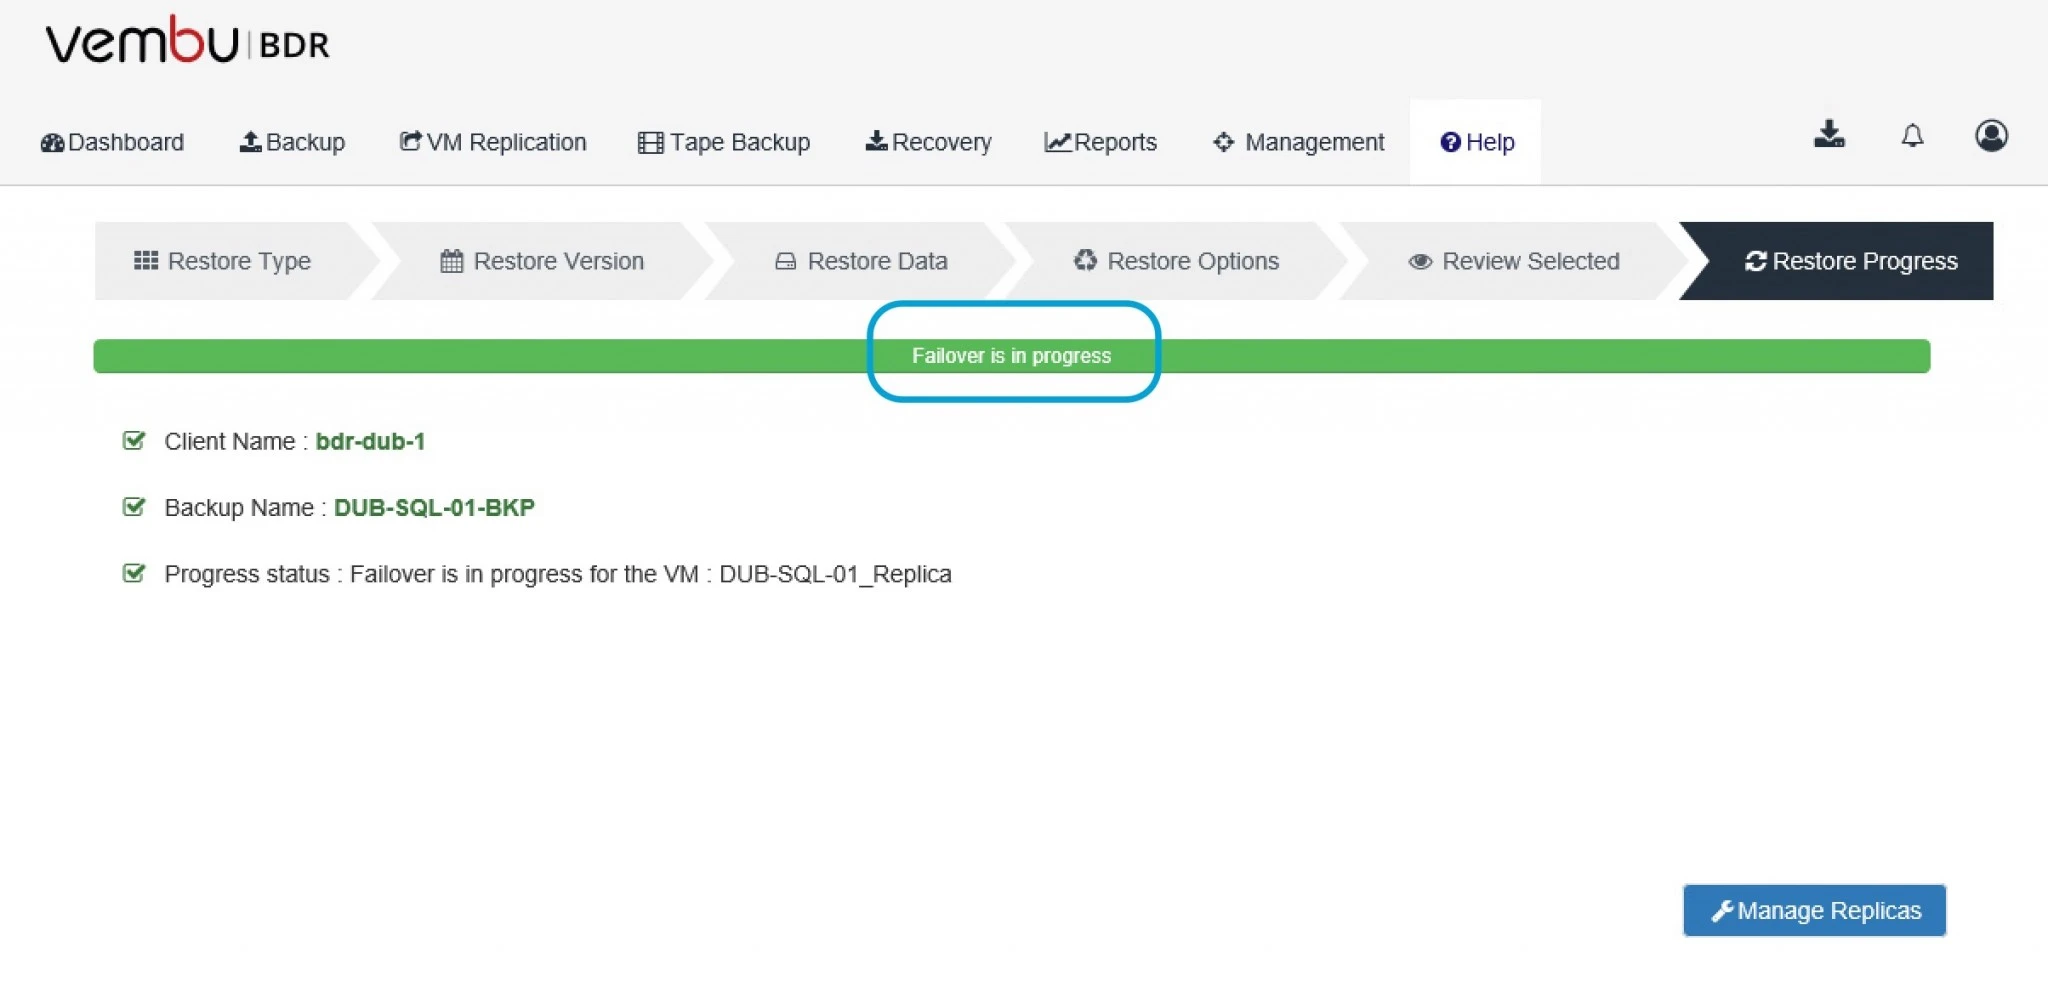
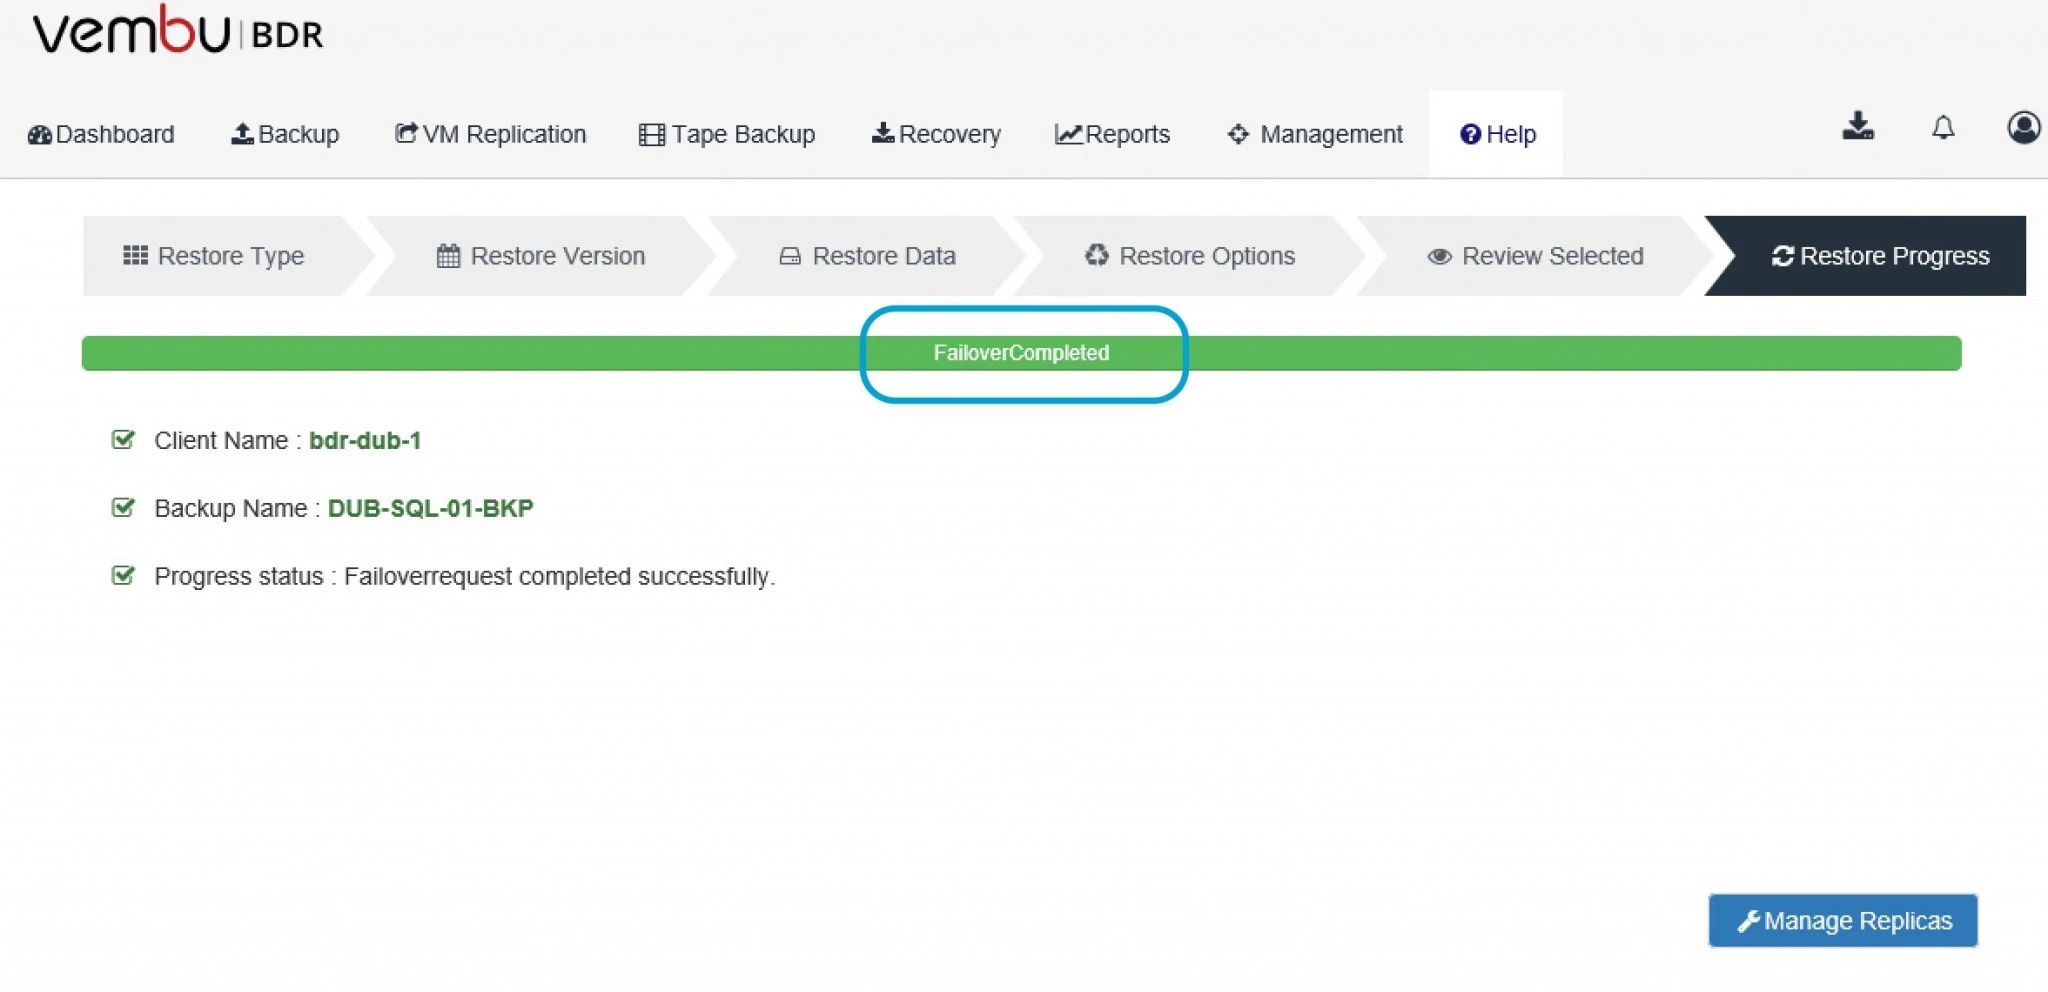
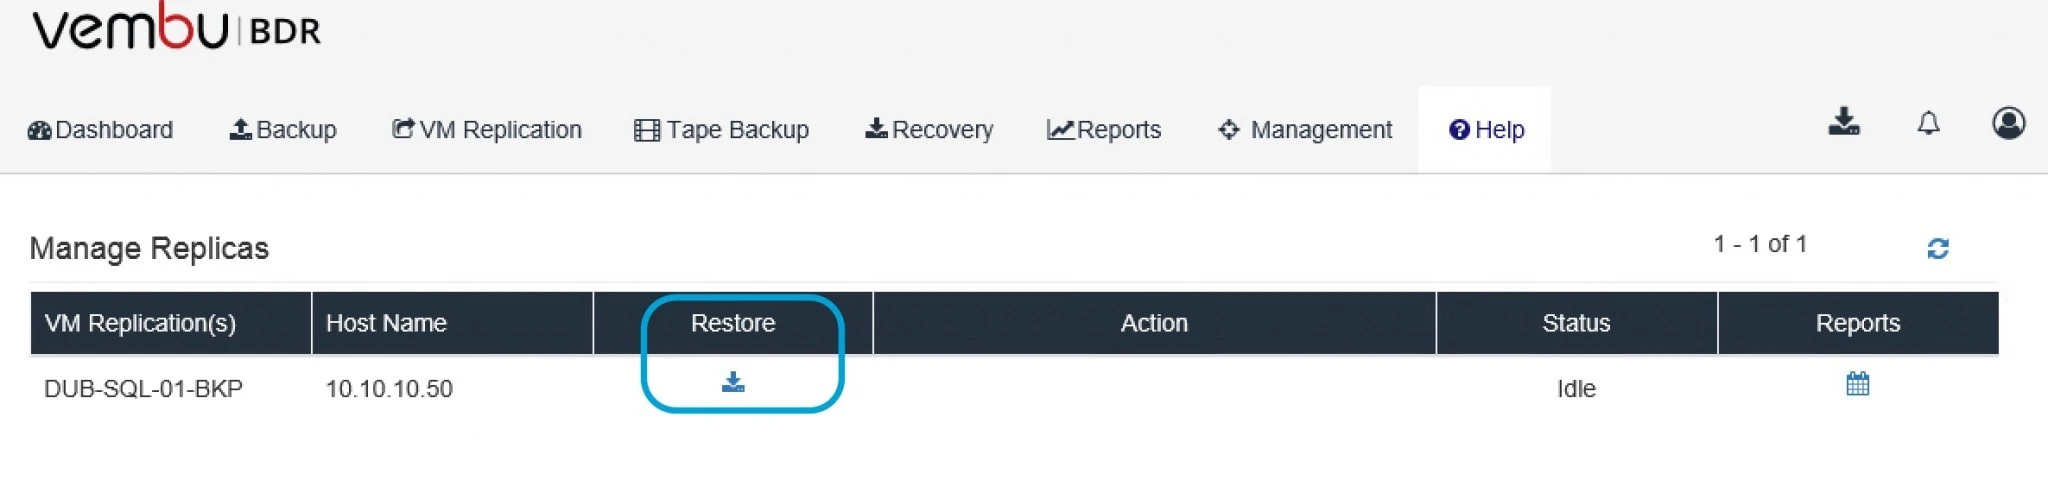
Now, Failover would have progress as you can see in below image. After this click the option Manage Replicas to proceed to next
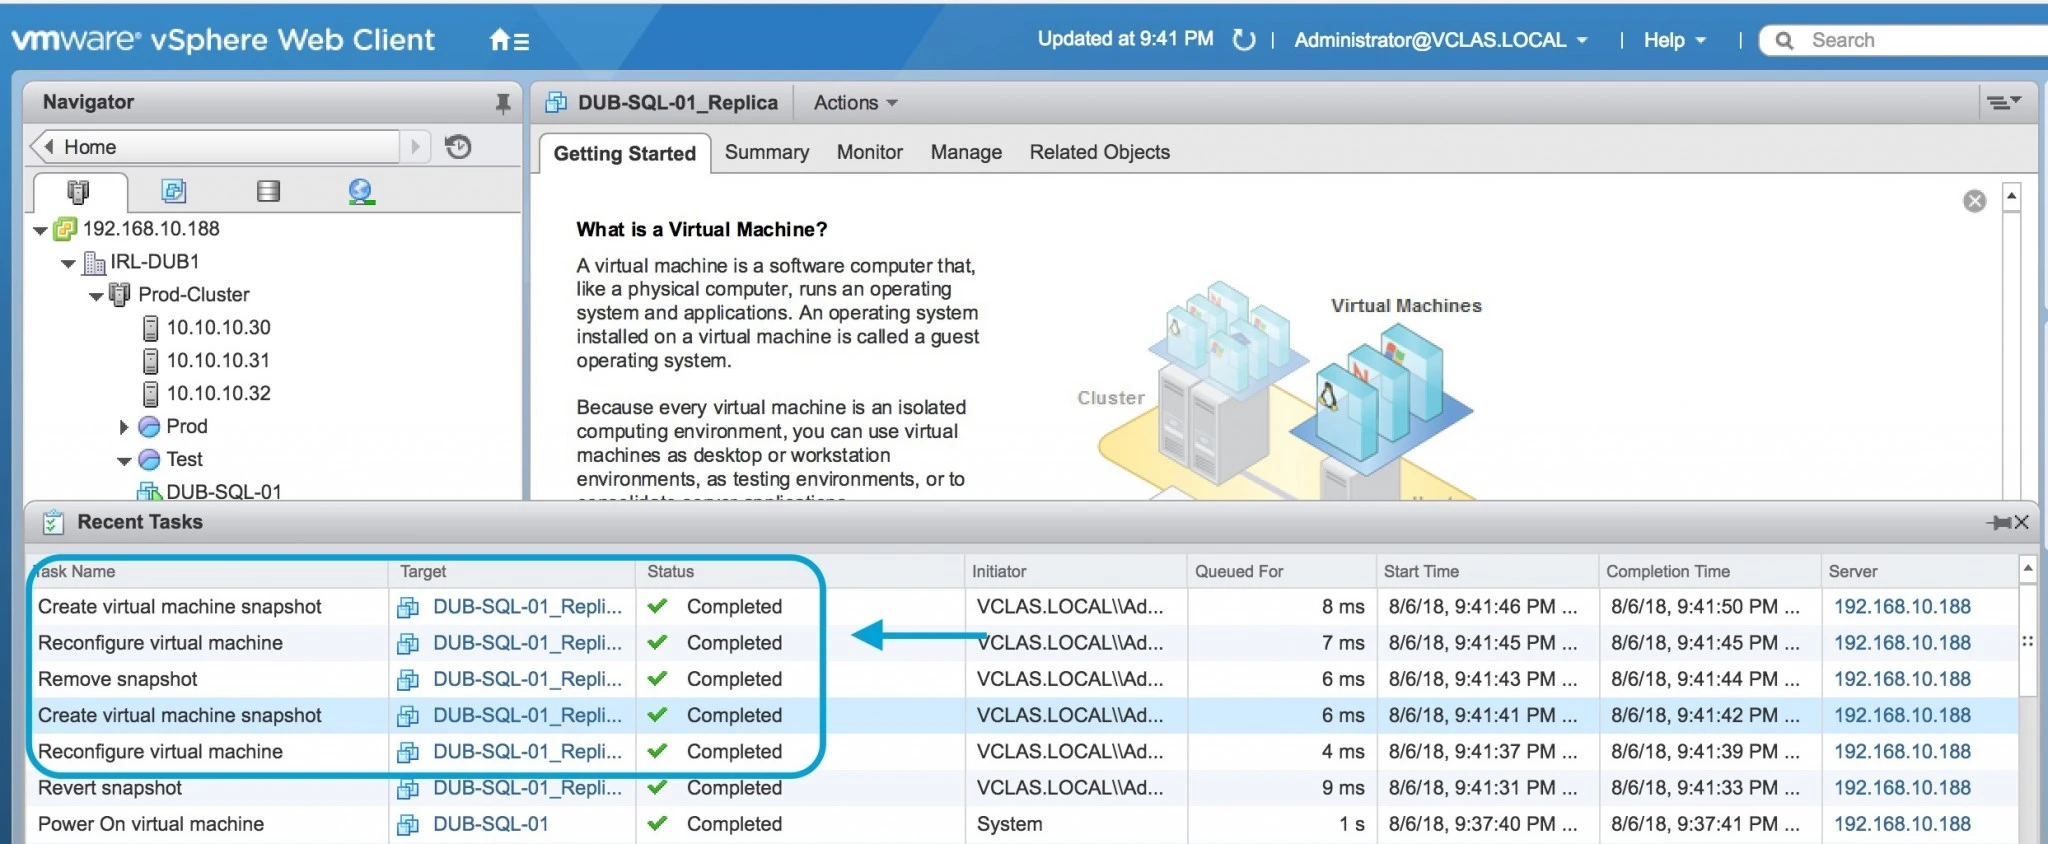
During this progress you can see the task under vCenter server it’s creating VM snapshot and reconfiguring VM.
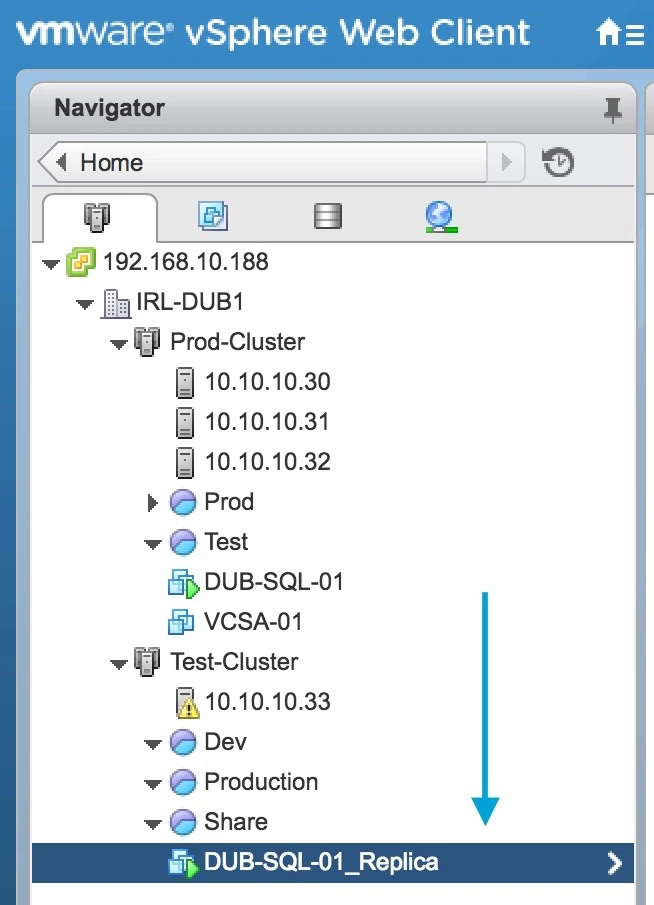
Once Failover process completed you can access your VM and start working.
 
0

How to failback vm via Vembu BDR

Topic Outline:Restore TypeRestore DataFinalize Type vCenter Activity We have already seen the background process or steps for failover a vm.When you will use Vembu BDR failover process in this process it will create a VM and to the replica VMs from the source VM for a while when the source VM is temporarily not available due to corruption or system crash. During that time this VM act as Main or Production VM.Failover is a temporary state that may be further finalized using any of the below processes:
  • Undo Failover
  • Permanent Failover
  • Failback
Lets see these options and meaning.
  1. Go to Vembu BDR login screen under manage replicas click on restore option.
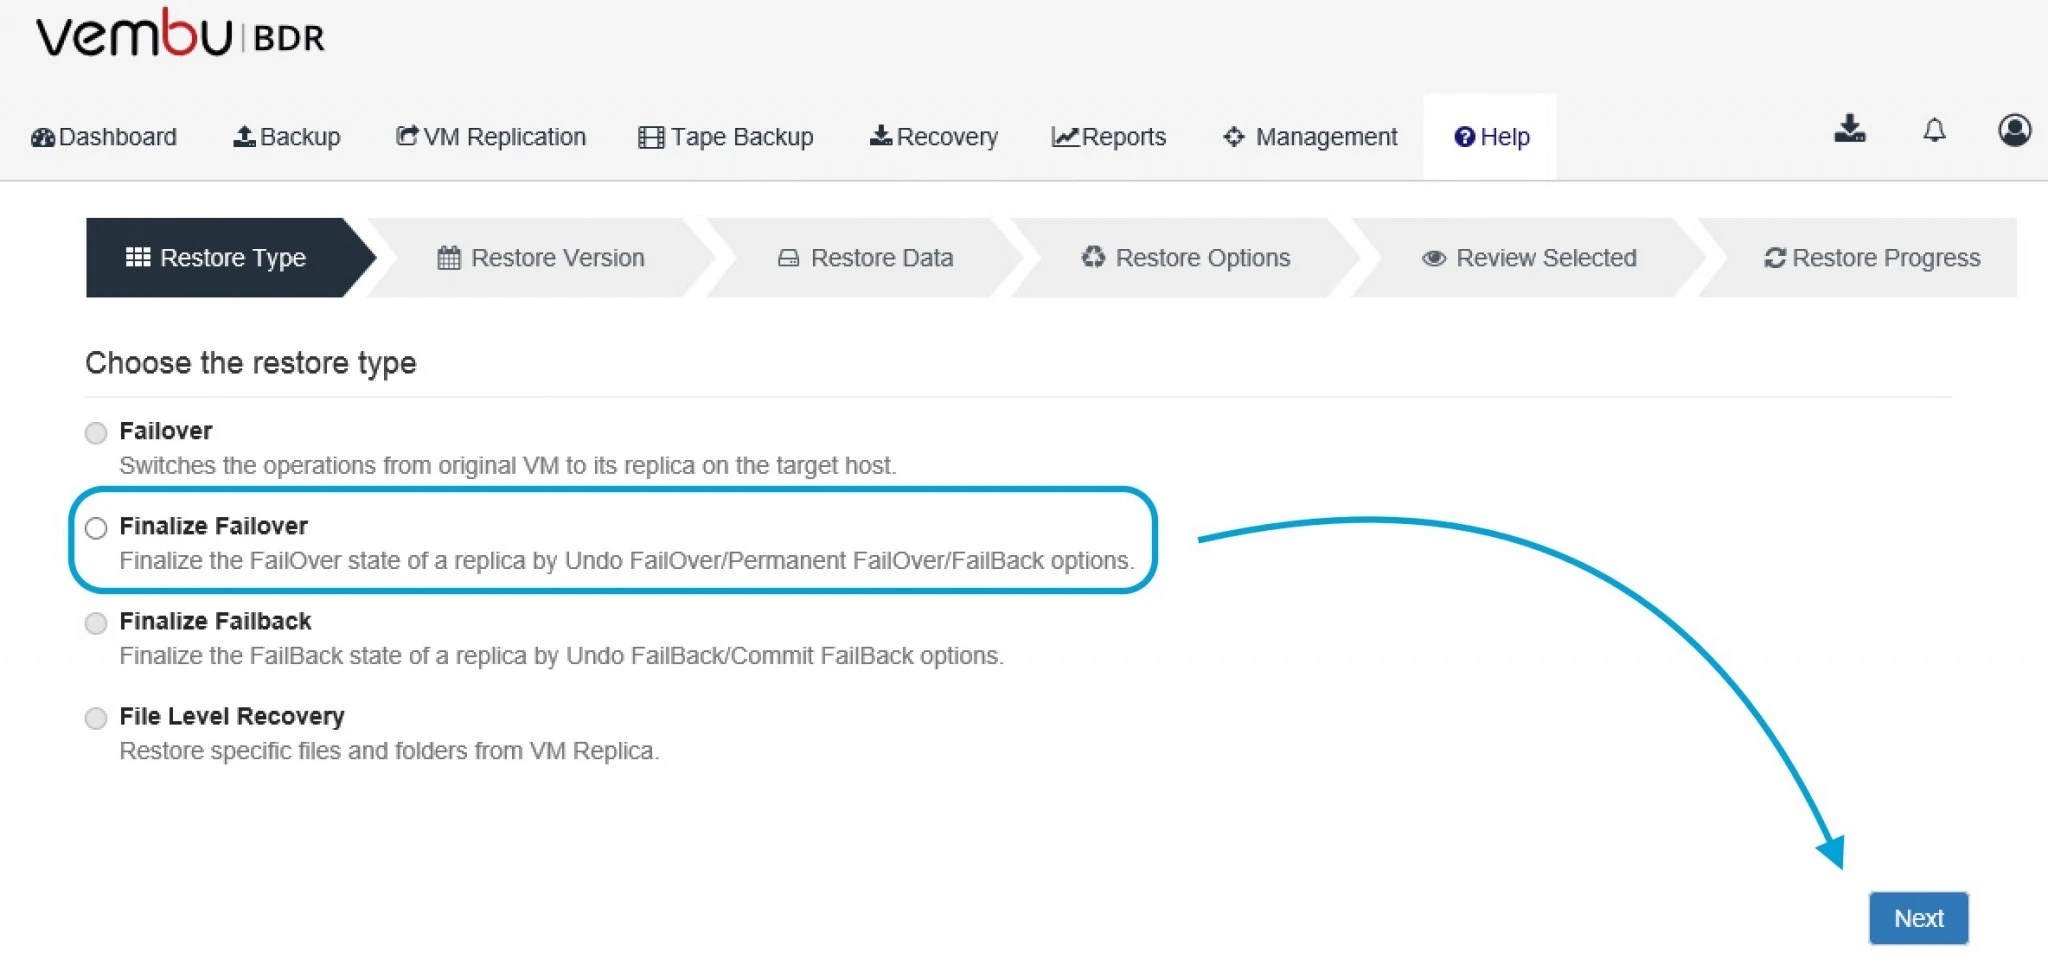
 2. Here you can see all these options but only one is highlighted which is Finalize Failover select and click on next.3. Here select the VM and click next. 4. Failover is a temporary state that may be further finalized using any of the below processes:
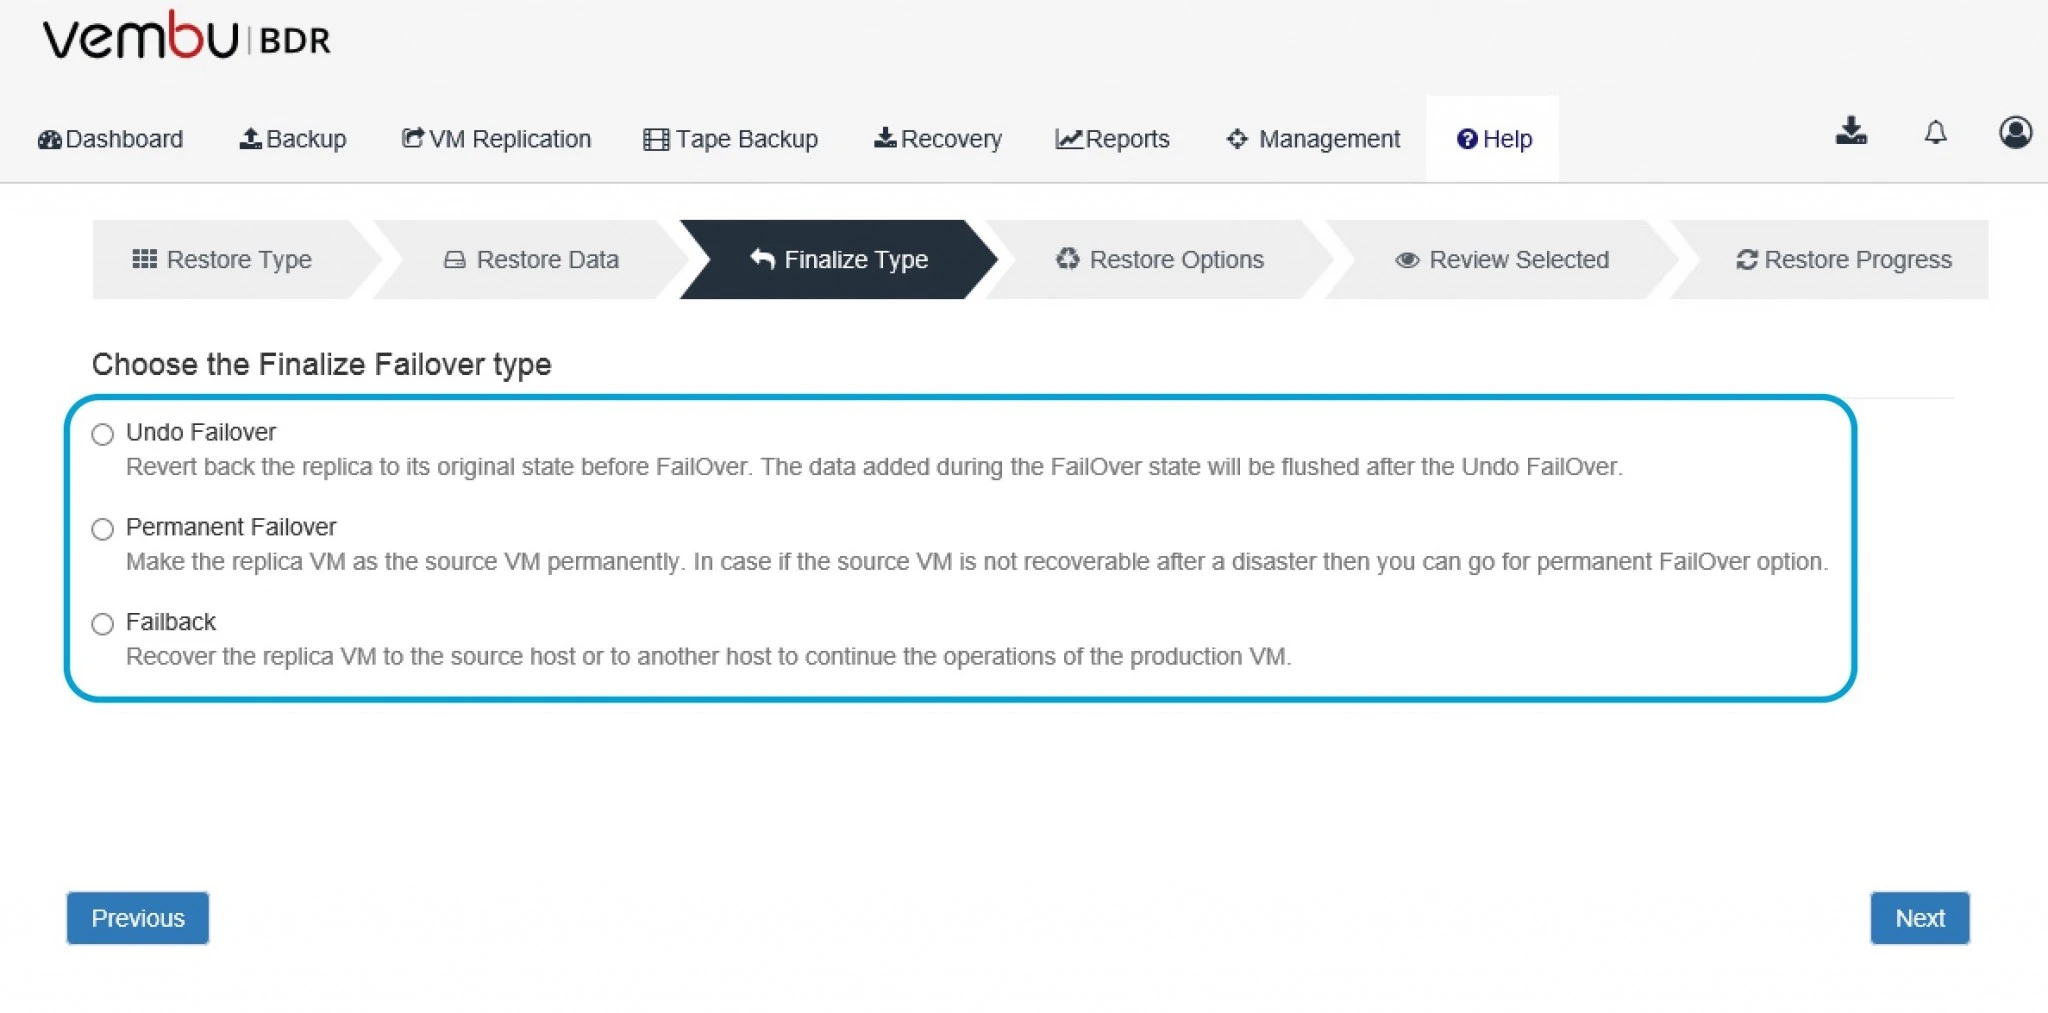
  • Undo Failover
  • Permanent Failover
  • Failback
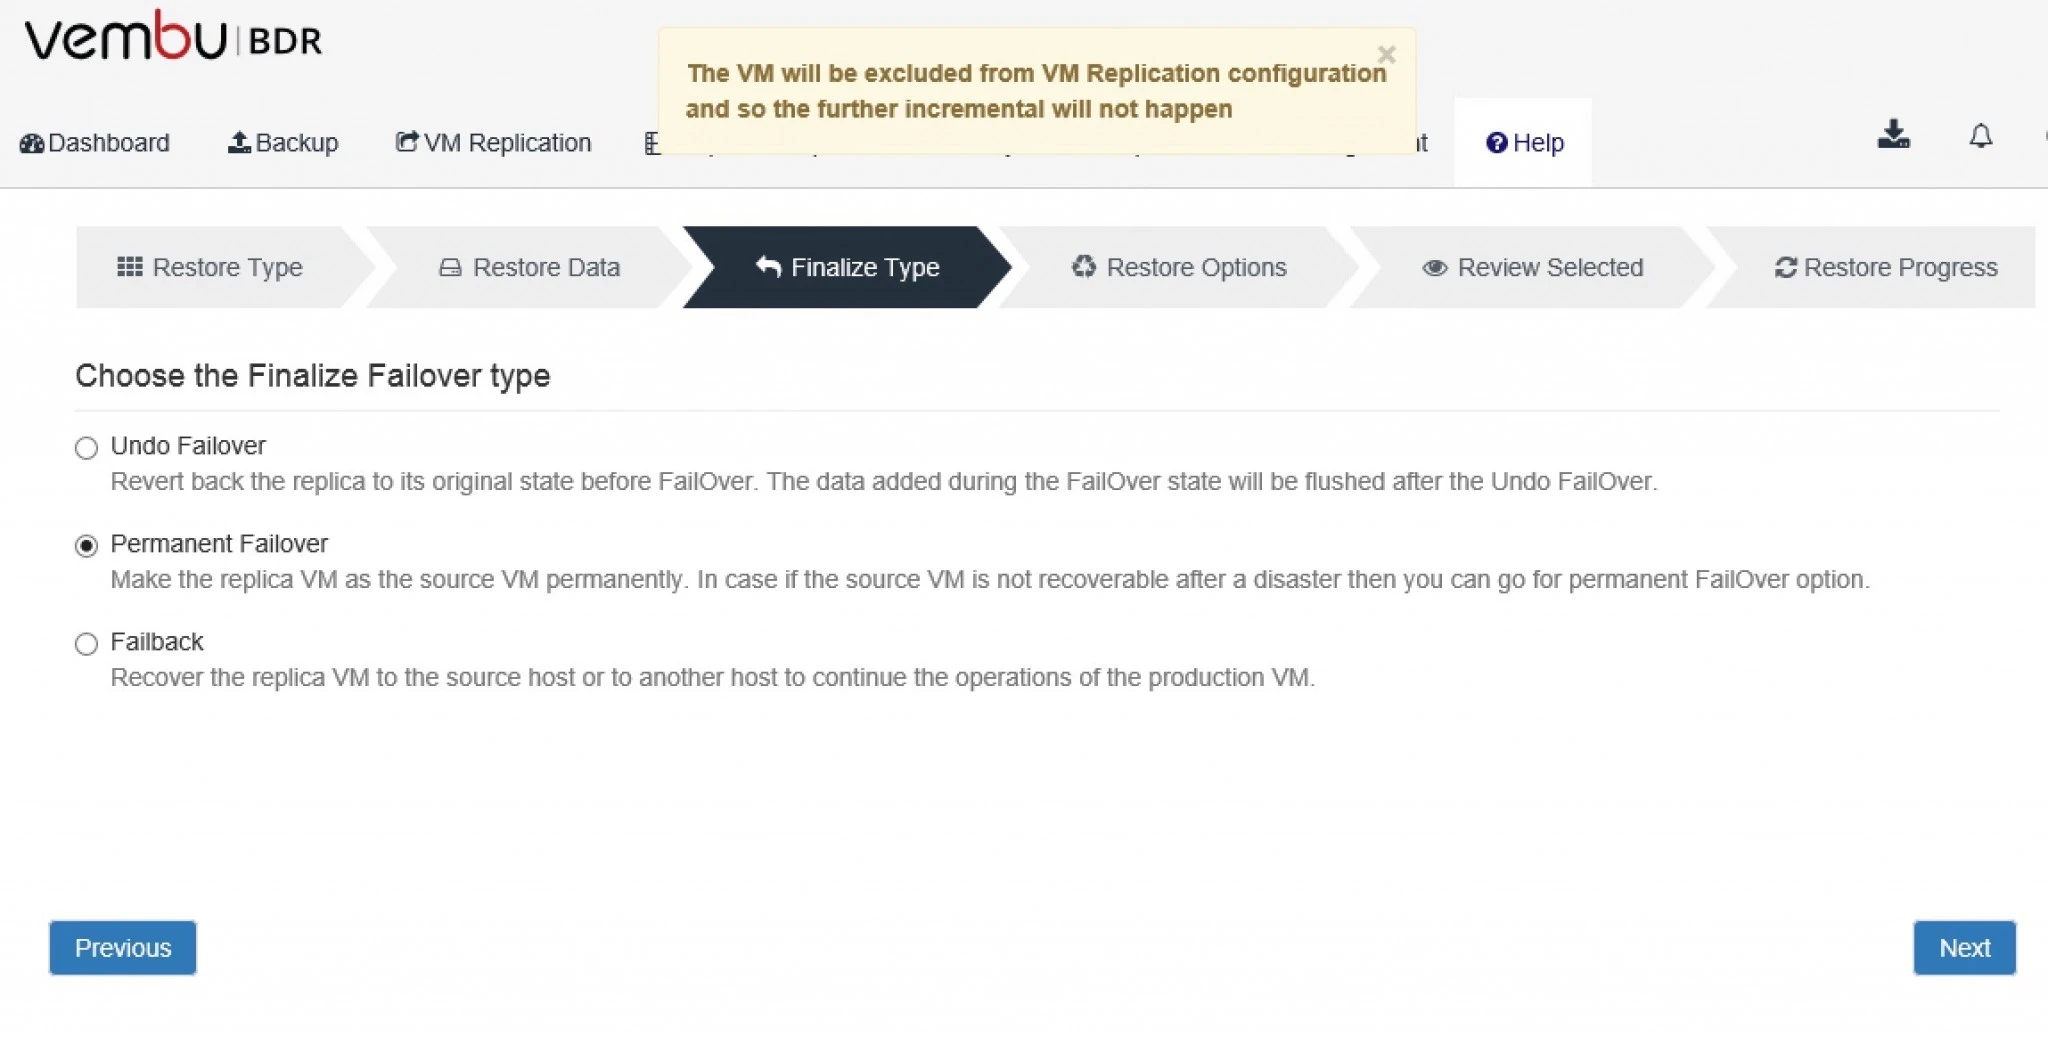
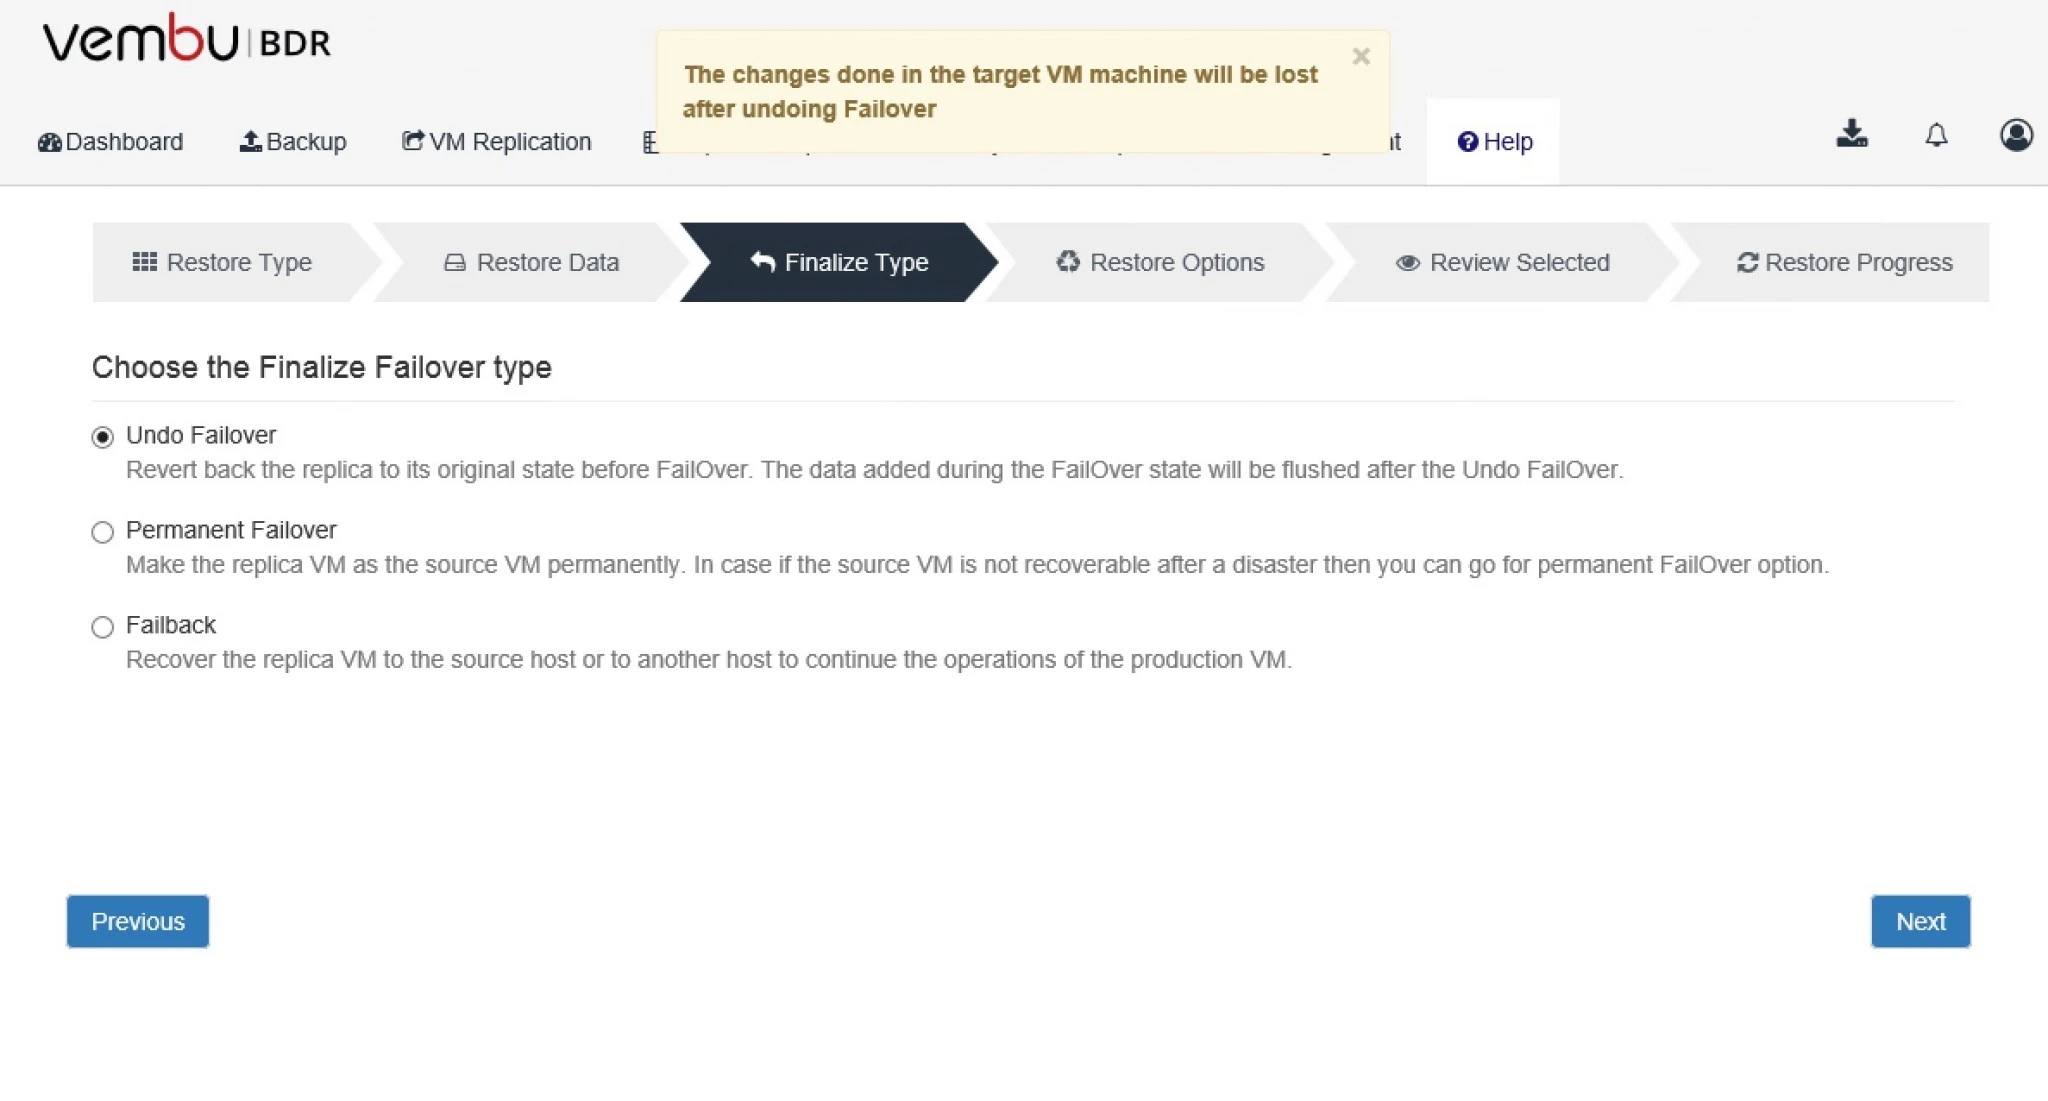
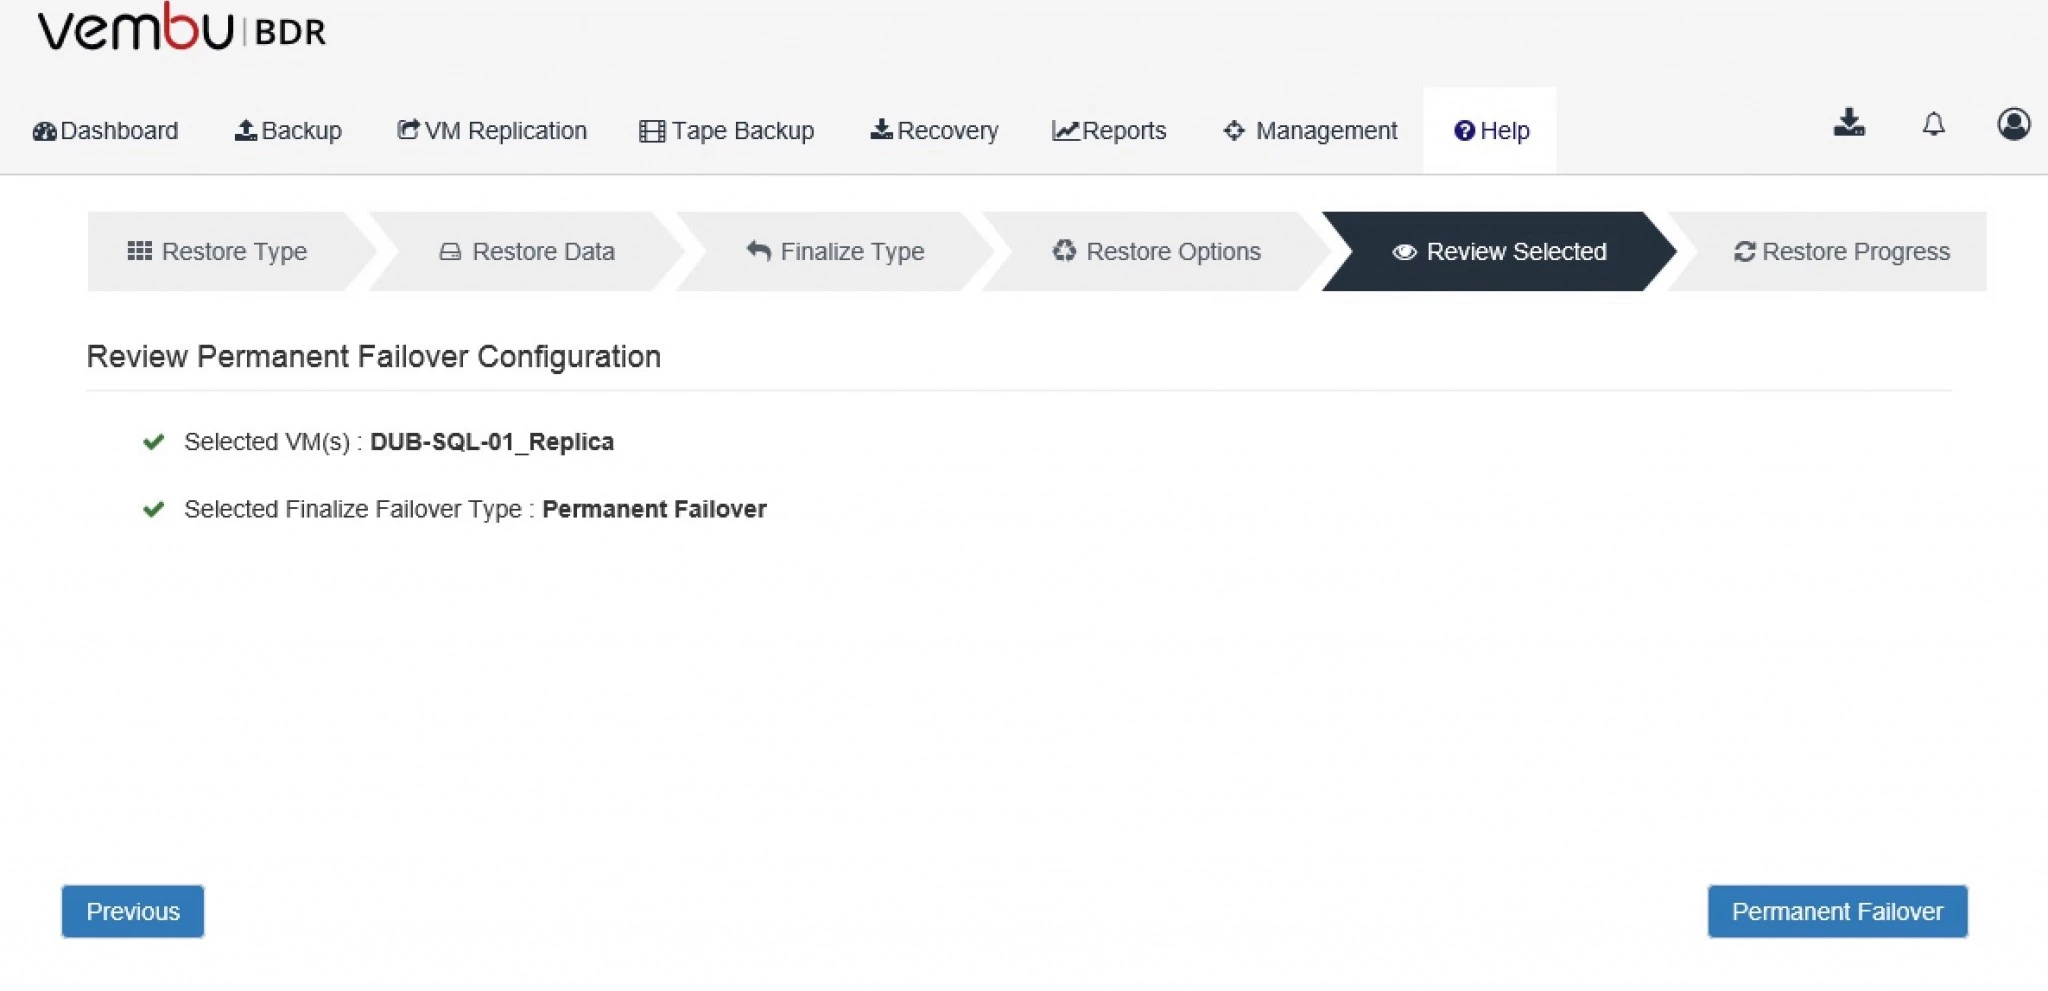
 Lets talk about these options:5. Permanent Failover: In case the source machine is not recoverable after a disaster or you want to continue business operations with the replica VM itself, then you can use permanent failover option. Permanent Failover helps IT admin to use the replica VM for production purpose permanently instead of source VM.All changes made during the failover process will be committed to the disk once the permanent failover is done. So, all the snapshots of the replica VMs will be consolidated. Further incremental will be blocked for the replica VM after the permanent failover process and the VM will be excluded from the VM replication job. 6. Undo Failover:  Undo Failover is a process of reverting back the replica to its original state before failing over replica VM. The data added after failing over the replica VM will be terminated after the Undo Failover process.Undo Failover might be useful if the replica failover was initiated for testing purpose or if you get the original production server back after troubleshooting and if you don’t want the data that has been added after the failover process. 7. Failback:  If you want to resume the source VM operation after disaster recovery and shift the production load back to the source VM, you can use failback process. (source: vembu.com) 8. Here it will start progress as per your selection. 9. In vCenter server under recent tasks you can see the progress for this VM. 10. It will show you the completed status under the restore progress option.
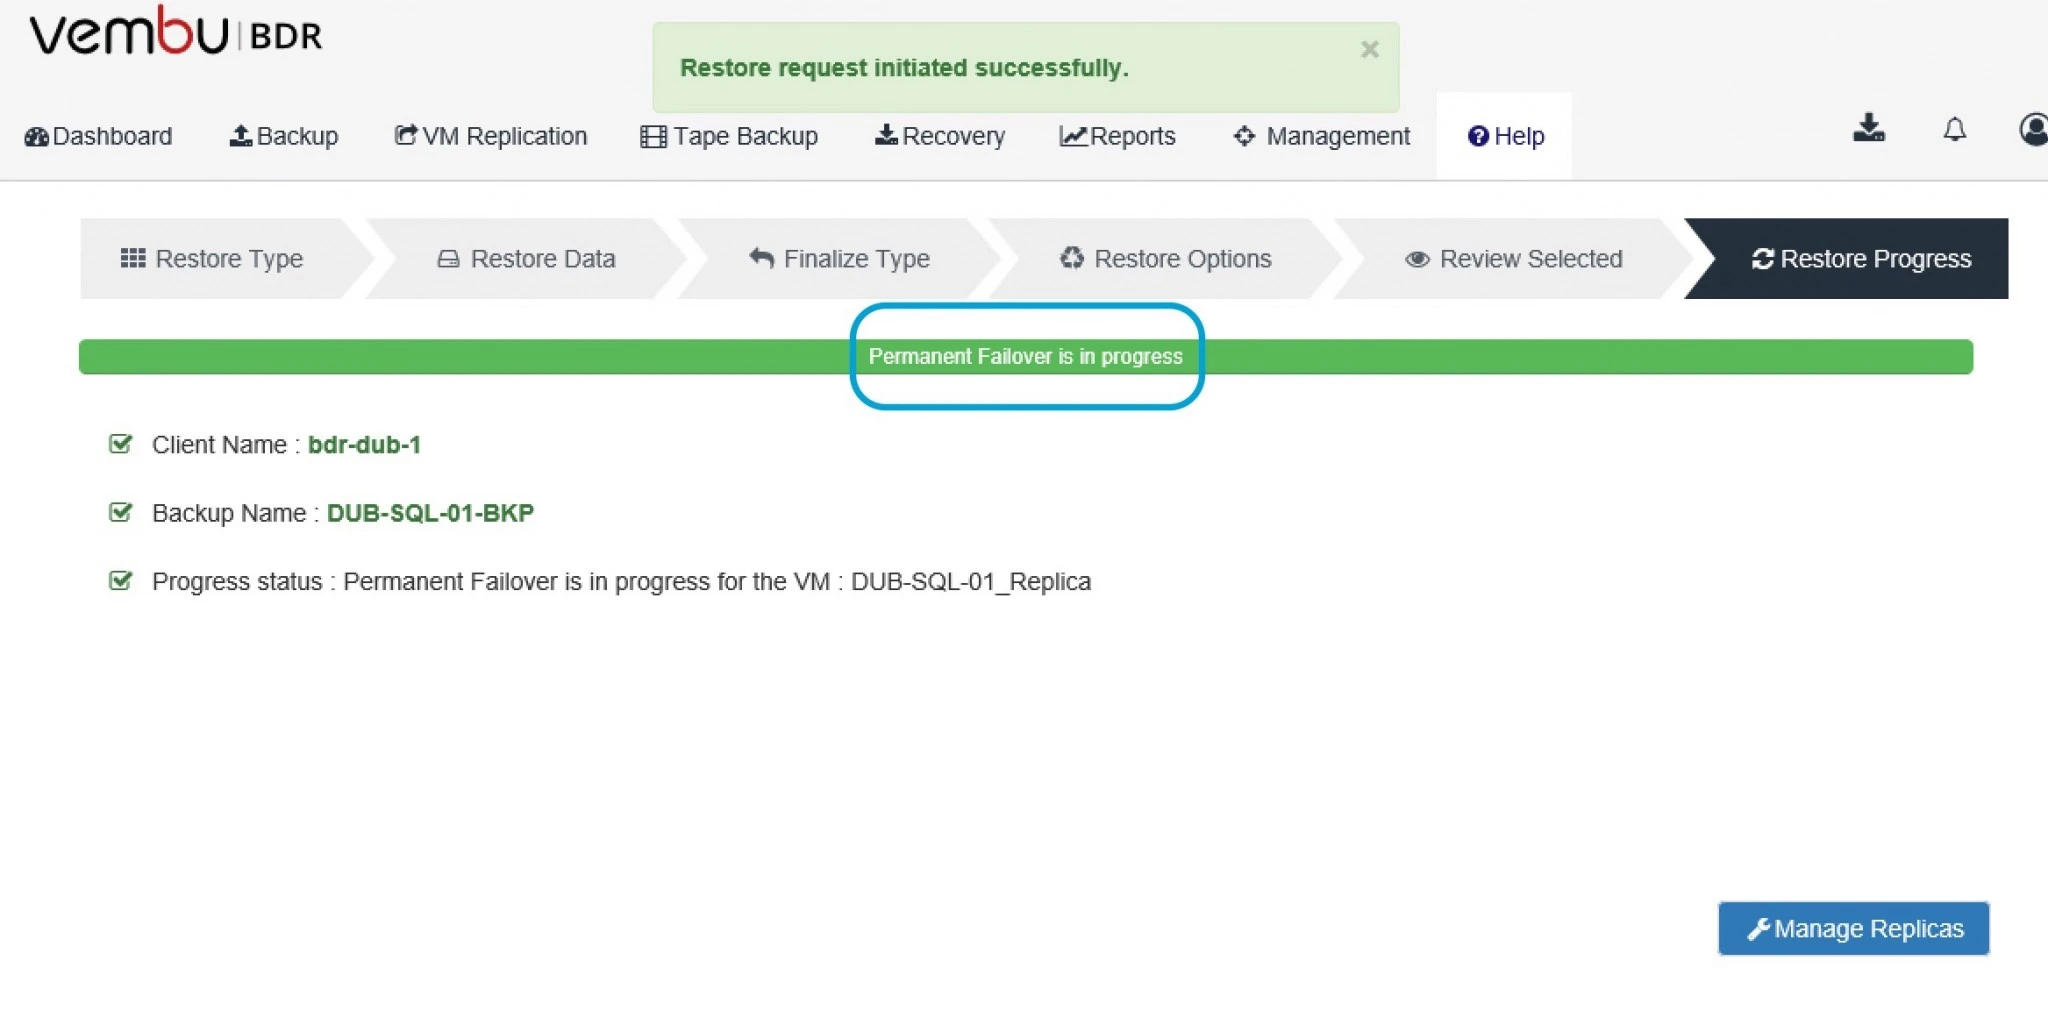
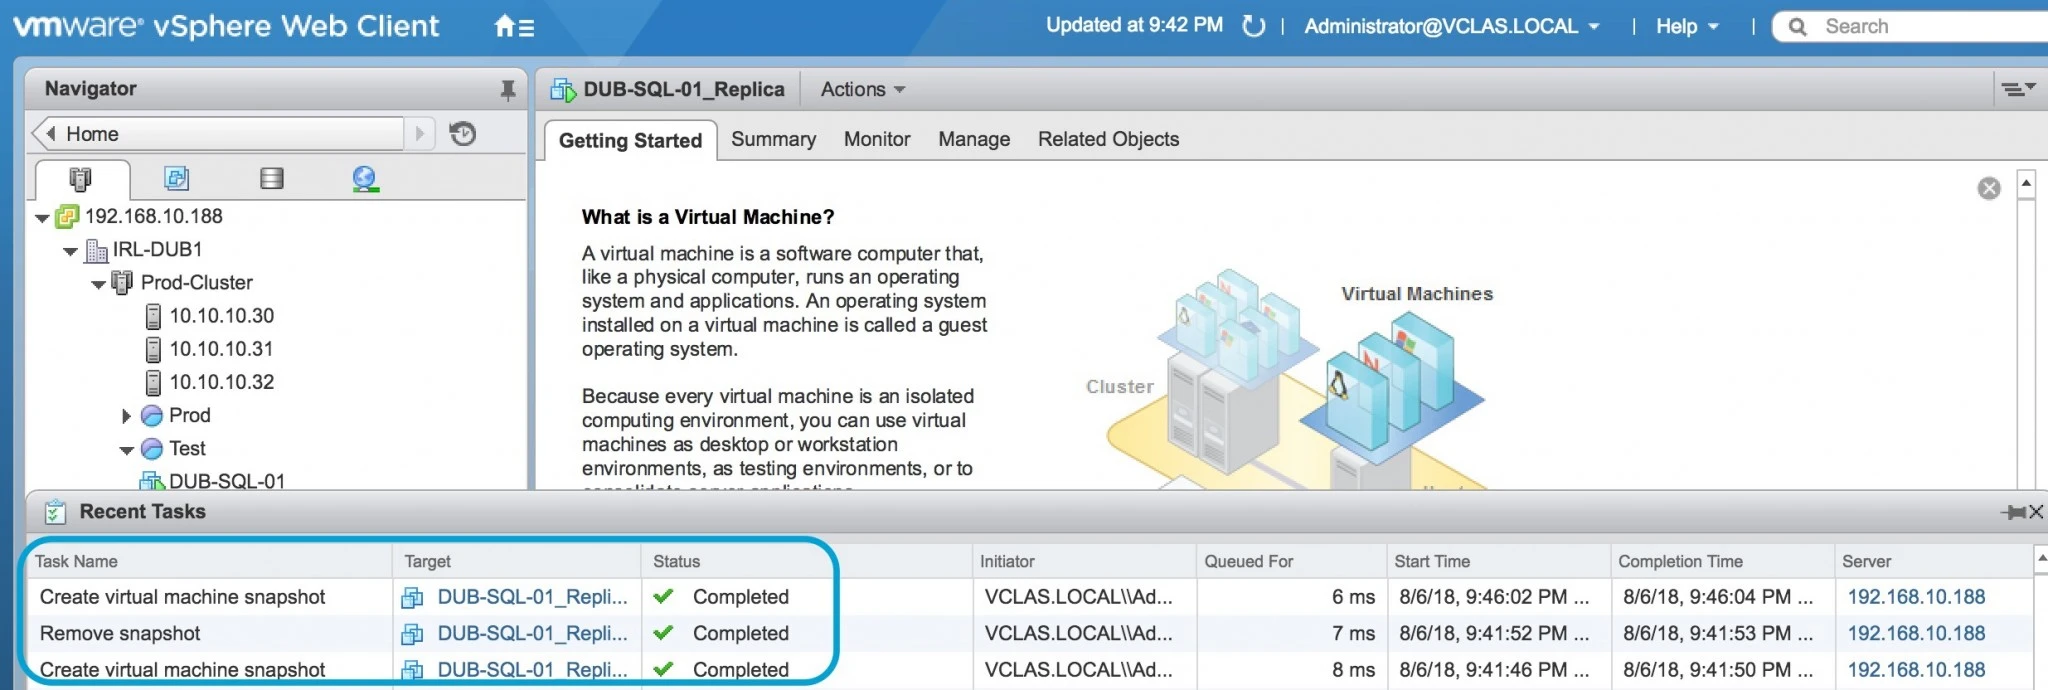
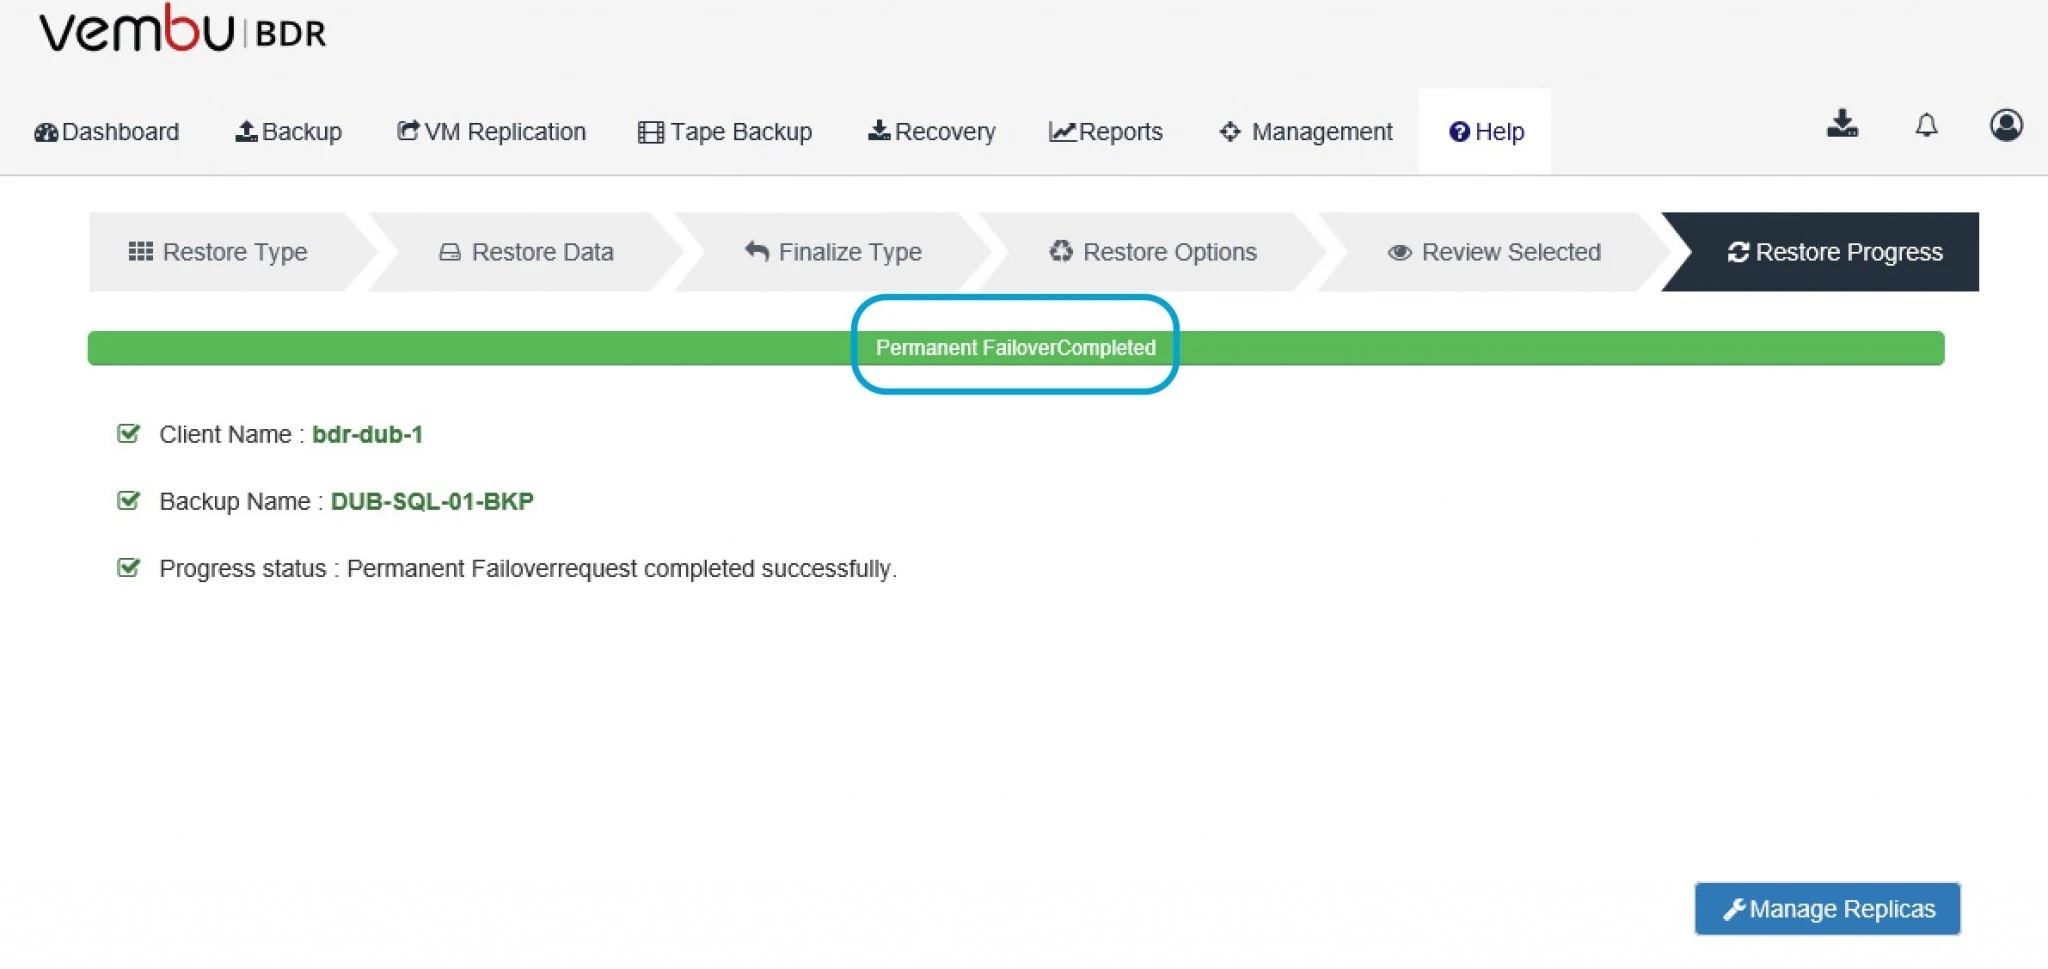
0

Restore Files with Vembu Network Recovery Option

Topic Outline:

 Restore File/Files
 Recover particular one file/files and folder/folders from FLR backup in Vembu BDR.

File Level Restore (FLR) addresses these issues by providing a way to access individual files within a restore point. This access makes it possible to read copies of files or restore them from within restore points to any other available location.

To restore specific file/files or folder/folders from image backups without restoring the entire disk(s), we can use “File Level Recovery” option by attaching the backup disk(s) to the Disk Management and then copying the required files or folders from the attached volume.

Follow the below steps to perform File Level Recovery from Vembu Network Backup Server

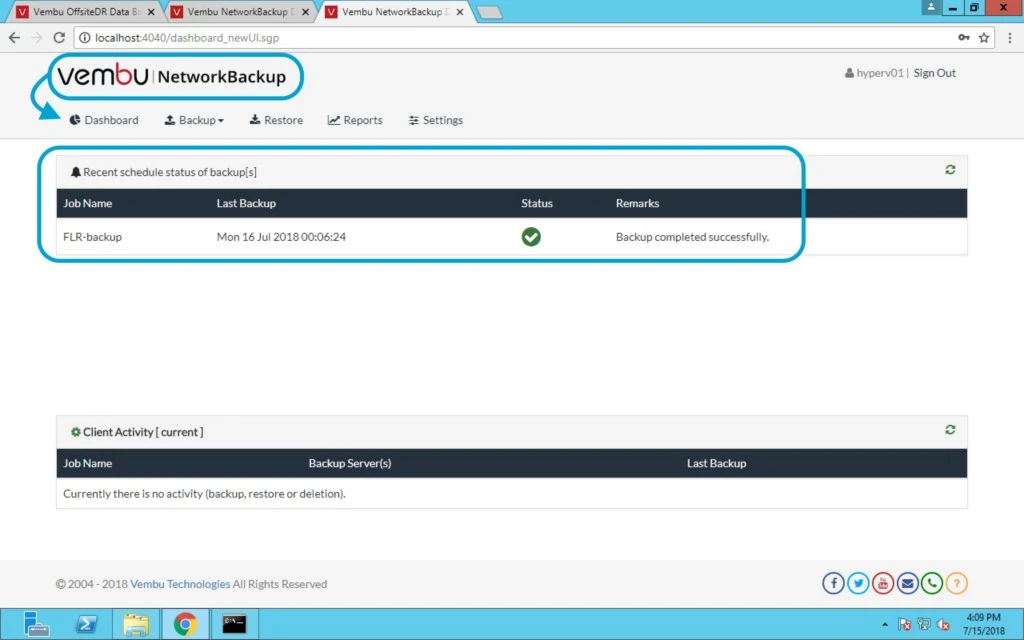
  • Login Vembu Network Backup web console and check the last successful backup.
  • Navigate to Recovery -> Restore (for the particular backup) -> File Level Recovery and click “Next” button to proceed.


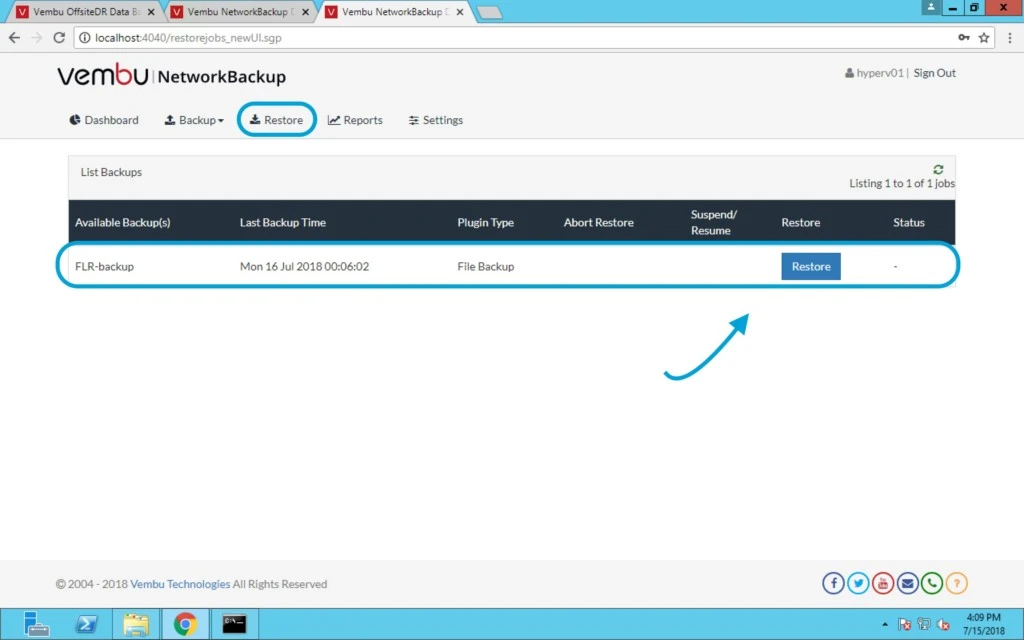
Now Go to Restore tab and Click on Restore button which is highlighted in blue.


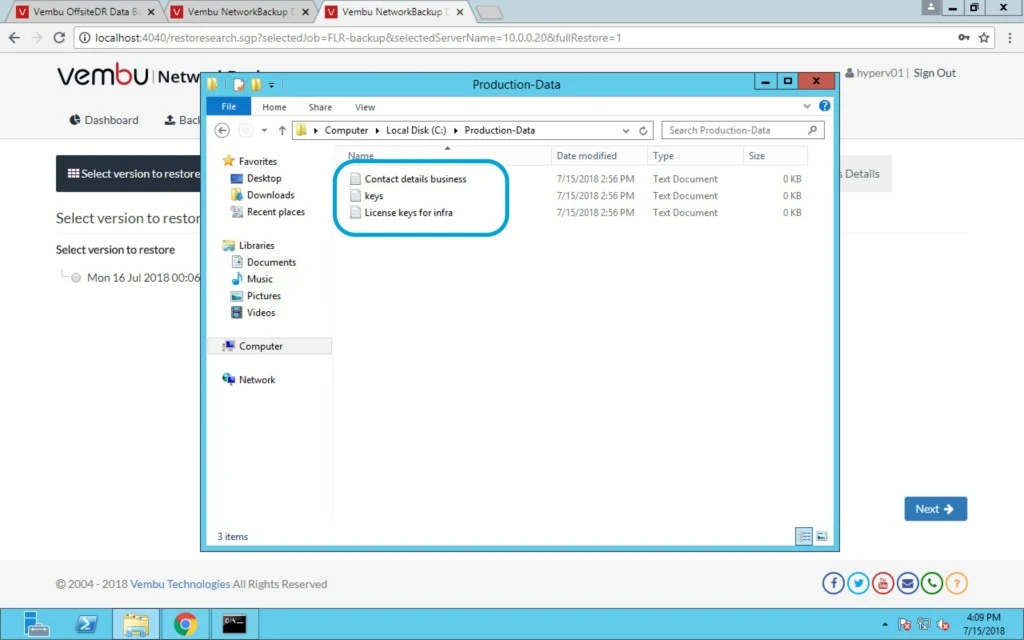
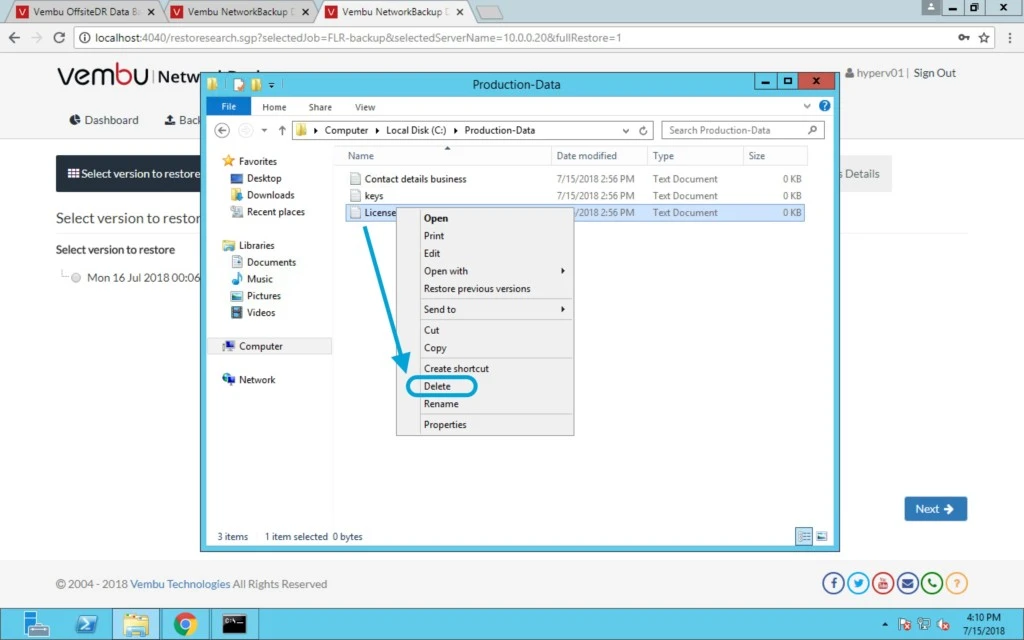
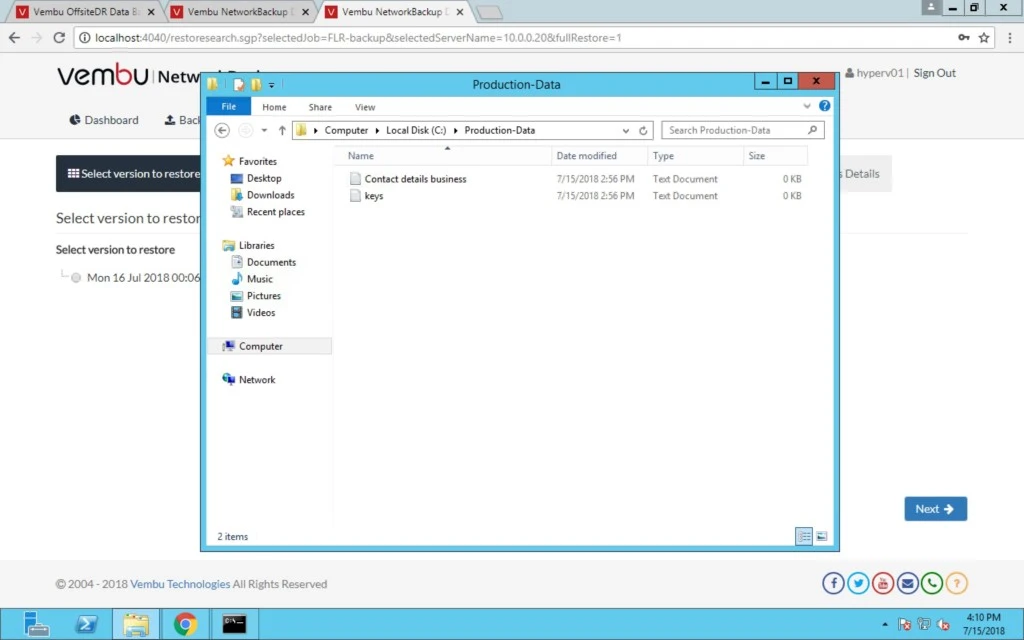
In the below screen we have three files for demo purpose, first i will delete one file and then we will restore it.


Case scenario: If a user deletes any file or folder accidentally in production environment, in that case FLR is good option.

You need to right click on the file and click delete.


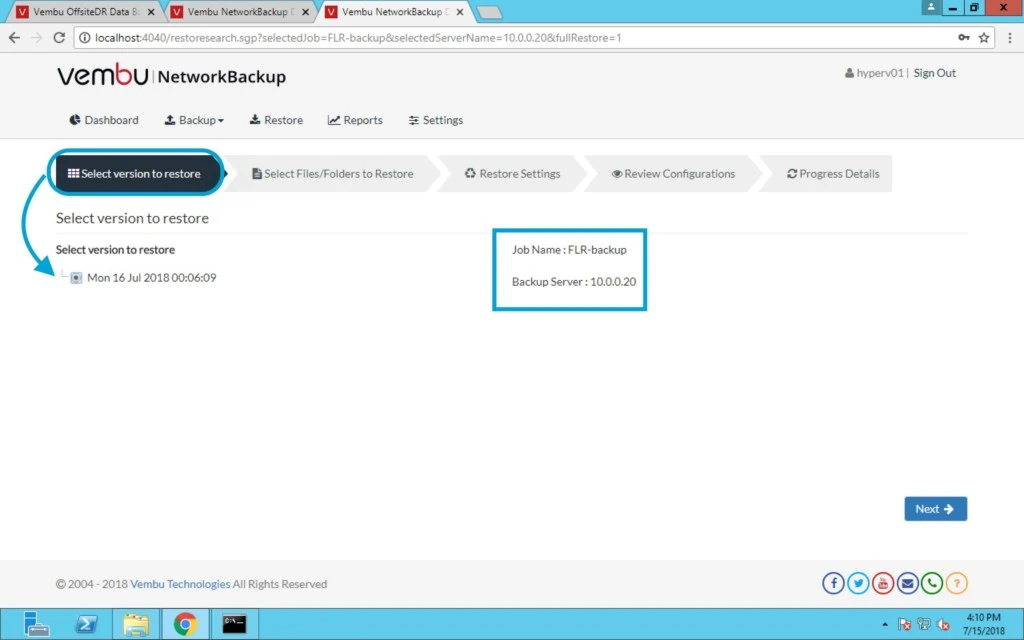
Even you also have versioning control for restore points.


Now Select version to restore file and you can have multiple restore points here.


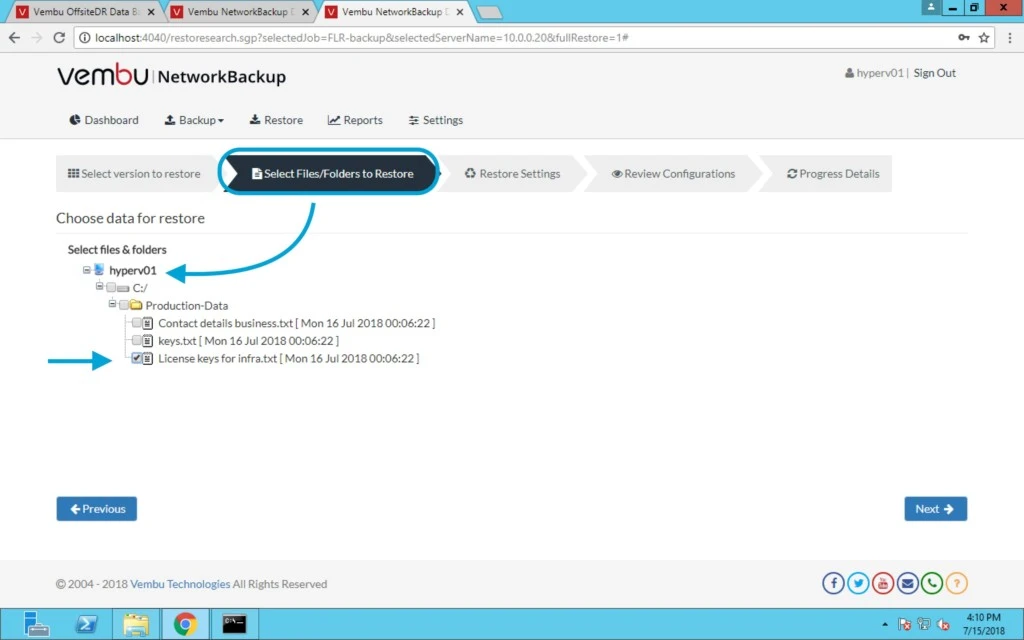
In this section select Files/Folders to restore > select the file.


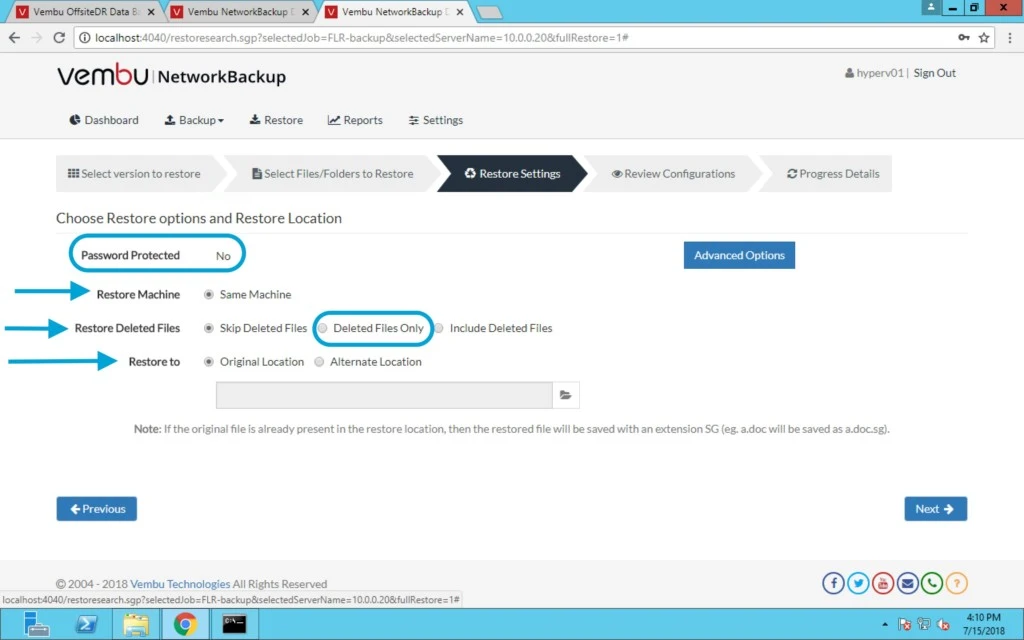
In Restore Settings Section; if file is password protected then need to provide password.

There are some more settings like:

Restore to Same Machine

Restore Deleted files only, include deleted files or skip deleted files.

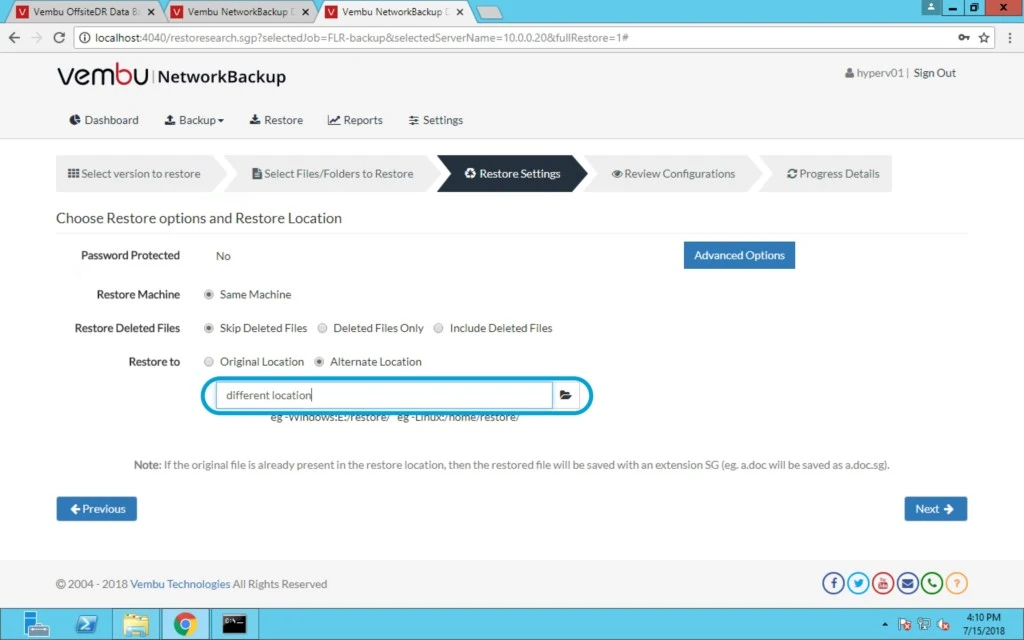
Under Restore to option > you can restore this file on Original location or different location.


For different location you have to click on folder option and provide the path.


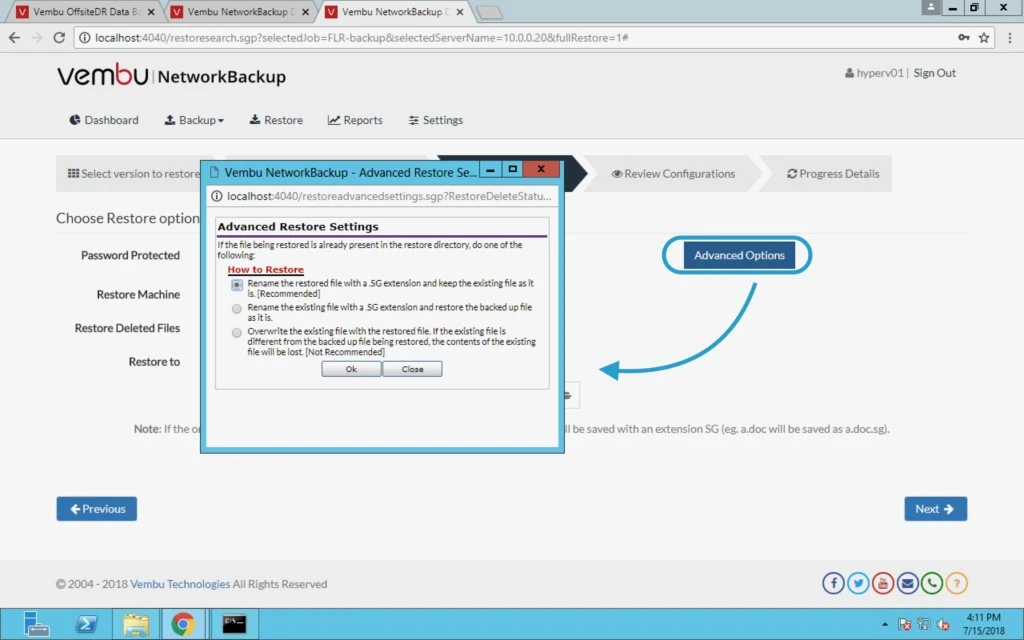
Under Advanced Options you have three options:

a) Rename the restored file with a .SG extension and keep the existing file as it is. [Recommended]

b) Rename the existing file with a .SG extension and restore the backed up file as it is.

c) Overwrite the existing file with the restored file. If the existing file is different from the backed up file being restored, the contents of the existing file will be lost. [Not Recommended]

Note: If the original file is already present in the restore location, then the restored file will be saved with an extension SG (eg. a.doc will be saved as a.doc.sg).


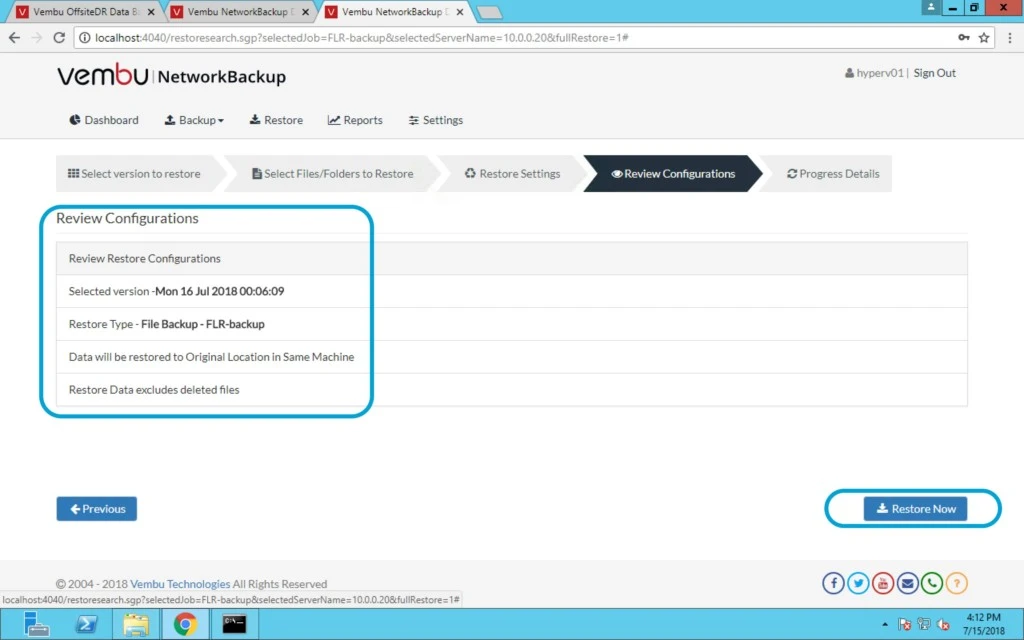
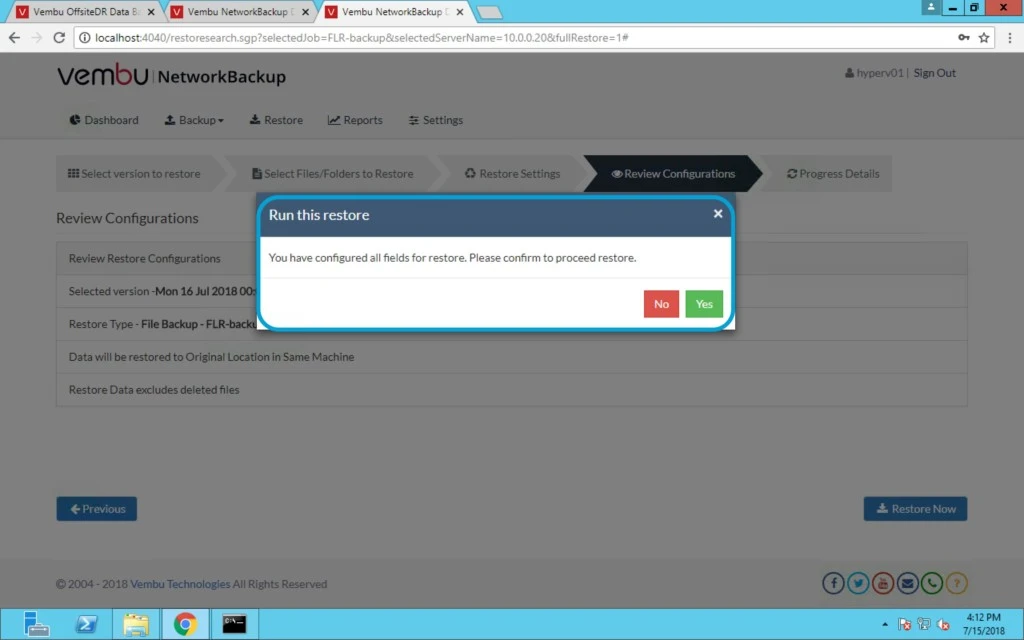
Final step click on restore and check the location of file as per your selection by reviewing the configuration. Click on restore now button.


Click Yes.


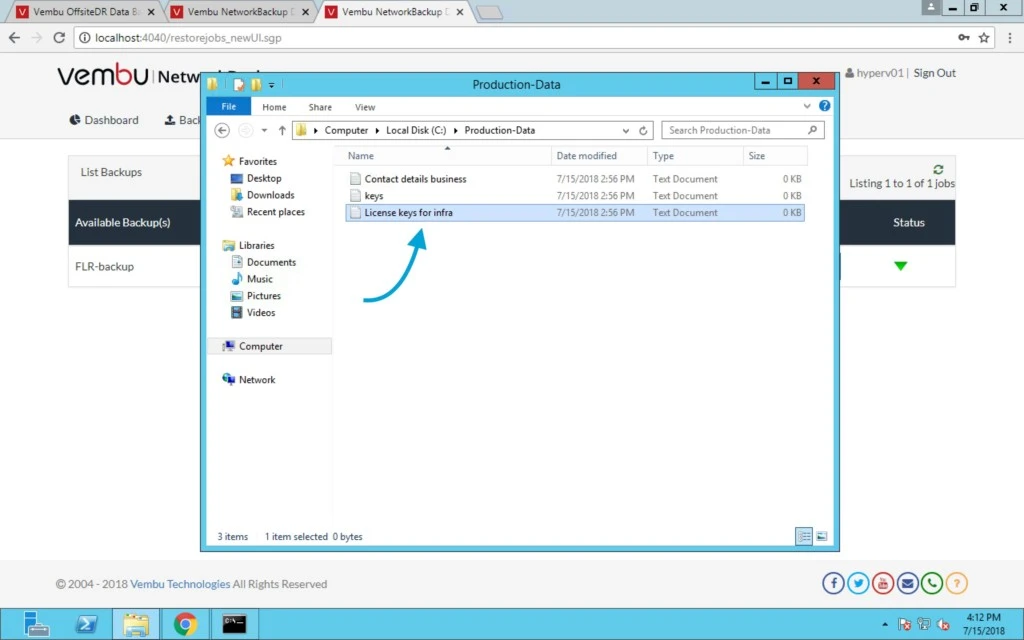
Finally your file has been restored within few clicks.


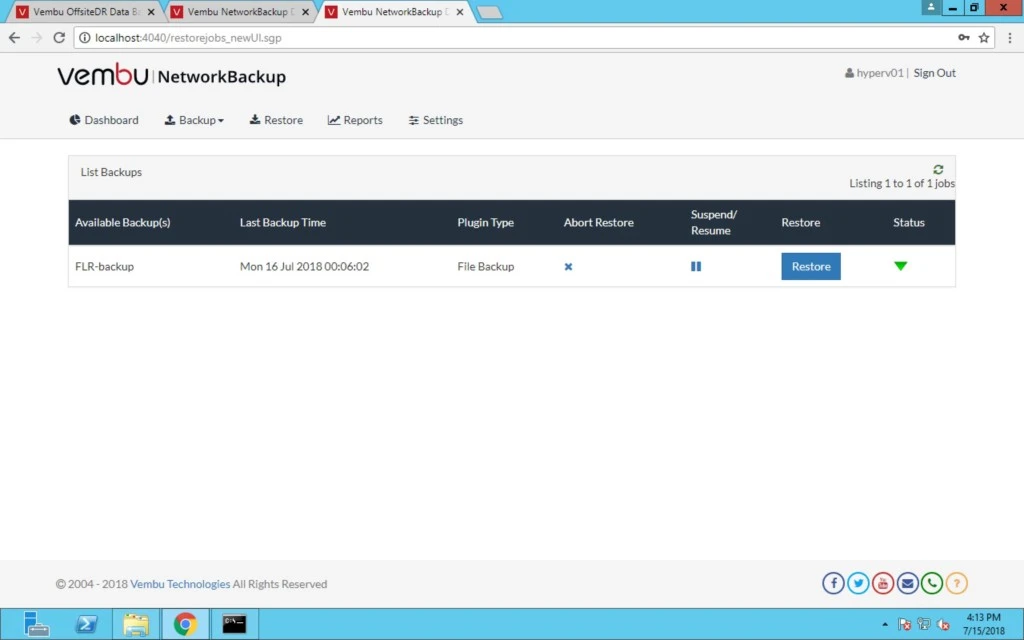
On Vembu Network Backup server you can check the status of last backup restored.

0

How to replicate a VMware Virtual Machine using Vembu BDR Suite

Topic Outline:

 VM Replication.

 Source and Destination ESXi host.

 Scheduling.

 Host Selection.

 Datastore Selection.

 Network Selection.

 Re-IP.


Backup, replication and Disaster Recovery software is a key component of any organisation now a days. Replicating your virtual machines in VMware/Hyper-V plays a very important role in it. Vembu BDR Suite a Backup and Disaster Recovery software will be a key solution to manage replicas of your servers in environments like VMware and Microsoft Hyper-V.

Backup is the process of making a secondary copy of data that can be restored to use if the primary copy becomes lost or unusable. Backups usually comprise a point-in-time copy of primary data taken on a repeated cycle– daily, monthly or weekly. It has its own suite of products which includes VM Backup for VMware, ImageBackup, Network Backup, and OnlineBackup. Vembu BDR Suite when trying to install in your backup server works in both physical and virtual environment i.e., a Windows/Linux based server machine.

Vembu VMBackup uses VMware replication technique to replicate virtual machines from one ESXi host to another ESXi host. VMware replication in Vembu VMBackup allows a user to get hold of their most critical VMs stays periodically synced as an original. It ensures data integrity and high-speed data transfer from production host to DR host.It simply helps you achieve Hyper-Availability for ALL your virtual, physical and cloud-based workloads. With a single console, you can manage fast, flexible and reliable backup, recovery and replication of all your applications and data.

During vSphere replication, the exact copy of VMs from the primary host will be created in secondary host. VMware replication makes Vembu VMBackup a reliable solution in getting best RTO (Recovery Time Objective) and RPO (Recovery Point Objective) values in the industry. With VMware vSphere replication enabled, Vembu VMBackup ensures business continuity and high availability by offering failover and failback as DR options. During disaster scenarios, users can failover the replicated VMs to get auto-started on DR host and the failover can be either temporary or permanent based on a scenario. Later, failback can be achieved by the primary host or to a different host. VMware replication allows a user to map production host network and IP Address with the DR host network.

Steps to configure VMware Replication:

  • Select primary host/virtual machines to be replicated
  • Configure replication job. (i.e) Job Scheduling, configuring DR hosts and network mapping etc.
  • Initiate the replication job

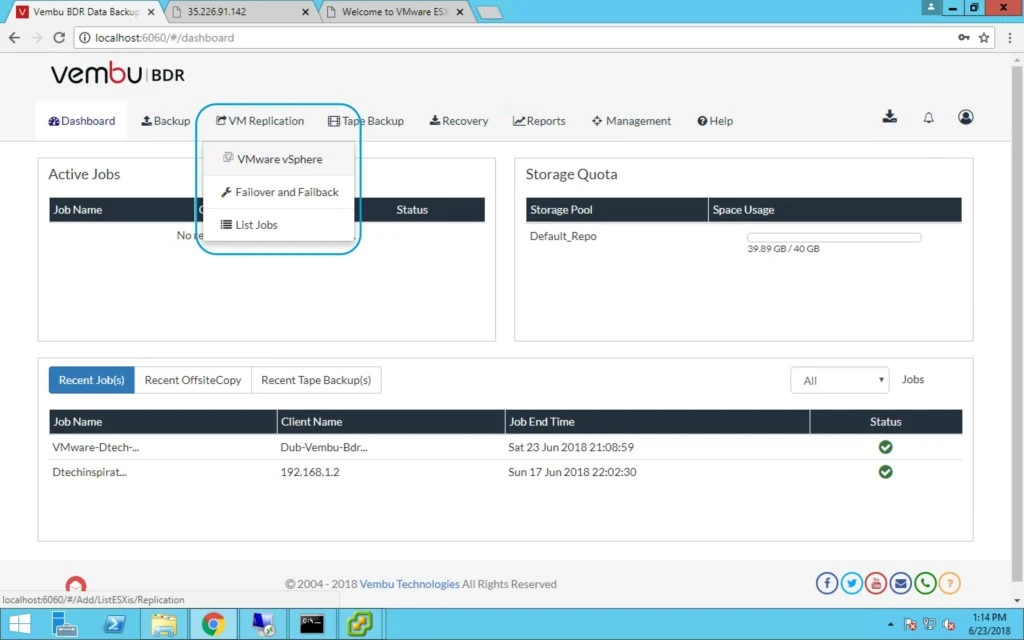
1. Login into Vembu BDR server > Go to VM Replication option and under that select VMware vSphere.


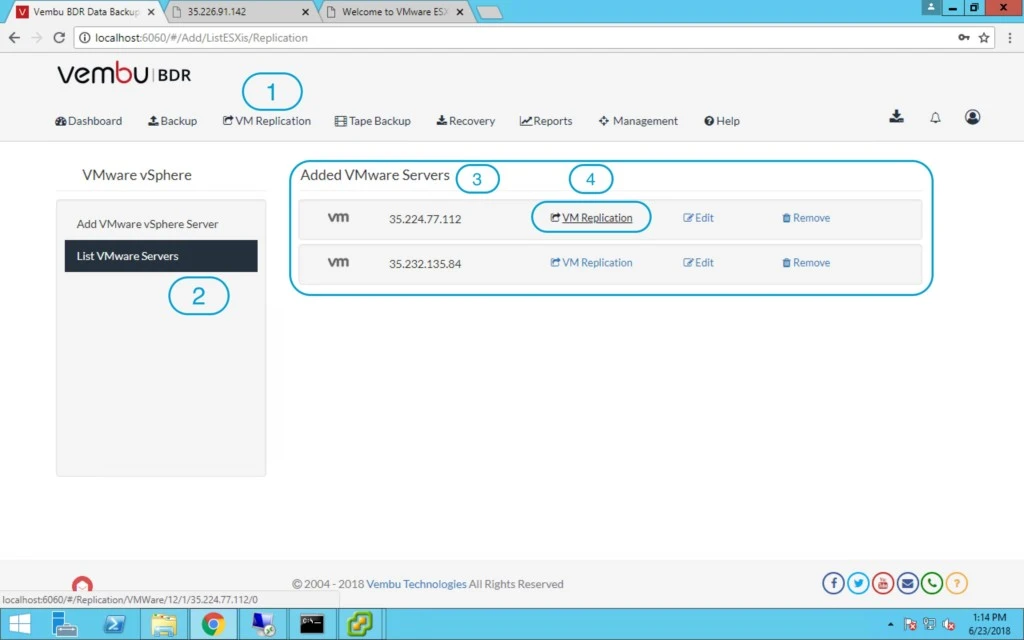
2. You can see all the VMware hosts or vCenter under VM Replication option.

3. Under VM replication option click on the list of VMware servers and then click on number 4 that is VM Replication hyperlink.


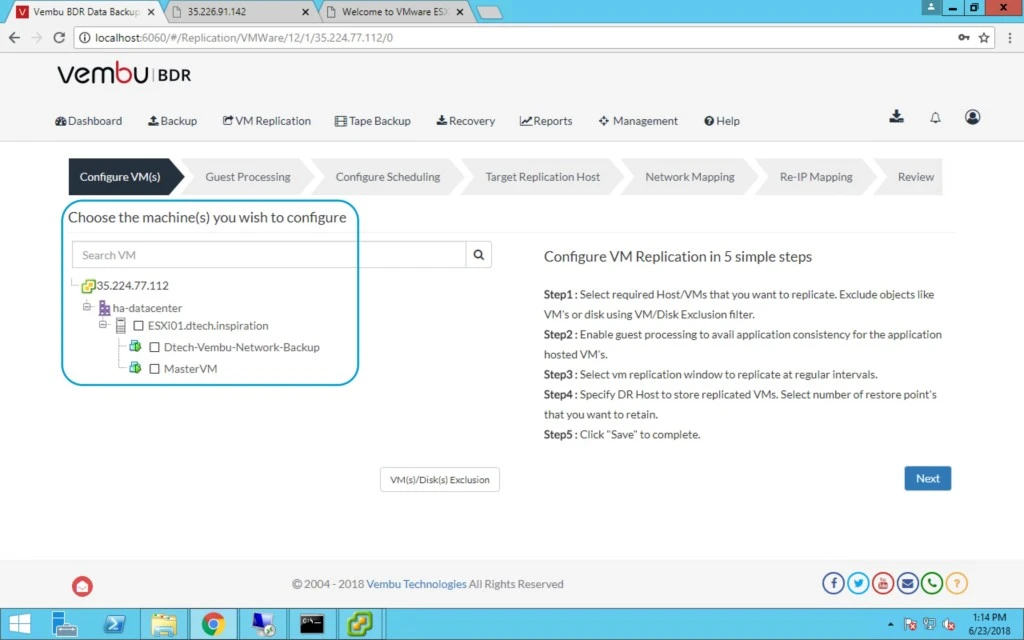
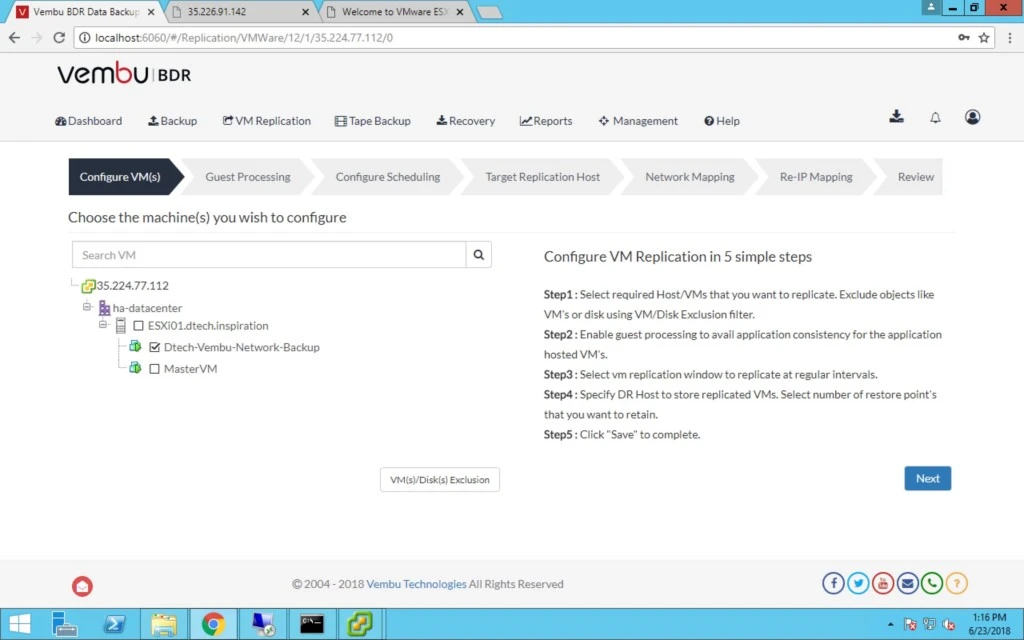
4. After clicking on VM Replication hyperlink, you will get few more options to select and we will got through all the options one by one. Lets start with the first option which is Configure VMs. Here you can see your ESXi host and VMs running on that hypervisor. You can select any VM which you want to protect.


5. You can also select VM Disk option.


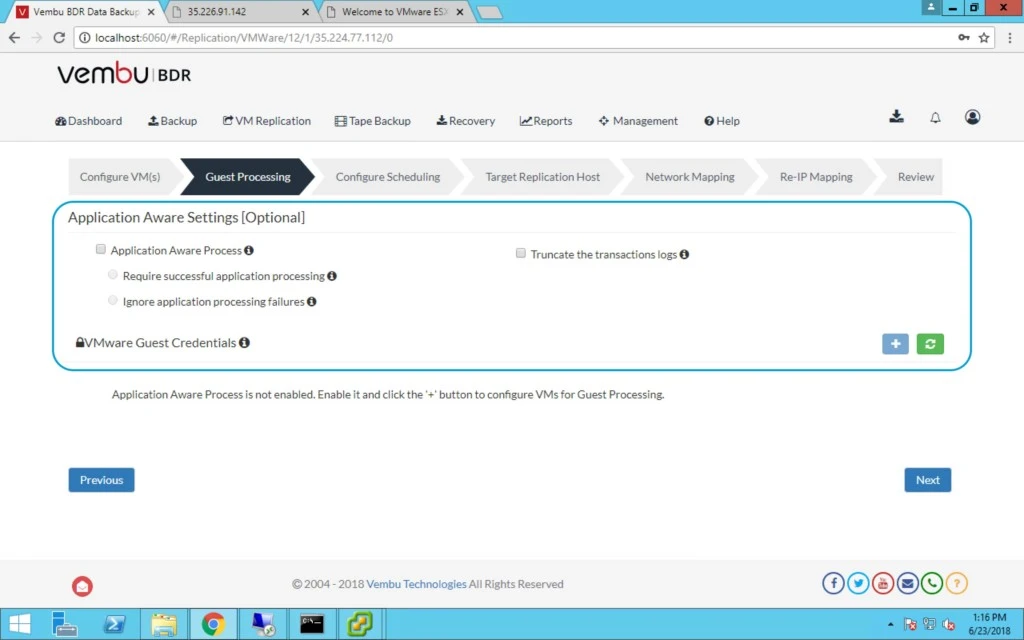
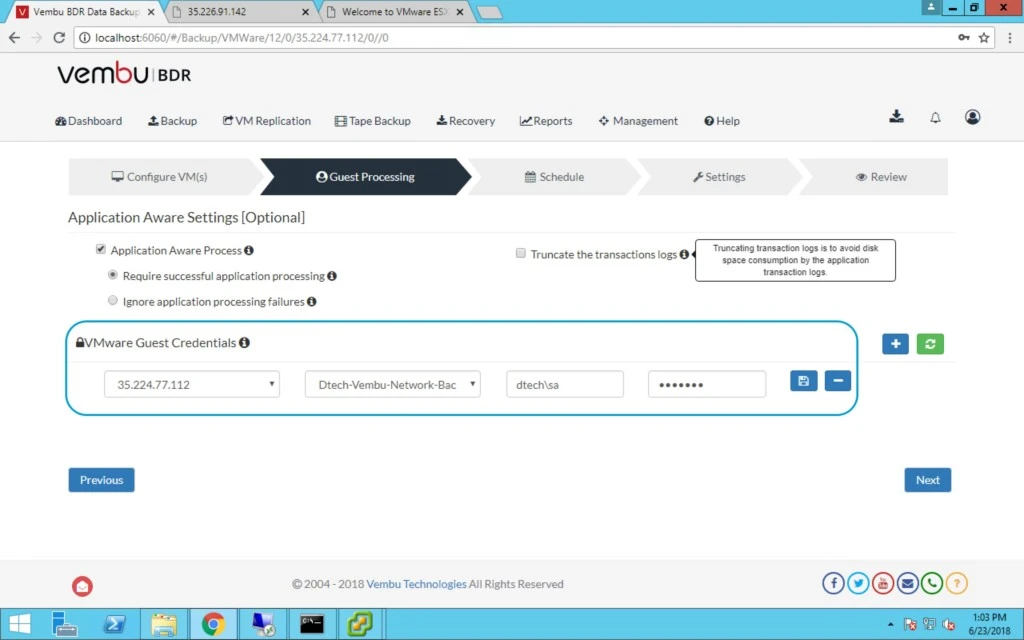
6. Under Guest Processing option you can select application aware settings and VMware Guest Credentials. We also get the transaction logs truncate option.

In Application Aware settings which is optional here has two options :

  • Require successful application processing.
  • Ignore application processing failures.


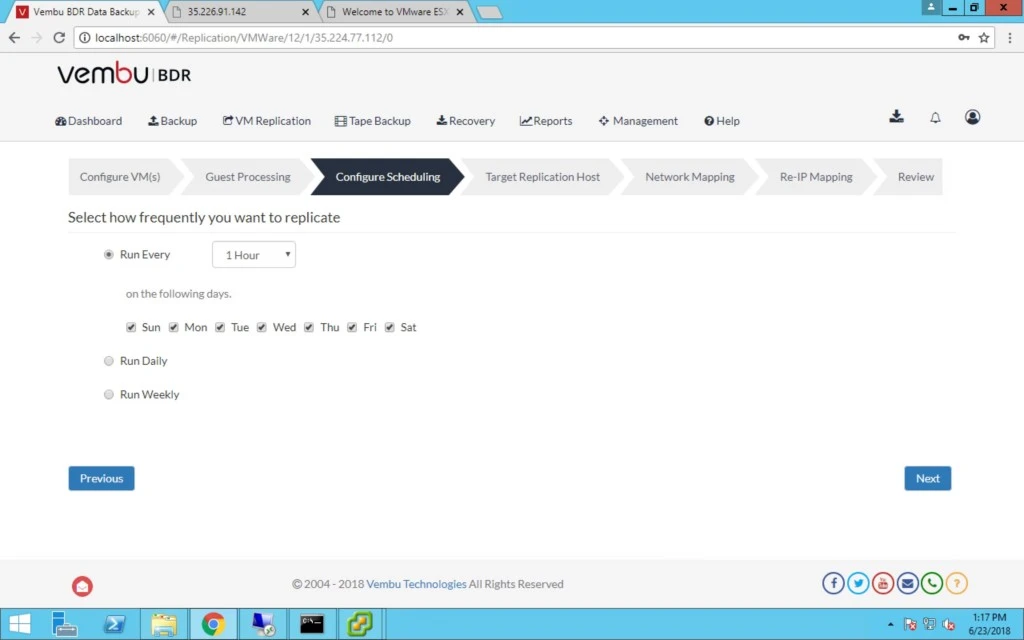
7. Under configure scheduling tab, you get three options :

  • Run every hour and you can also select specific days if don’t want it to be scheduled on daily basis.
  • Run daily
  • Run weekly.


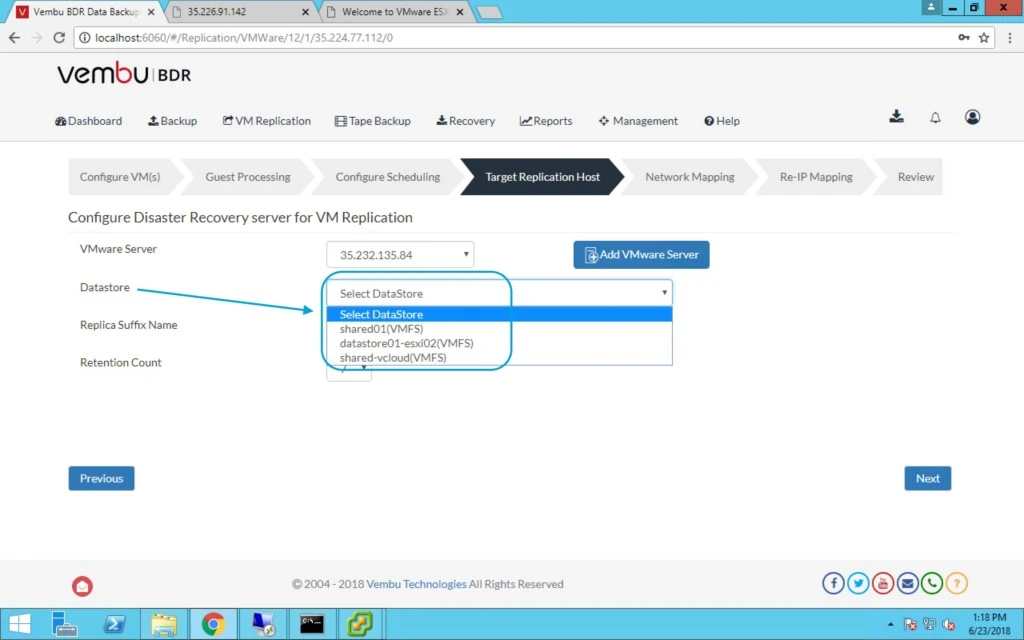
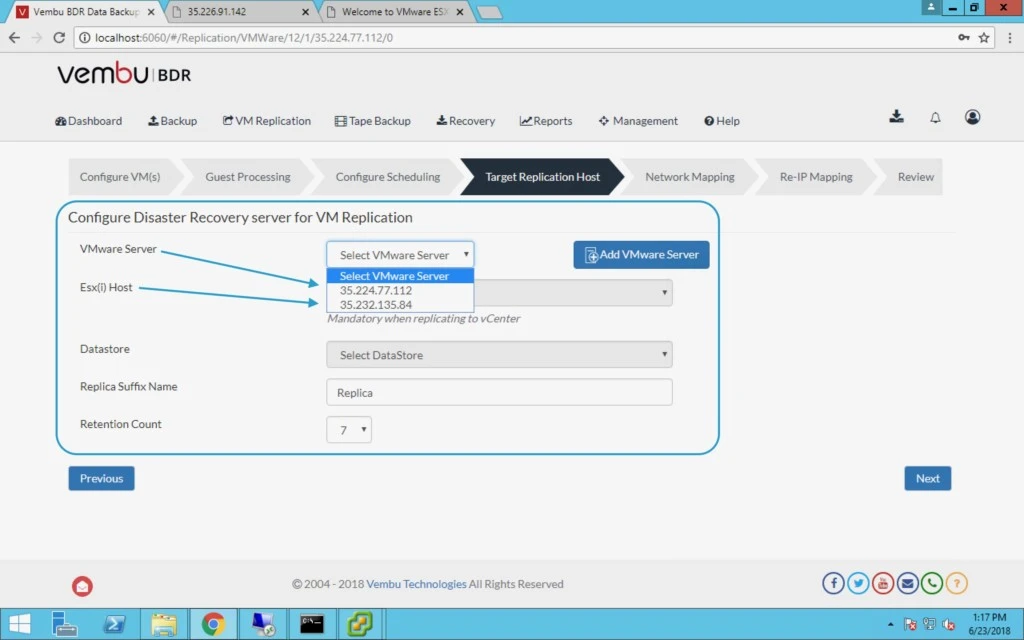
8. Under Target replication host tab > you have to select VMware server from drop down list which we have added before.


9. After that select the datastore from drop down list where you want to keep the replicas/ copies, it’s destination datastore.


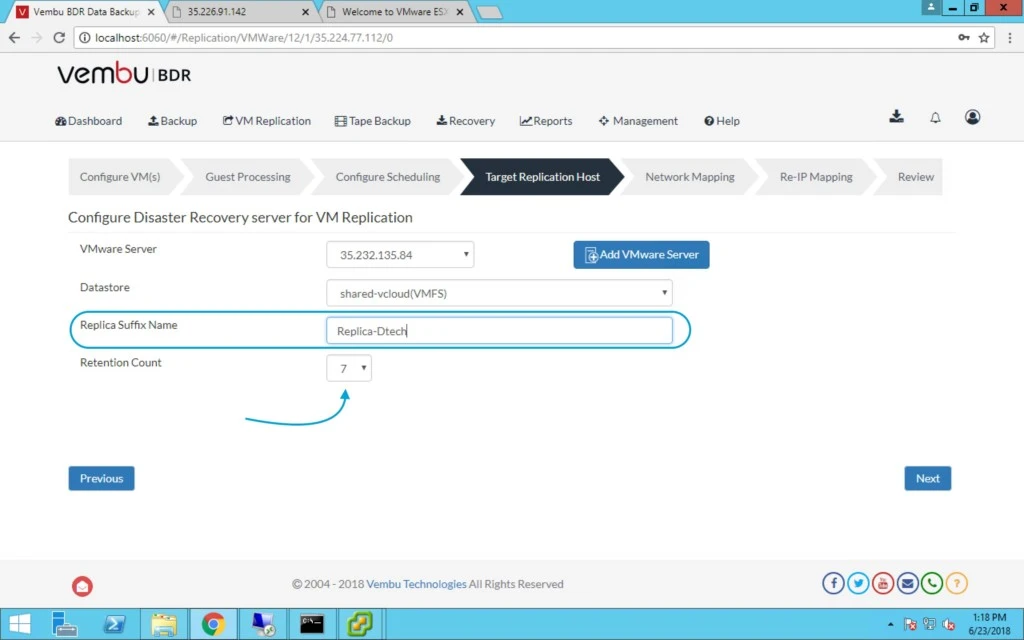
10. After that provide replica suffix name so that you can easily identify that it’s a replica VM. You can also select retention count from drop down list for the replicated VM.


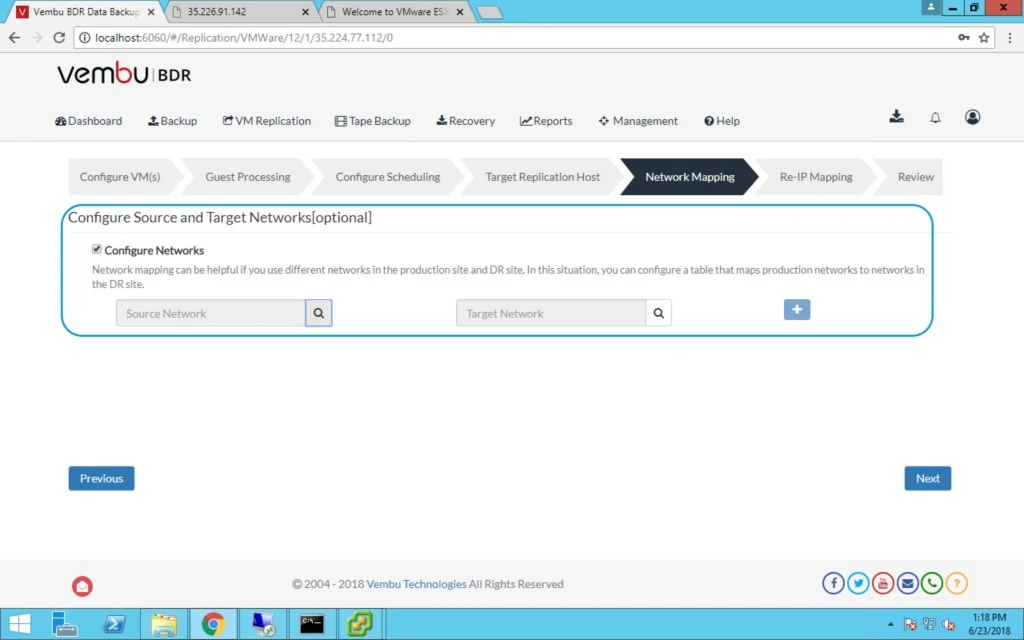
11. It’s time to select virtual machine network for both the sites source and destination. when this will failover in case of DR then it will go ahead and use this selected Target network.


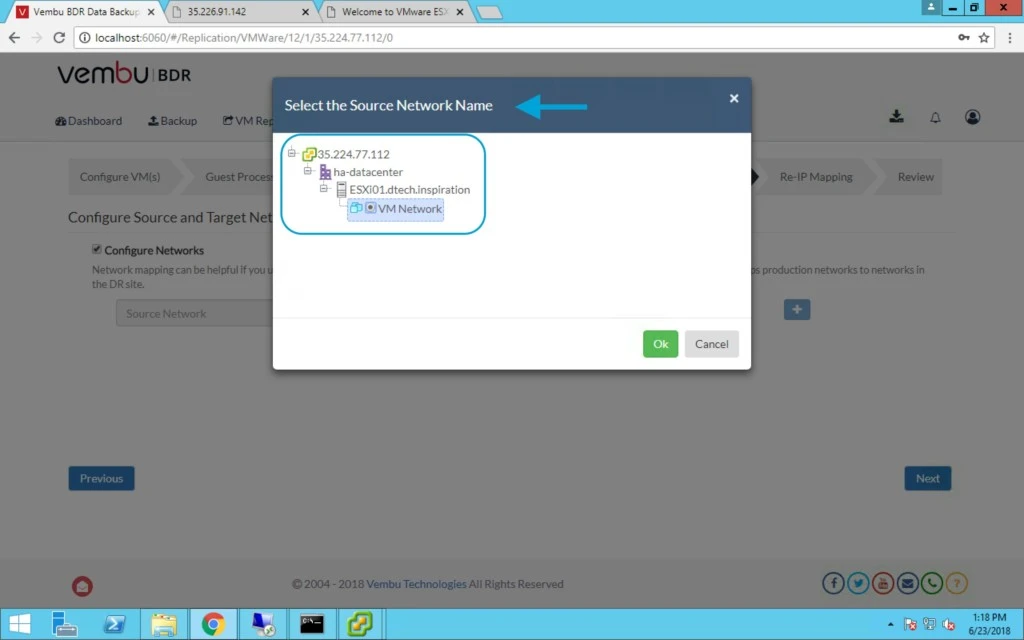
12. When you click on search icon, it will show you all the networks created in vCenter Server/ESXi host.

First you have to select from Source location. Click OK.


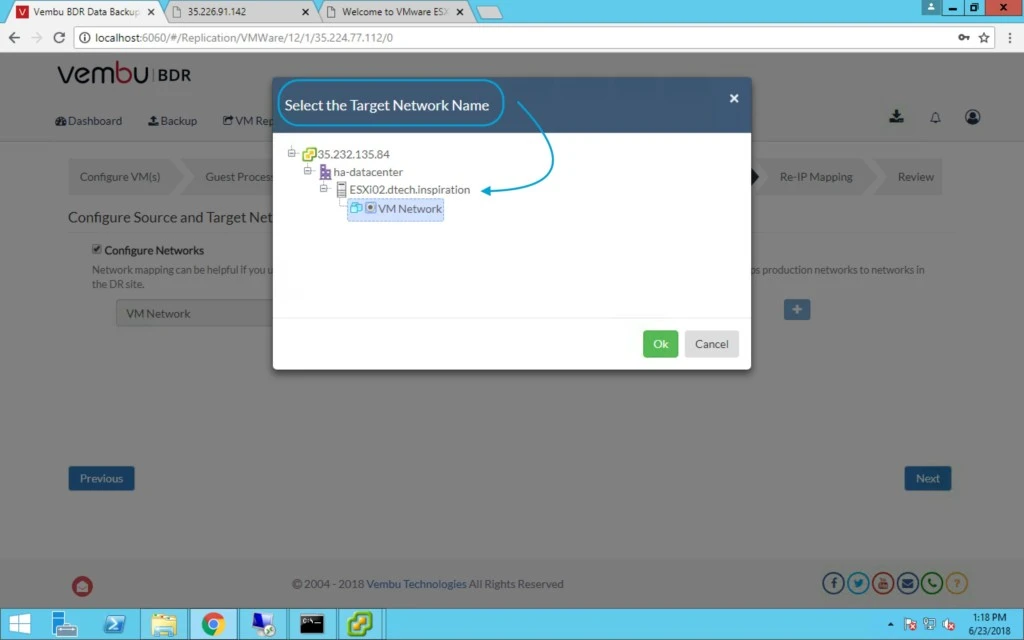
13. After that select for Target site network and search the network from there.

Note: Network must be created before VM replication setup.


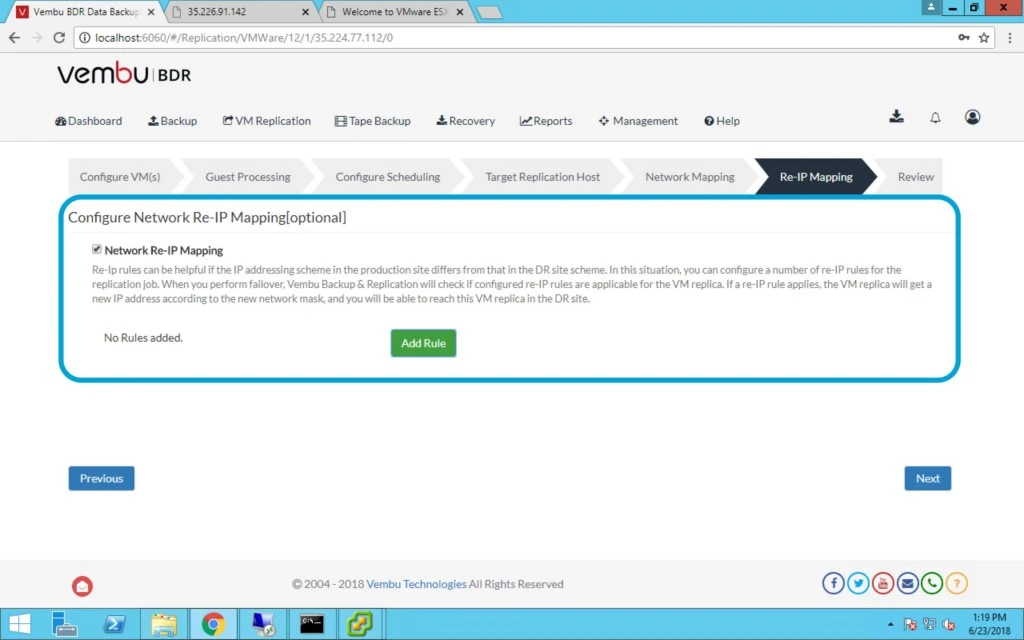
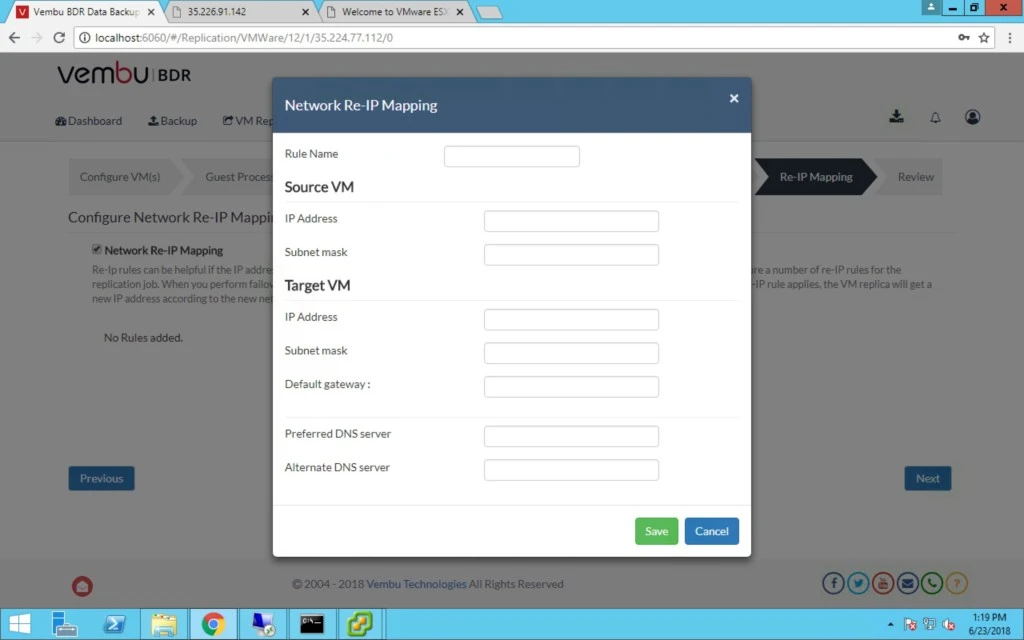
14. Under Network Re-IP Mapping option >

Re-Ip rules can be helpful if the IP addressing scheme in the production site differs from that in the DR site scheme. In this situation, you can configure ‘n’ number of re-IP rules for the replication job.

  • Re-IP Mapping rule will be applied during Failover. When failed over, the replica will be powered on with the configured Re-IP Mapping rules.
  • If you wish to configure Network Re-IP Mapping, do enable the Network Re-IP Mapping checkbox. (Reference: vembu.com)


15. Here you can provide all the Source and target Network details for Network re-ip mapping.


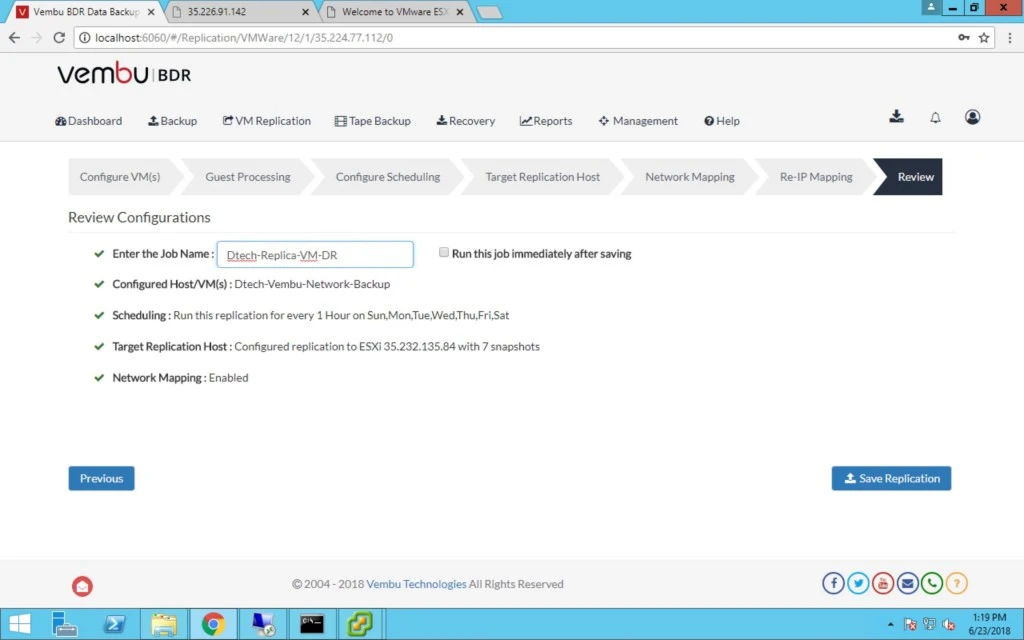
16. Now Provide the Job name and save it. You can also configure to run the job immediately right after saving the VM replication.


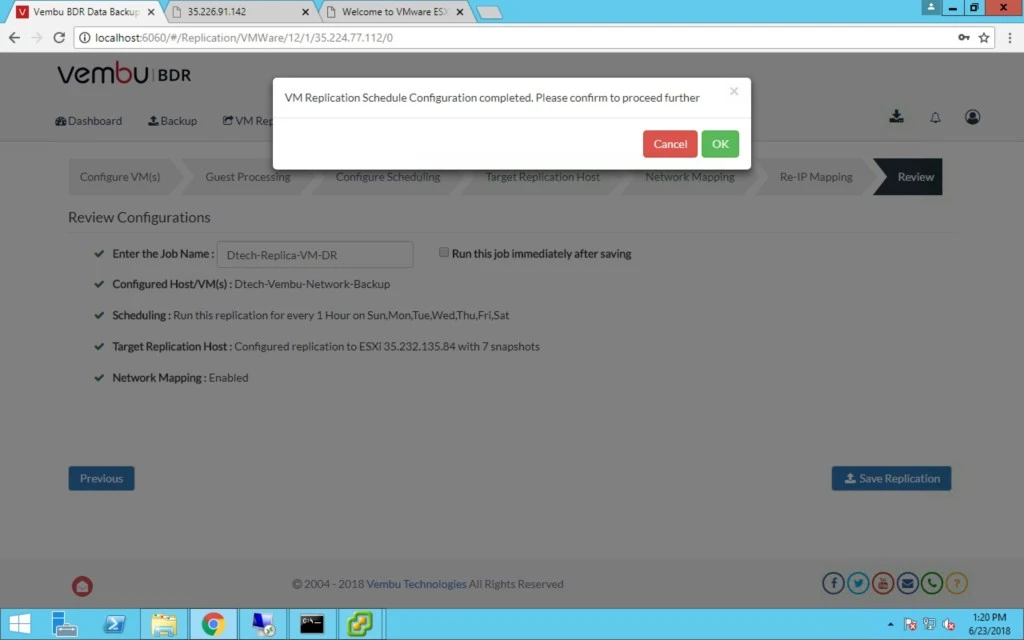
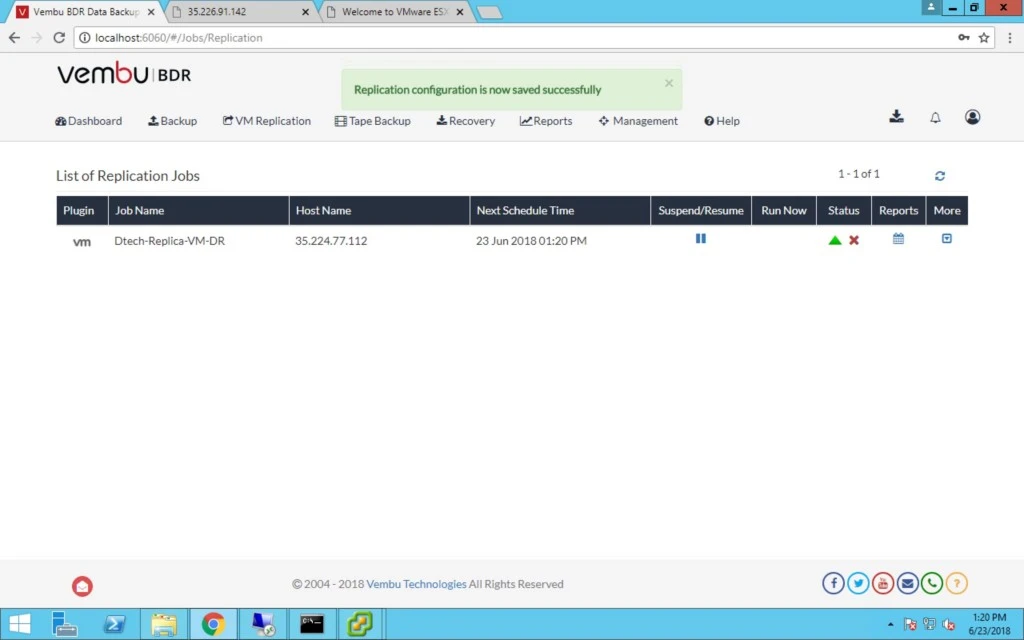
17. After successfully saving replication job it will pop-up a successful message.


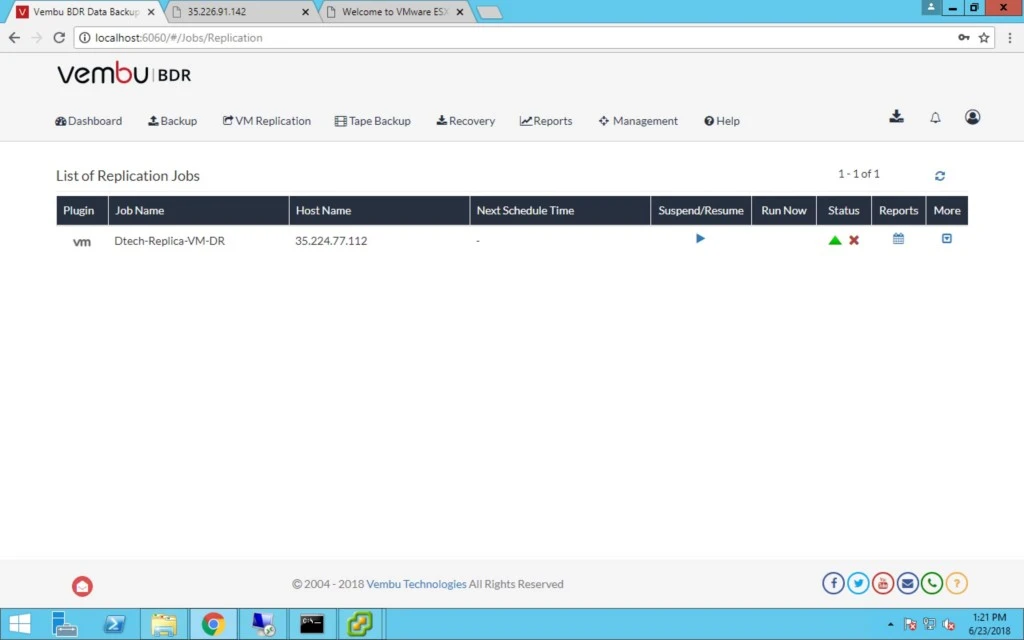
18. Now under List of replication jobs you can see the progress for newly created replication job. You can also suspend or resume the job, check the status for successfully completed or failed etc.


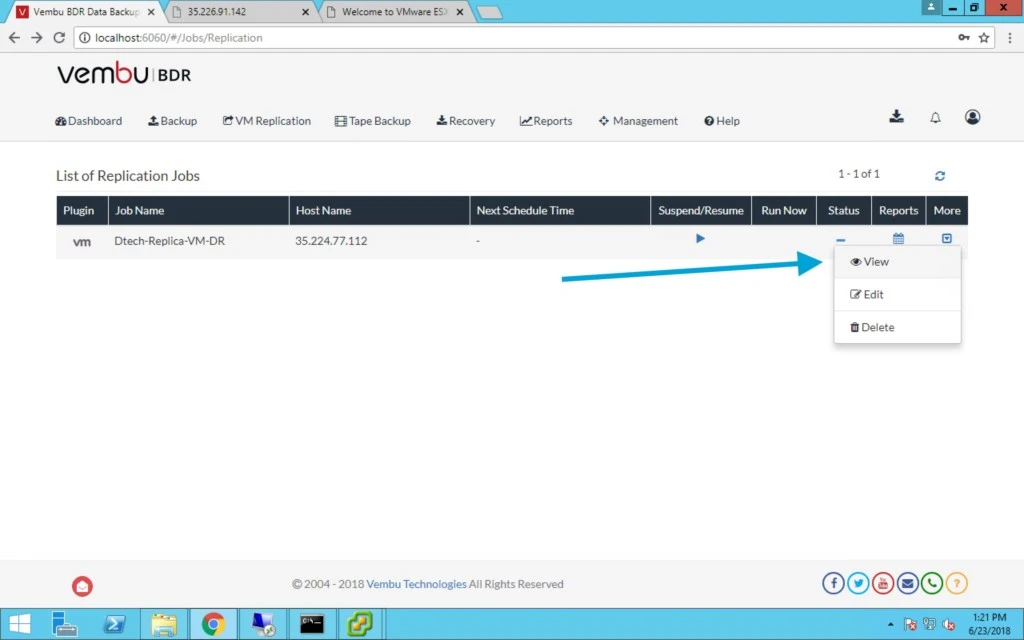
19. After job creation you may want to edit, for that you need to select the job then click on more and under that click on edit option to make modifications.


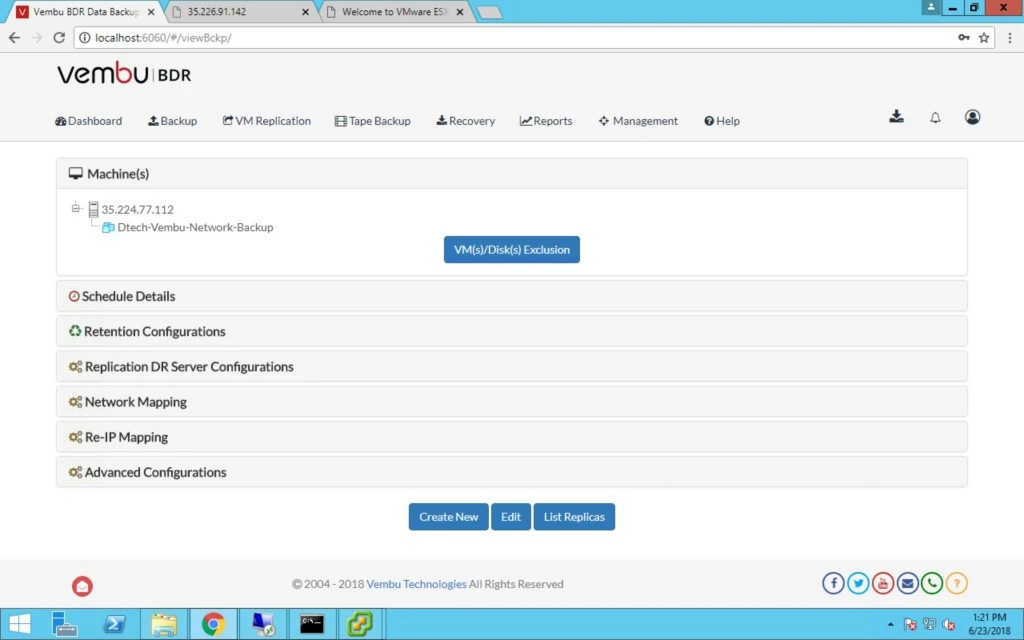
20. Here we can create new jobs, edit the existing job settings as per our requirement and also list the replicas.


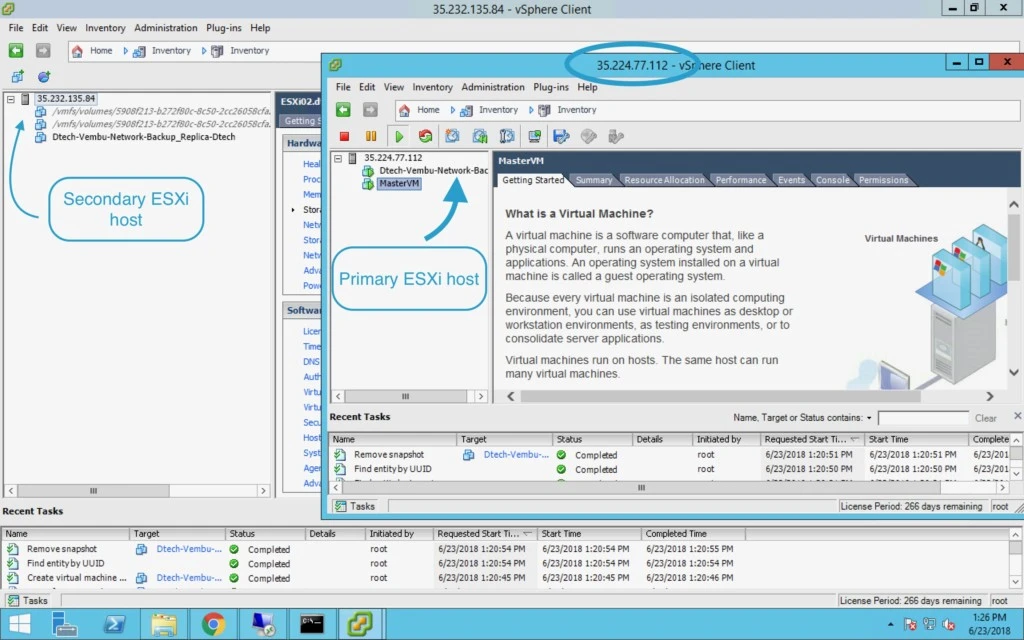
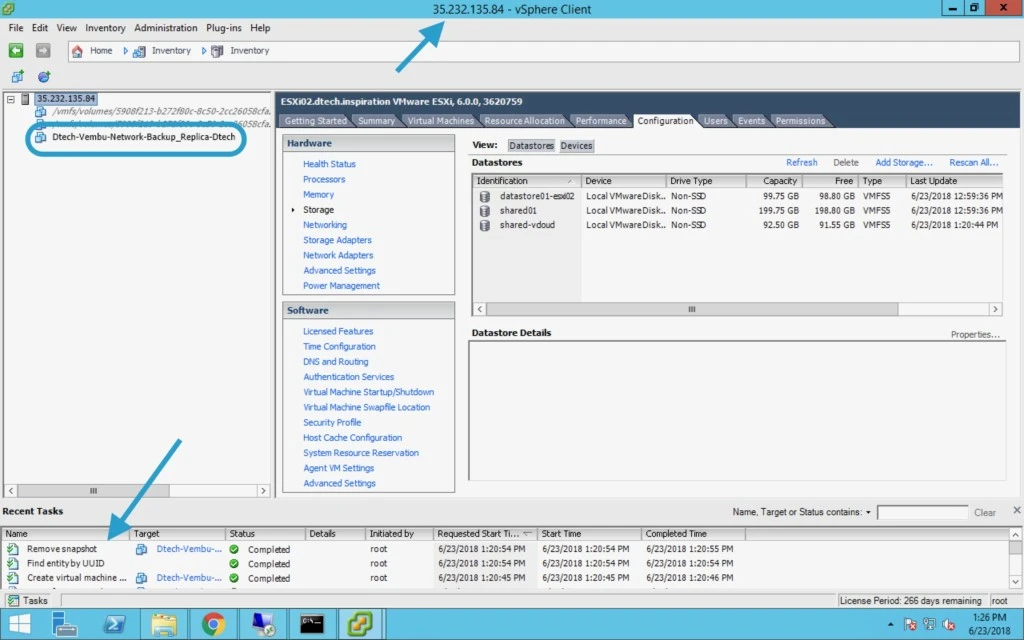
21. After successful replication you can view this VM under ESXi host.


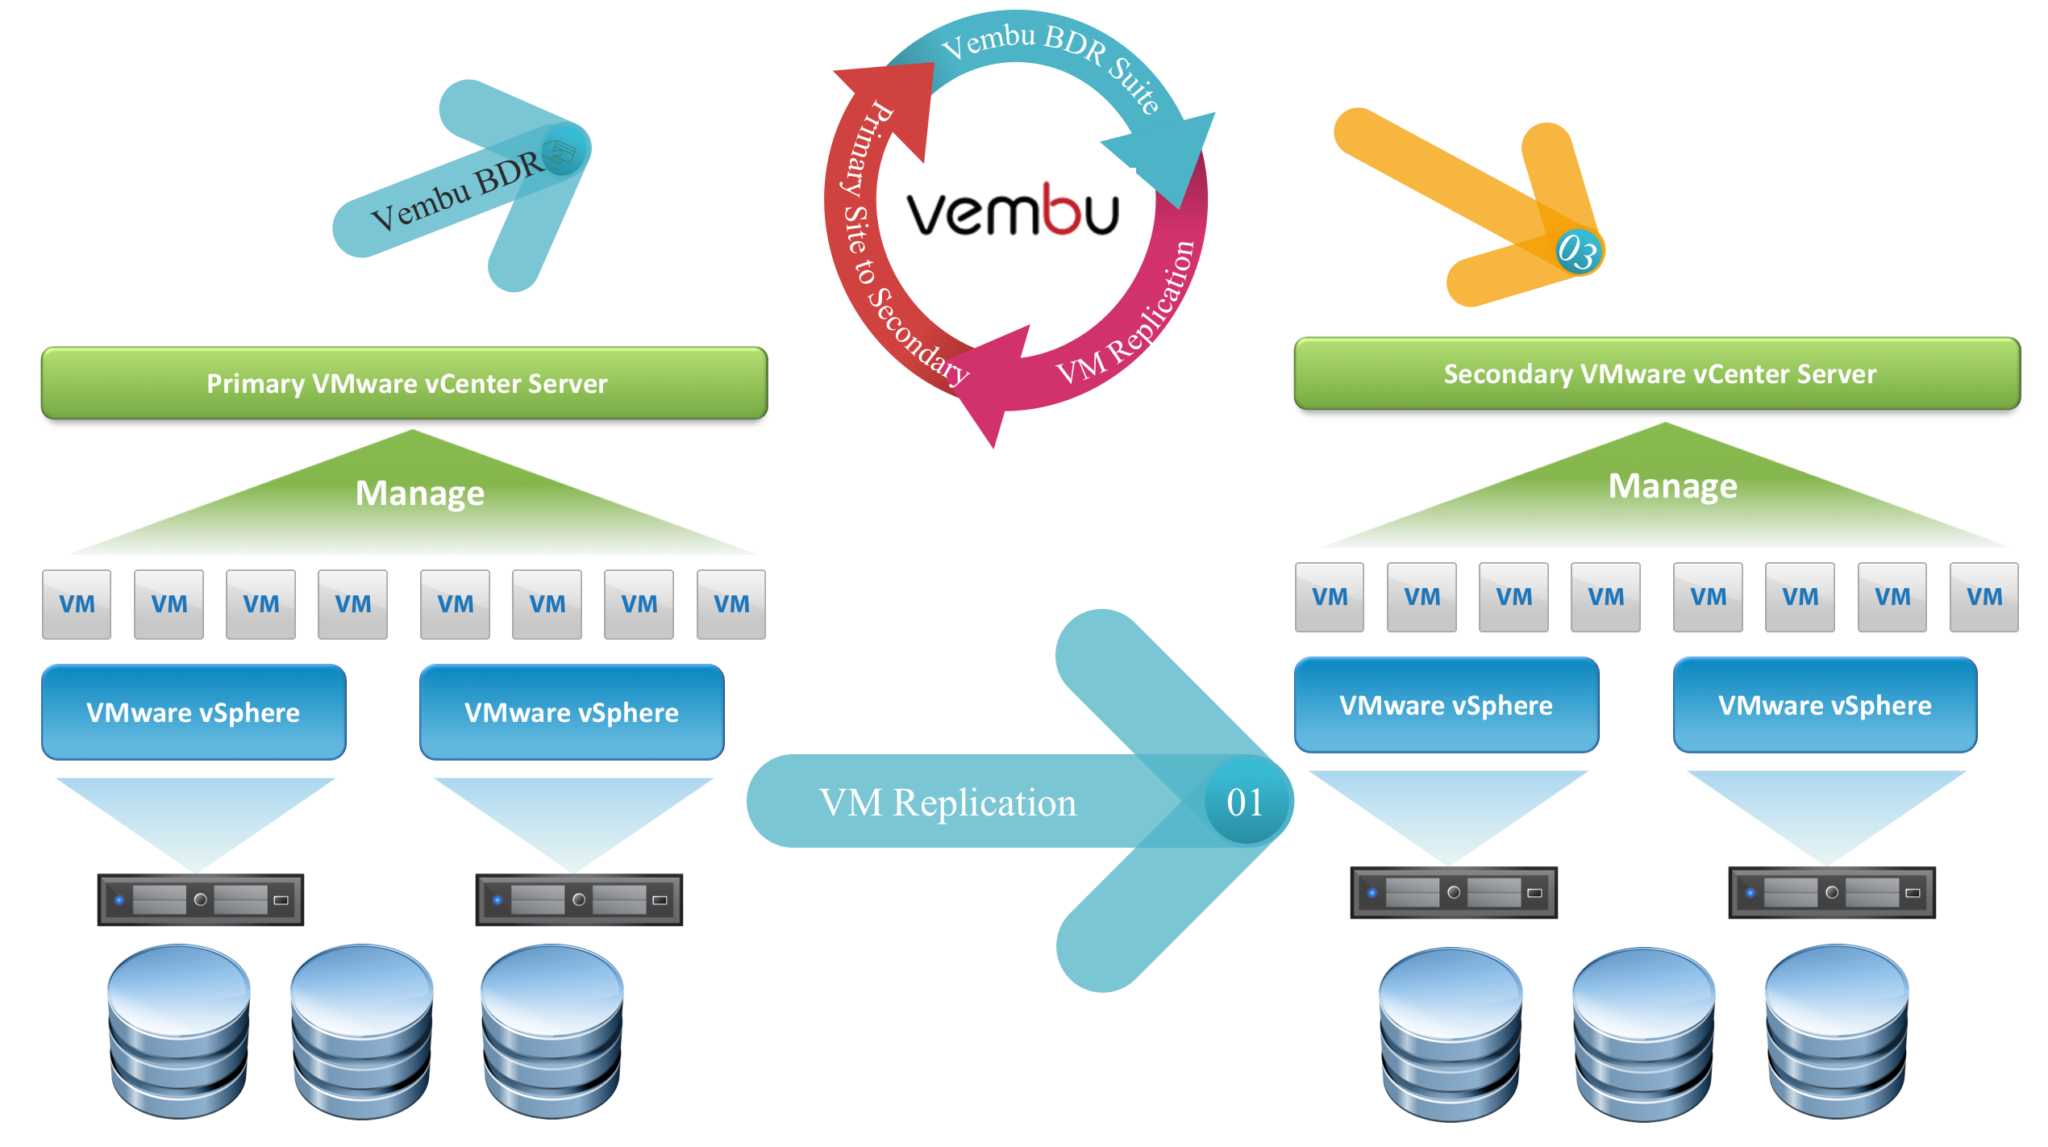
22. Below is the Primary and Secondary site examples.

0

How to backing up VMware workload using Vembu BDR

Topic Outline:

 Adding VMware ESXi or vCenter Server.

 Taking Backup of VM.

 Disk Settings

 Guest Processing

 VMware Guest Credentials

 Schedule Backup Job

 Retention Policies

 Final Job Status


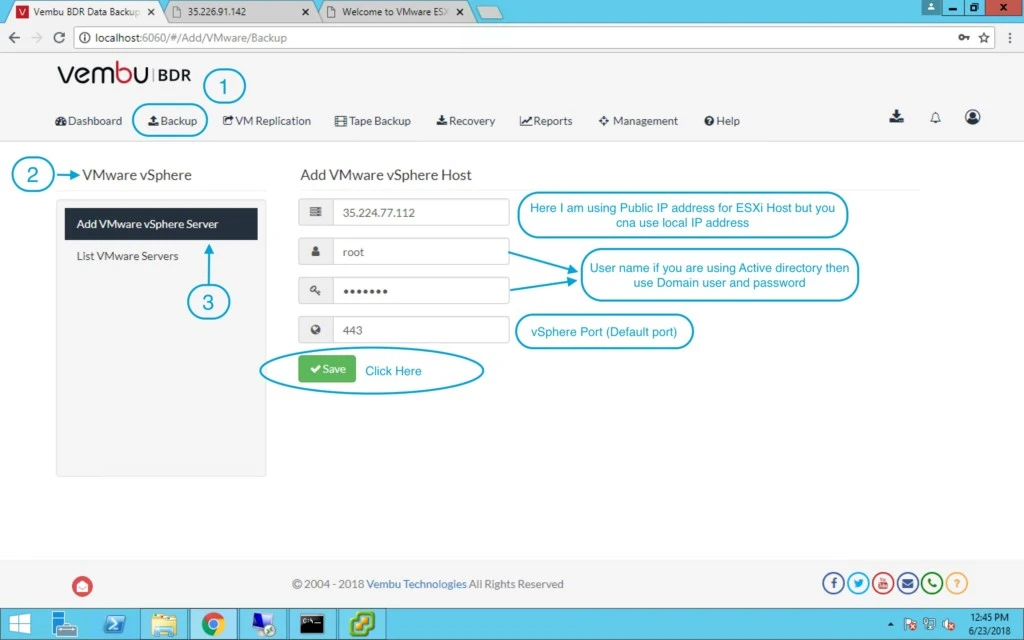
1. Open Vembu BDR server https://vembu BDR server IP:6060.

2. Go to > Backup > VMware vSphere > Click on Add VMware vSphere Server.

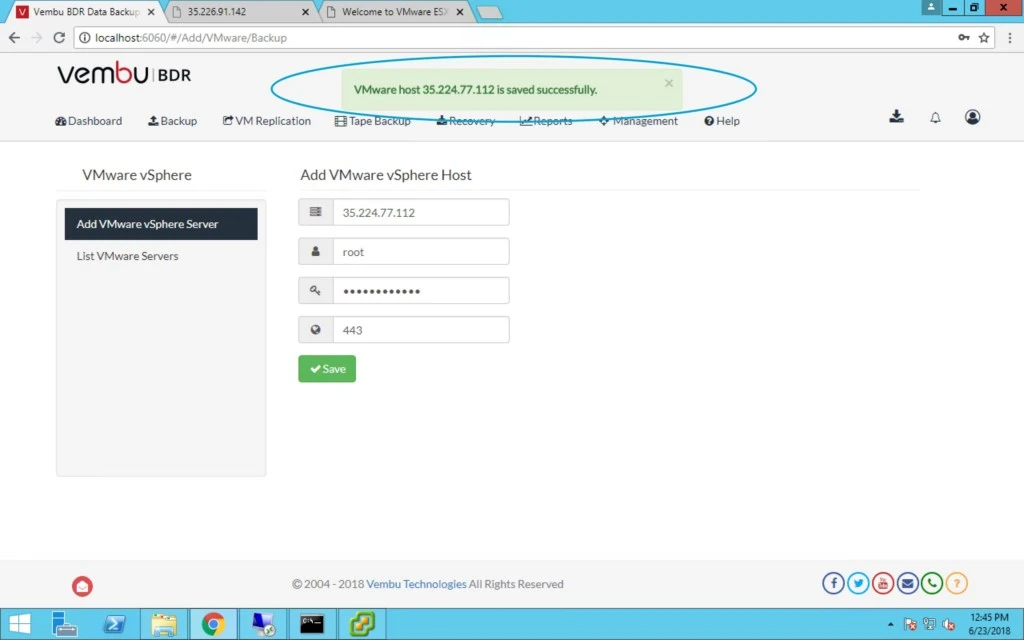
3. Provide VMware vCenter Server or ESXi IP/FQDN.

4. Username and password.

5.  Keep the default port for vSphere.

6. Click on save.


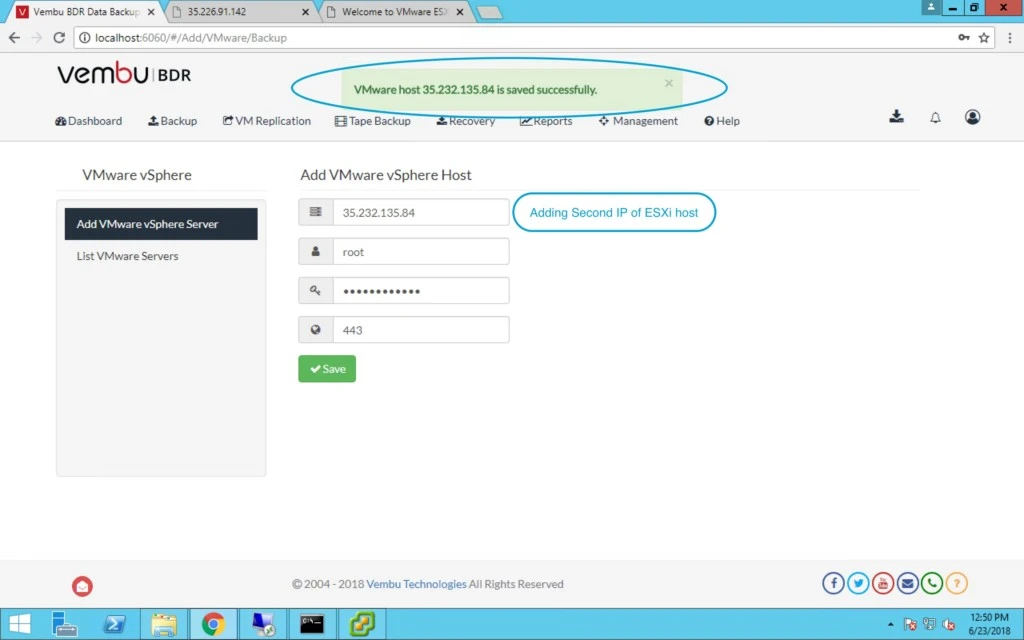
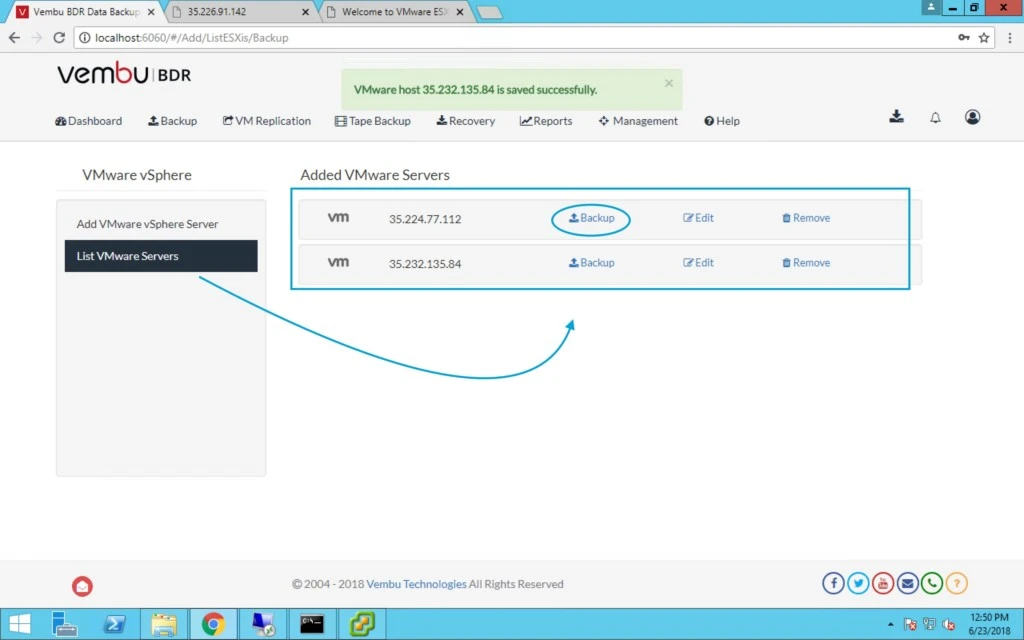
7. After click on save, it will show you successful message.


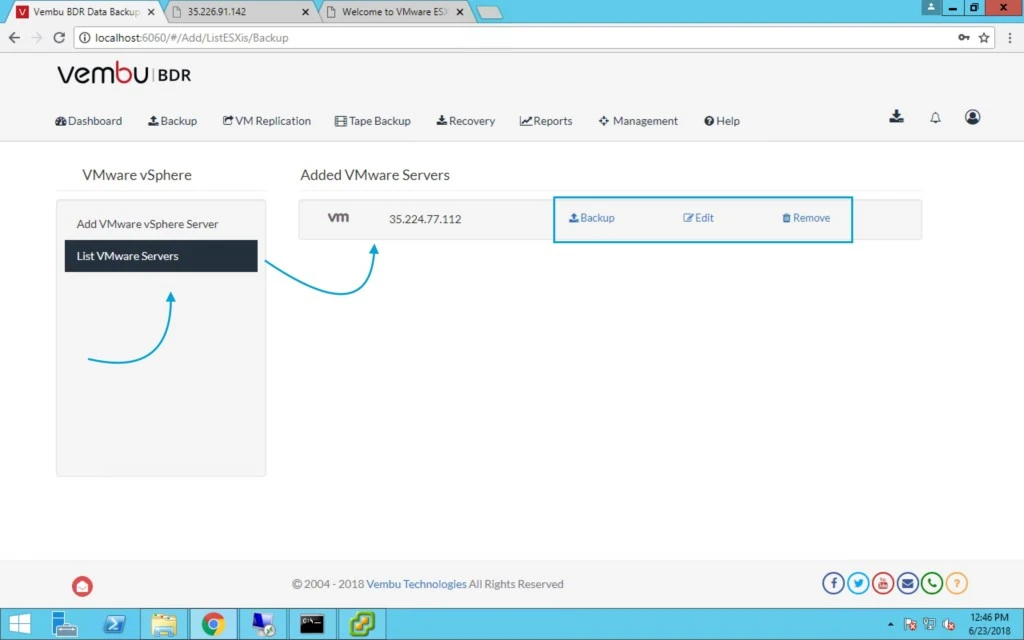
8. Now if you click on “List VMware Servers” you can see all the added servers and their list.


9. Now adding second ESXi host and you need to follow the same process.


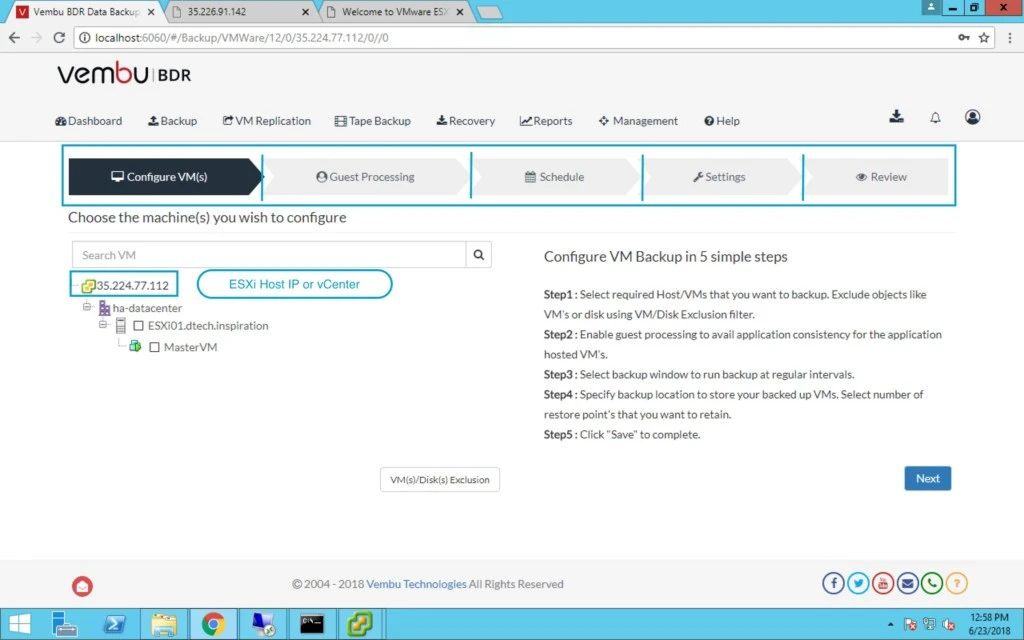
10. After adding VMware servers it’s time to take backup of VMs or a single  VM which is running on these vCenter/ESXi.


11. On below screen you can see ESXi host and all the VMs. Now you have to select VM for which you want to configure the backup.


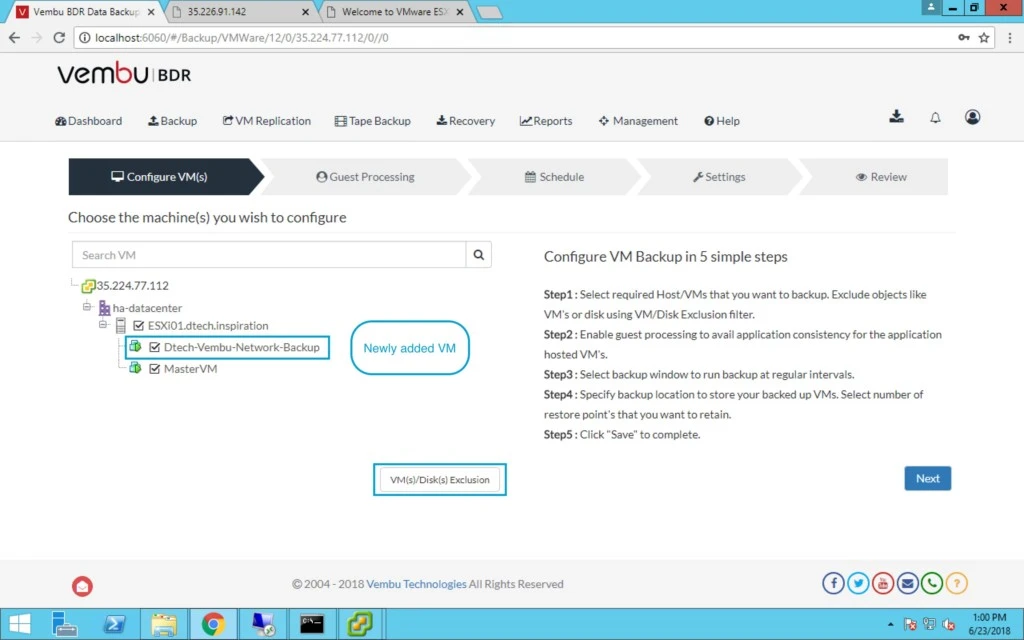
12. To test how quickly a VM can be showed up or can be searched in Vembu environment, after creating a VM on vsphere environment. The result is as quickly as you will create a VM in your VMware environment, right after creation,  you will have the VM in Vembu BDR for it to be searched.


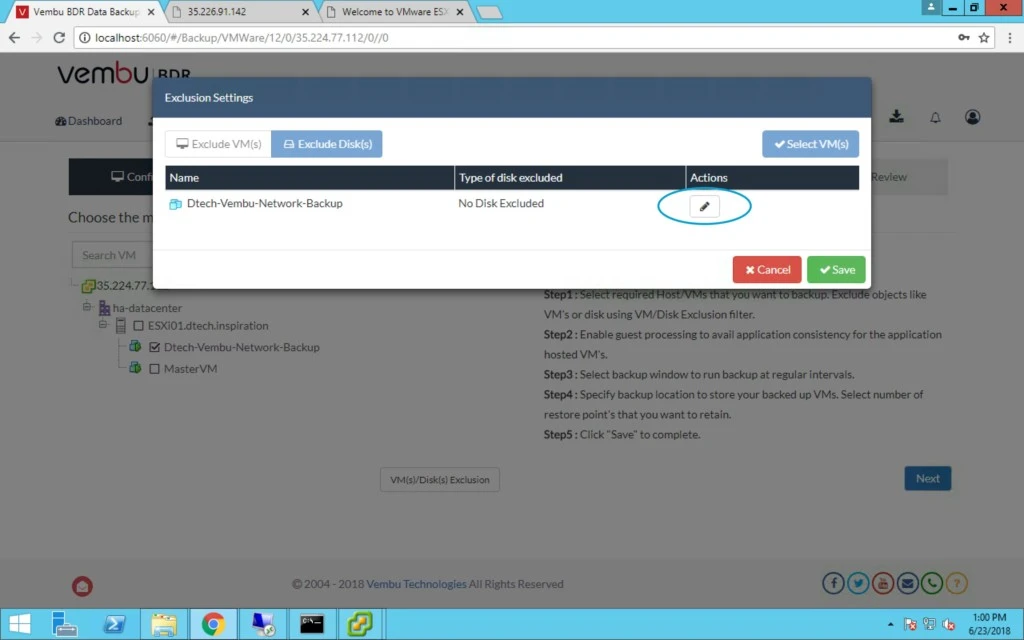
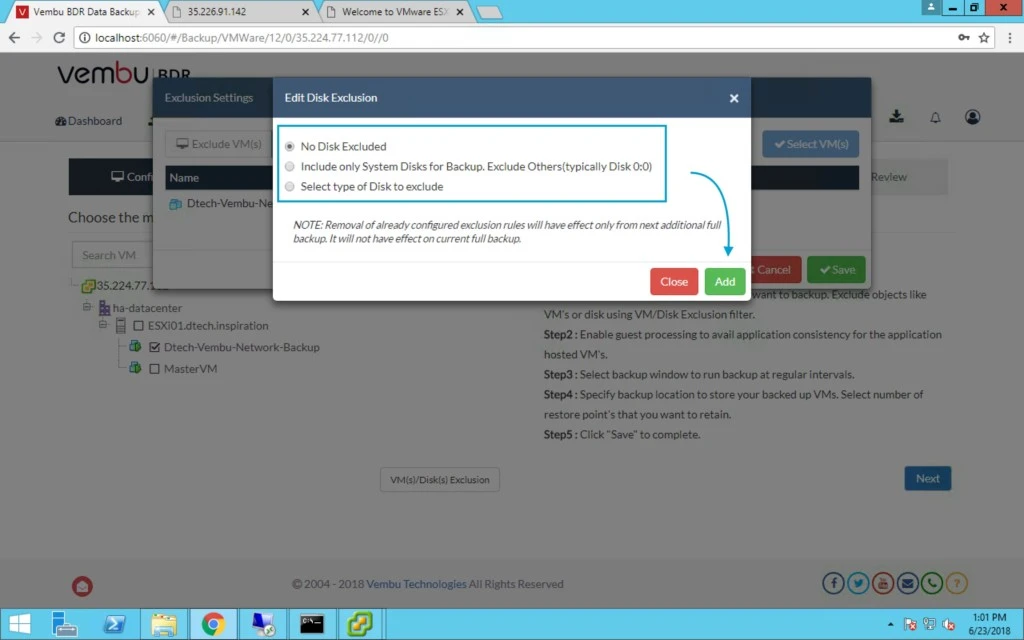
13. While selecting VM, you can also select a specific VM’s disk in exclusion setting option, if you don’t want to take backup of a specific Disk you can easily exclude that.

14. Click on Pencil symbol and select from below options.


15. These are the options for Disk Exclusion are given below:

a) No disk excluded.

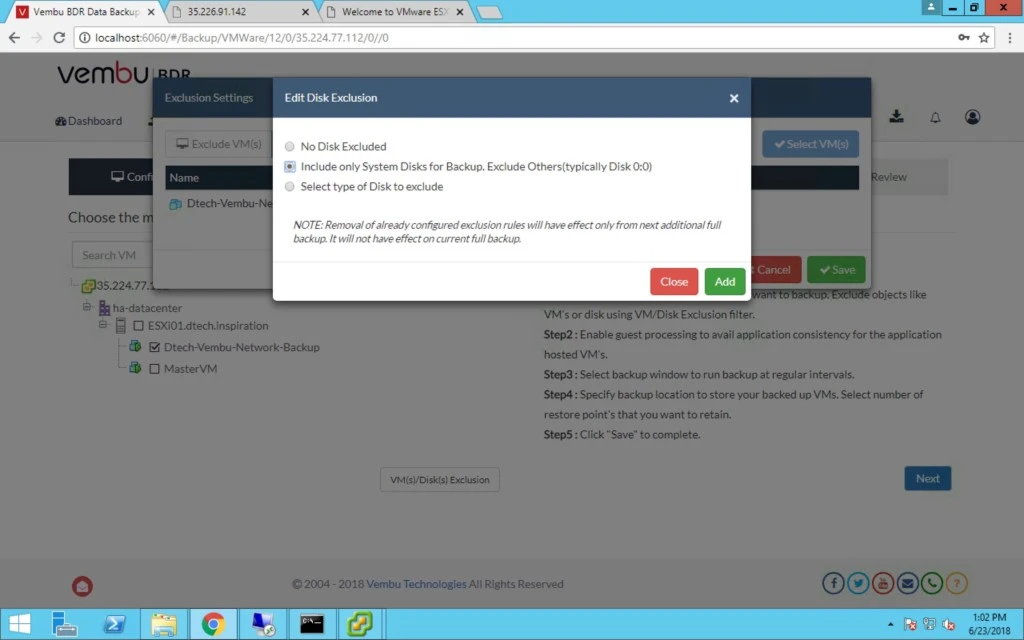
b) Include only system disks for Backup. Exclude others (typically disk 0:0).

c) Select type of disk to exclude.

Note : Removal of already configured exclusion rules will have effect only from next additional full backup. It will not have the affect on the current full Backup.


16. As per your requirement select the option and Click on add.


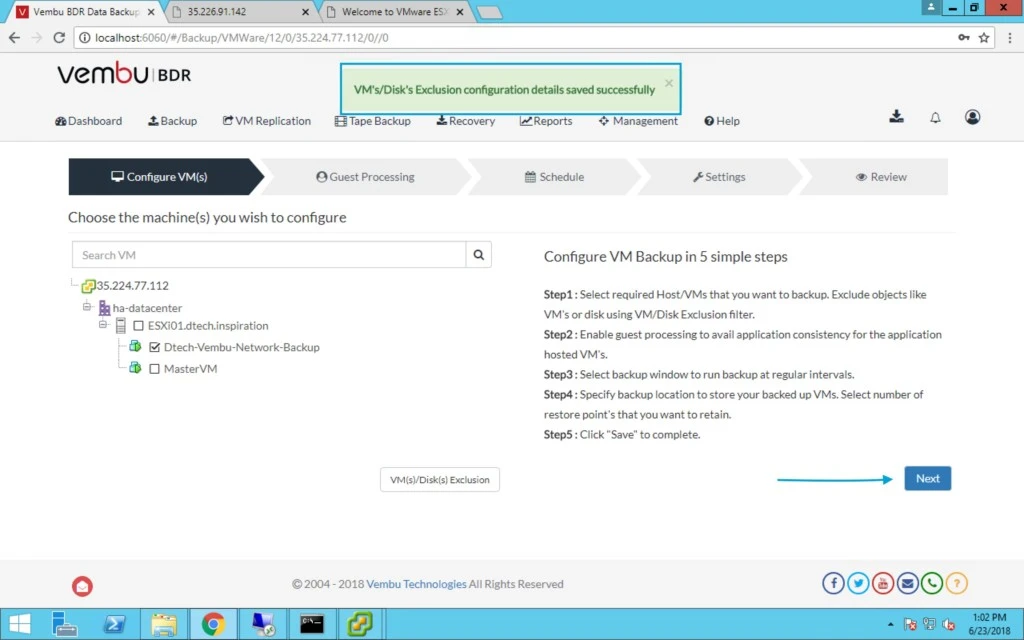
17. After selected the disk for exclusion then click on save button.

Note: By default No disks excluded option will be selected.


Host level Disk Exclusion- This exclusion type is possible when you opt to configure host level backup job. Under ‘Exclude Disk(s)’ tab, you will find the configured host(s) listed.

18. Once you saved the configuration for exclusion, it will prompt you a message with successfully saved and click on Next.


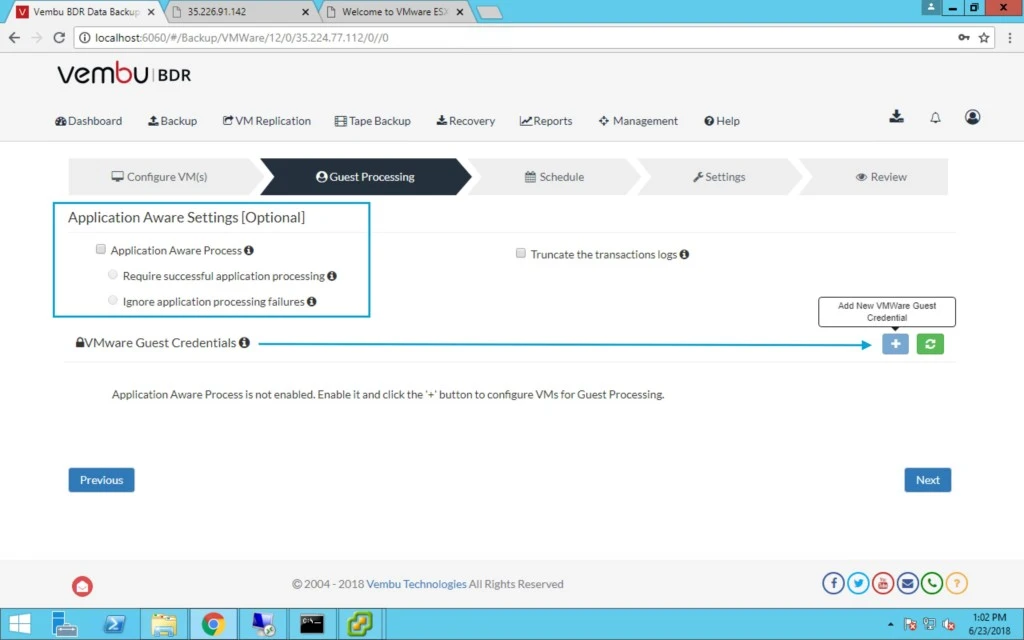
19. Here you can select Application aware settings that are optional.

a) Application Aware process.

b) Require successful application processing.

c) Ignore application processing failures.

Application-Aware VMware Backups:

VMware backups using VMware APIs, utilize application-specific VSS writers (SQL Server, Exchange) to take application-consistent backups and truncate exchange log files to free up the space.

Enabling application aware process, gives users two choices to choose:

Require successful application processing: Choosing this option lets Vembu BDR track application consistency and triggers backup process, only when all the VSS writers in the VM are in stable state.
Ignore application processing failures: This option, lets Vembu BDR trigger backup jobs whenever the job is scheduled, despite the success/failure of application processed.

Truncate the transaction logs:

Enabling this option lets Vembu BDR truncate the exchange server logs before initiating backup process. It purges and commits log files along with the .edb files and reduce storage space consumed.

Application Aware Image Process Prerequisites:

Backup jobs enabled with application-aware image process option requires that your guest OS has latest VMware Tools, all the latest packages and patches installed.
To perform application-aware image processing, you must provide guest OS login credentials for the selected VM(s) running MS Exchange server, MS SQL Server, MS SharePoint Server, MS Active Directory.(Reference vembu.com)


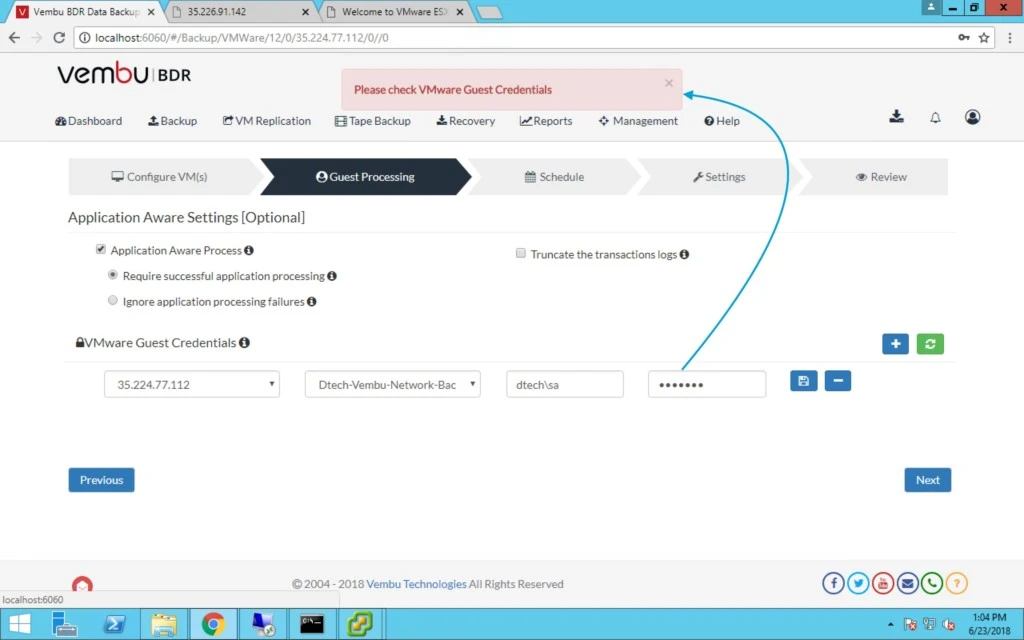
20. If you select VMware Guest credentials option then you can select VM and provide user name and password, when you click next, it will check the OS password to authenticate.


21. In my case, I intentionally provided wrong password and it prompt me an error given below.


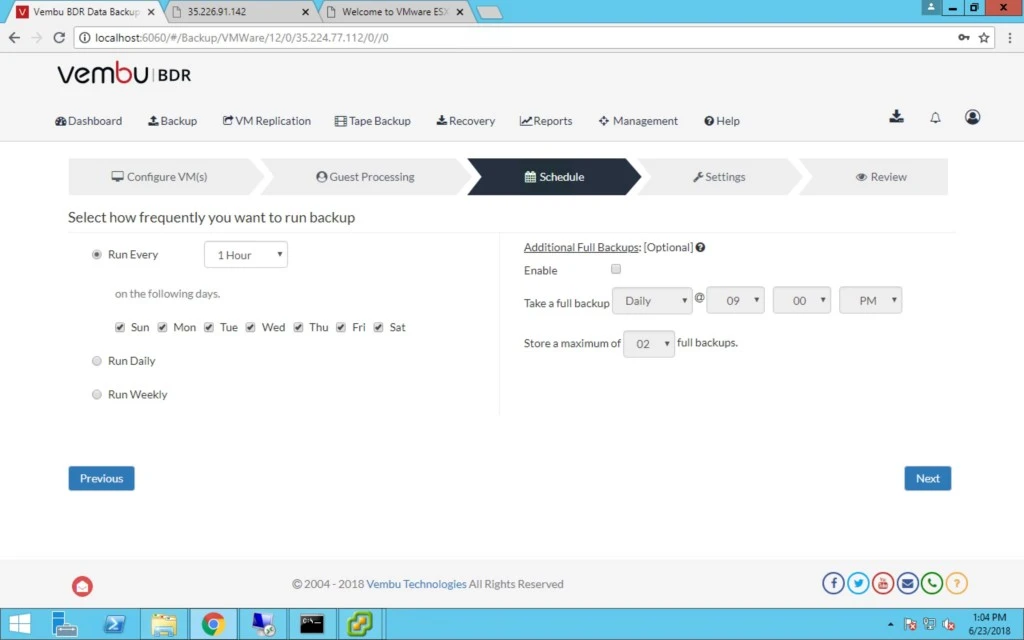
22. You can also schedule this job as per your convenience like Every Hour on selected days or Daily and Weekly basis.


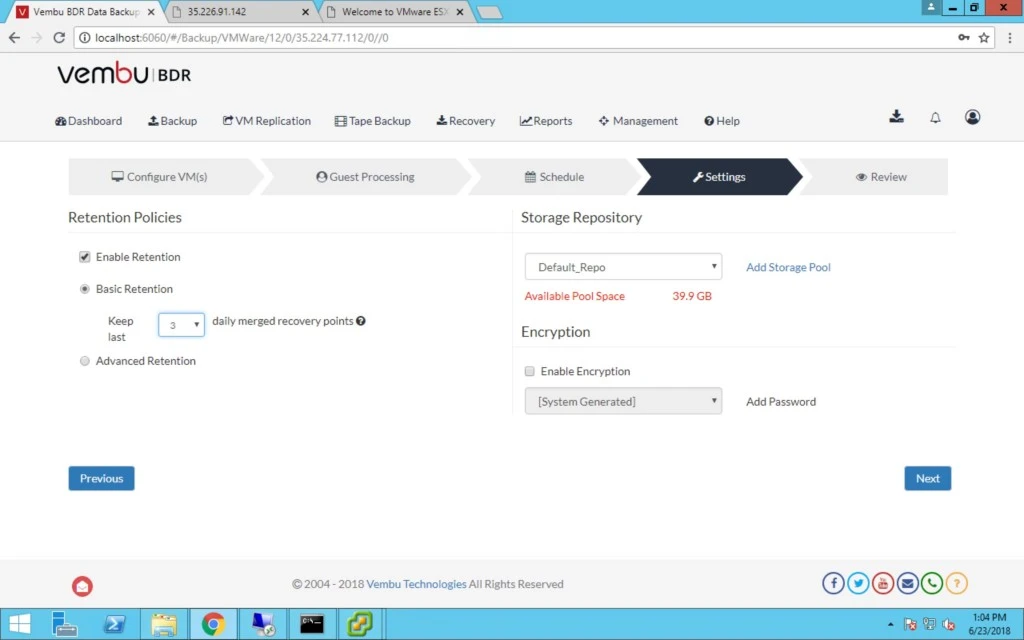
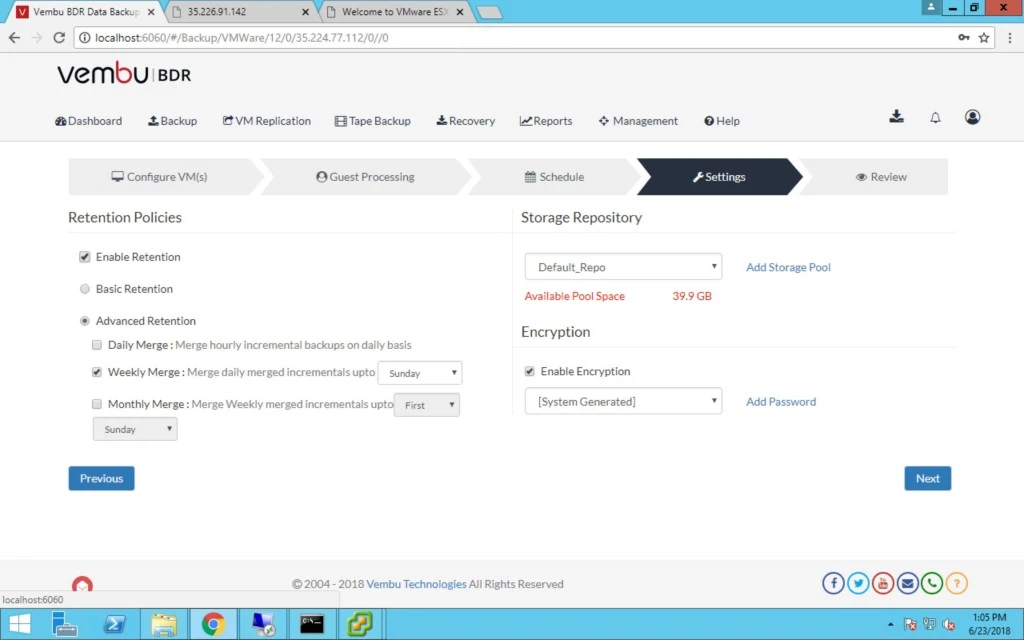
23. You can also select retention policies like basic retention or advanced retention.


24. Here are some Advanced retention examples.


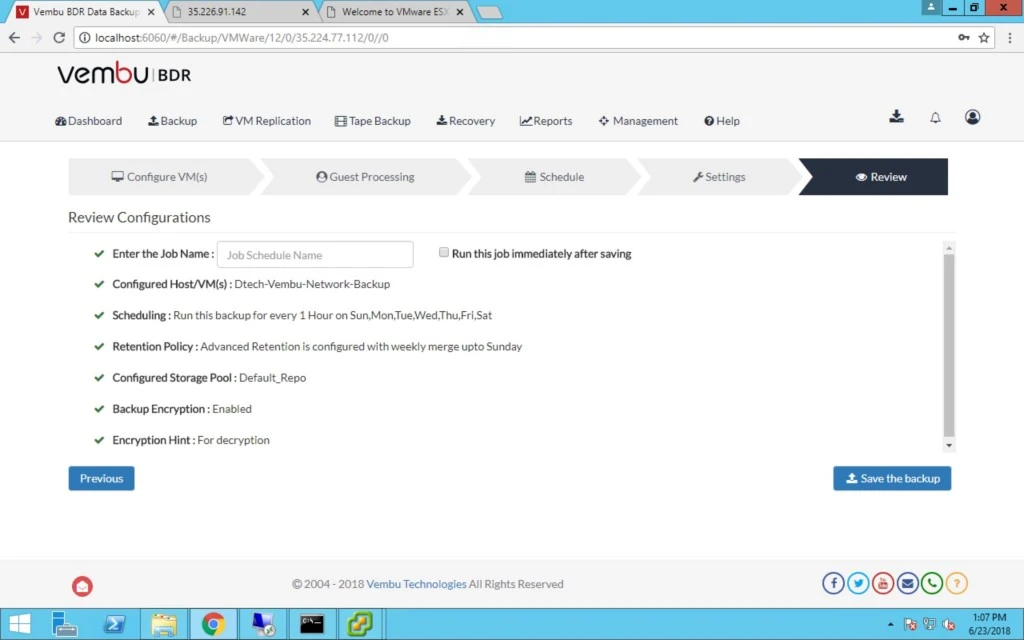
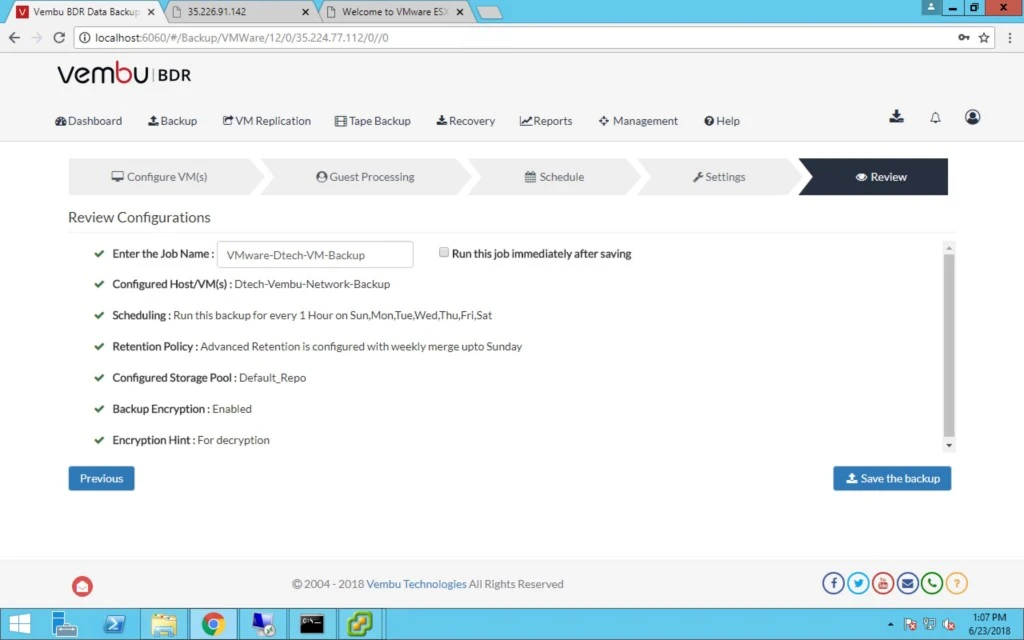
25. Finally Provide Backup Job name and save the backup Job. You can also run the job immediately after saving it.


26. Job Name is a mandatory field which means you can’t skip this step.


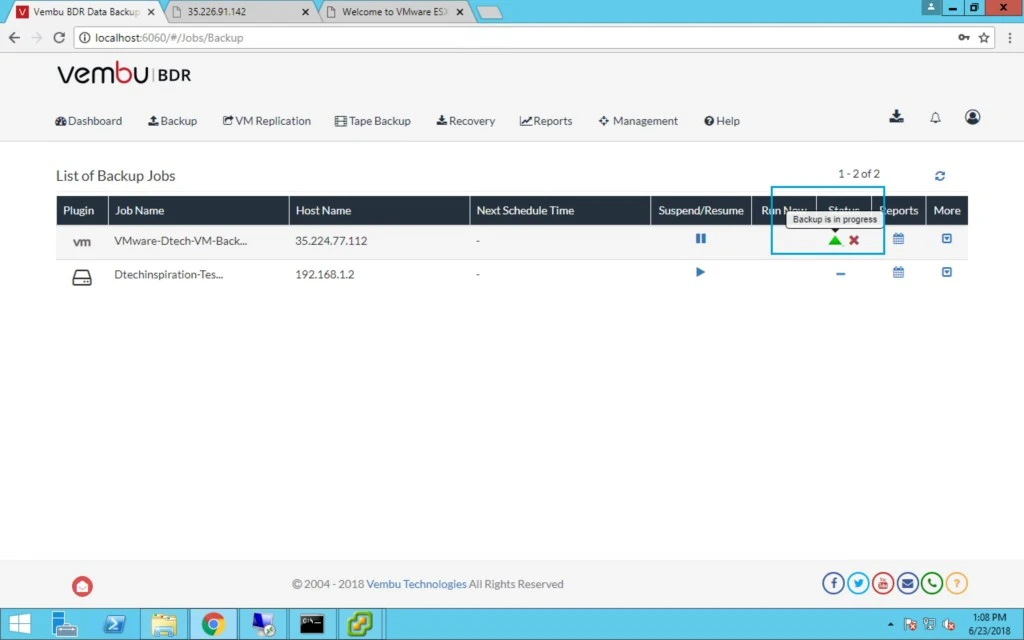
27. Now here you can check the backup status in progress.


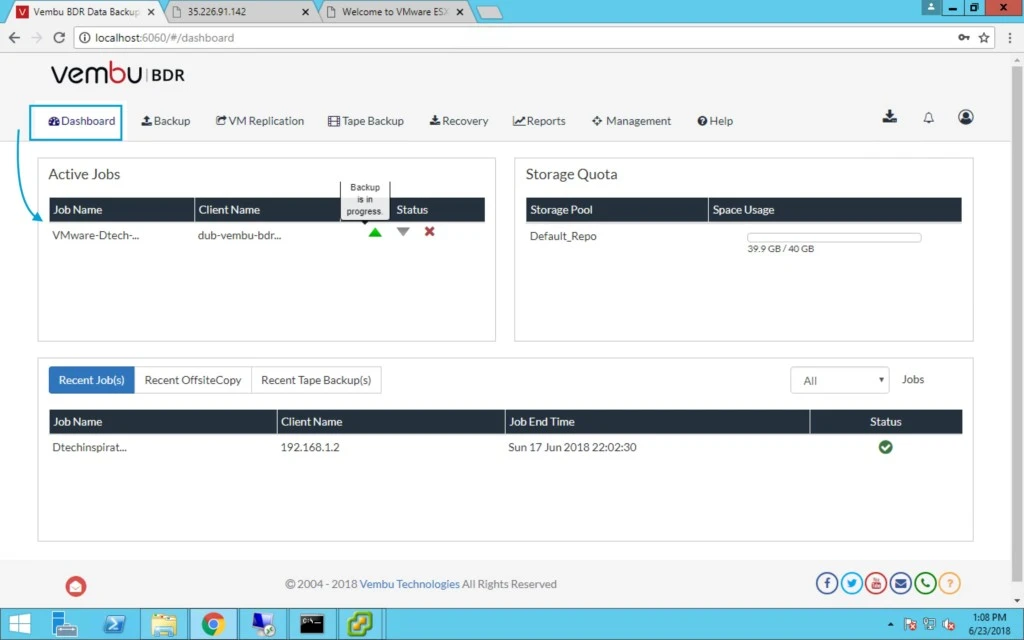
28. Click on Dashboard > under that you will see the Active jobs with a progress status.


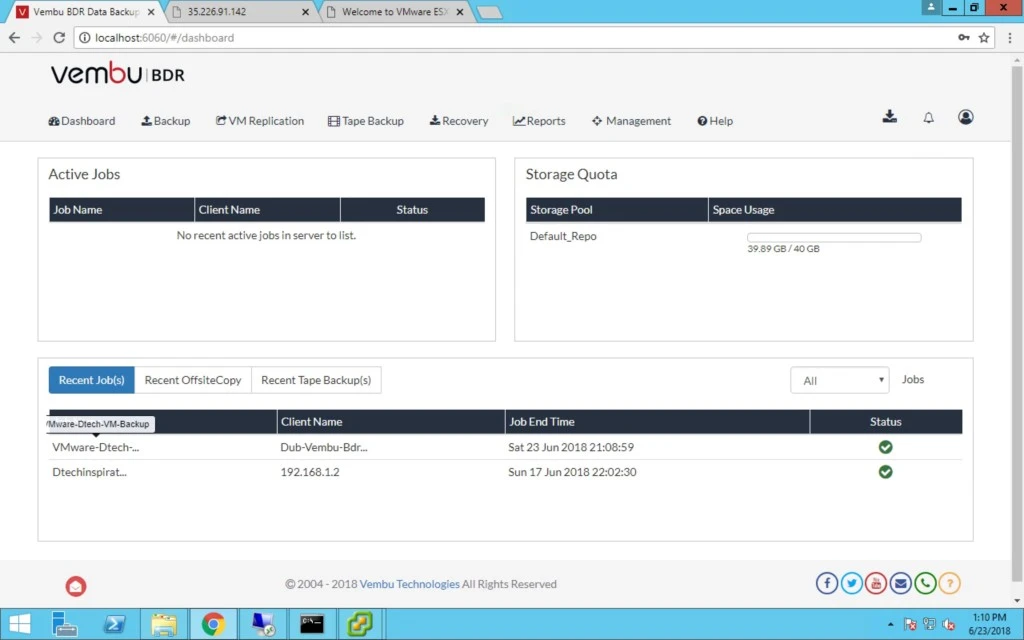
29. Under recent job you will see the job’s end time with status whether it’s failed or successfully completed.

0

How to configure Vembu Network recovery and file level backup

Taking backups of all the files or folders might not be an efficient solution for some enterprises, so its very important that we understand the requirement of an enterprise. For Example Some business requirements involve taking backup of only the critical files and applications and these critical data needs to be protected on a near-continuous basis. In Such requirements taking a disk image backup containing all the OS configurations might not be considered an efficient backup policy. It’s very important to have a backup solution that can be tailored to your needs by offering you control over data.

Vembu NetworkBackup ensures protection to all your business critical data across file servers, application servers, and workstations.

  • Backup Files/Folders
  • Backup System State, Active Directory & Registry
  • Backup Exchange, SQL, Sharepoint & Outlook
  • Encrypt your data, both at-rest and in-flight
  • Retain files that you need along with its versions, spanning years


Topic Outline:

 Registration VM with Vembu BDR backup server

 Selecting files and options

 Configuration Scheduling

 Configure Retention

 Review Configurations

 Details

1. After network backup setup installation in my previous article of installation of network file recovery, We will look into Backup and Recovery of your files and applications.

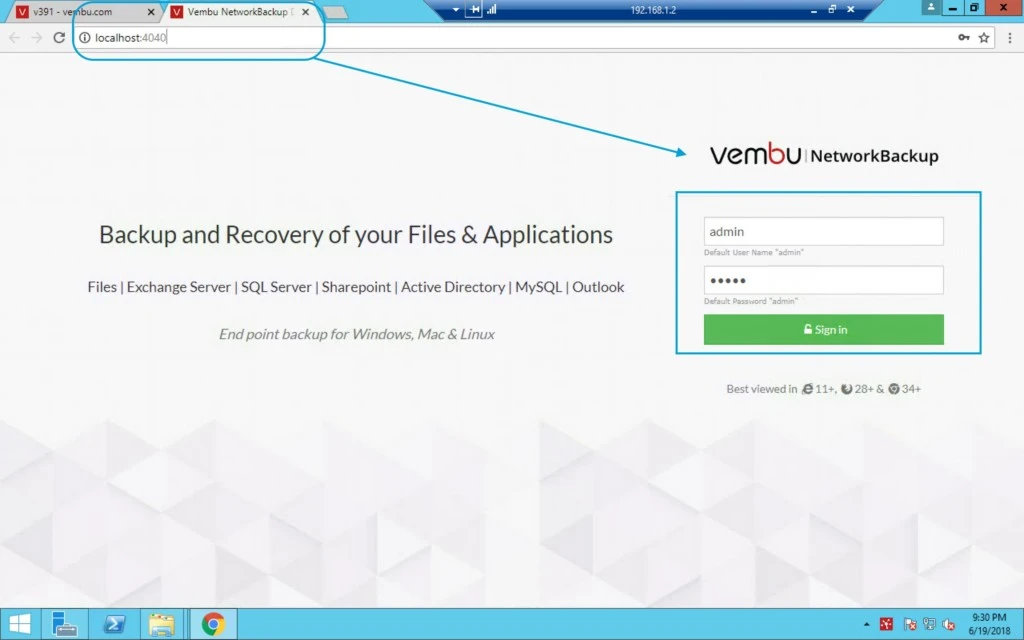
http://localhost or IP:4040/ after this provide username and password (if you have customized this during installation then use that customized username and password)


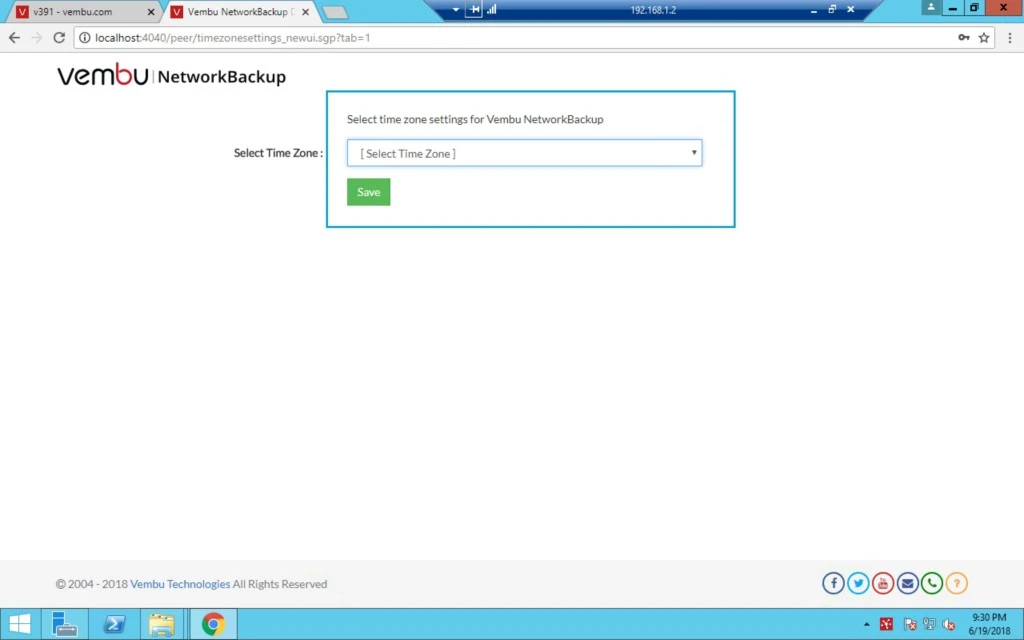
2. Select Time Zone as per your region.


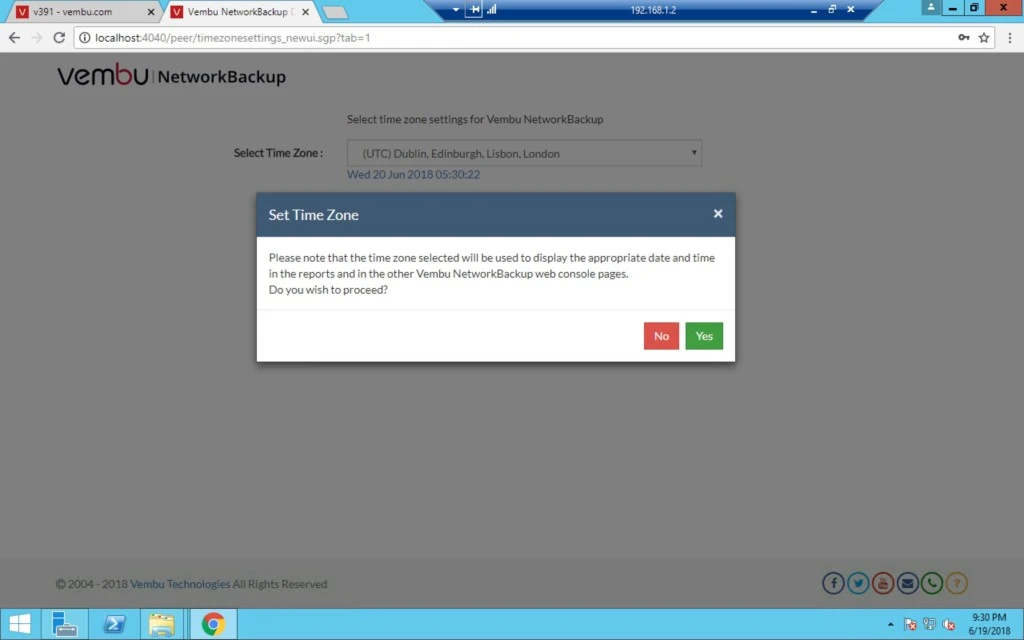
3. Click on Yes.


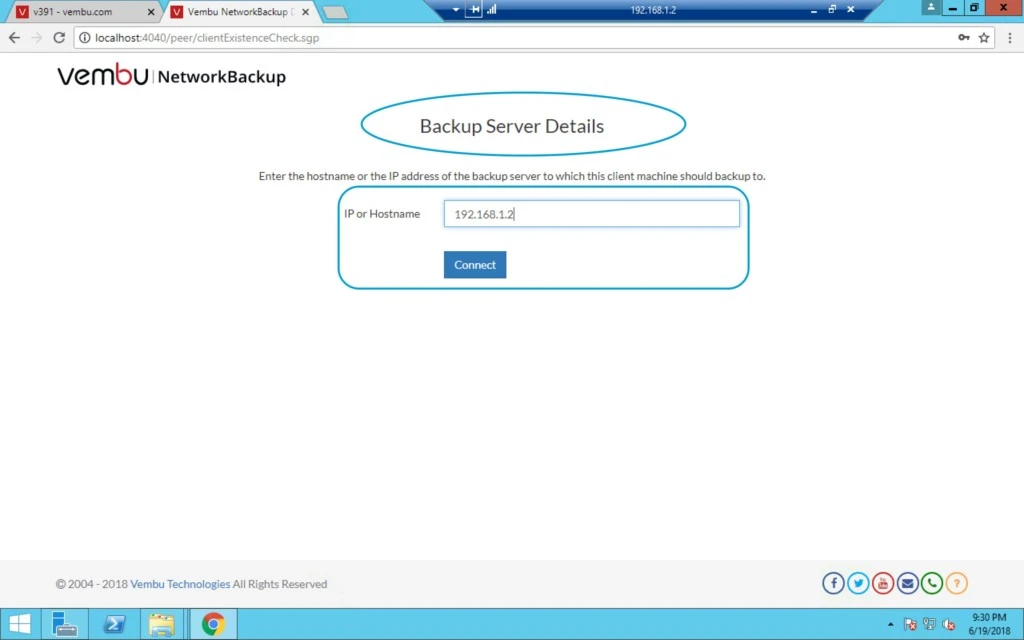
4. Here you have to provide your Vembu BDR server IP.


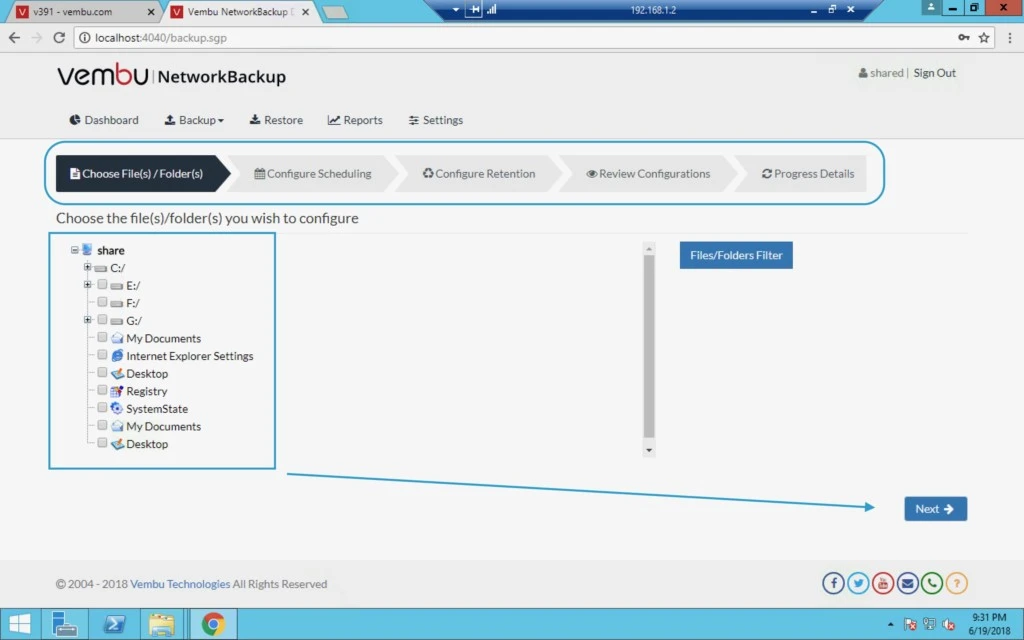
5. Now at this point on the left-hand side, you can see local machine drives and other folders for which you can configure the backup (File Level Backup).


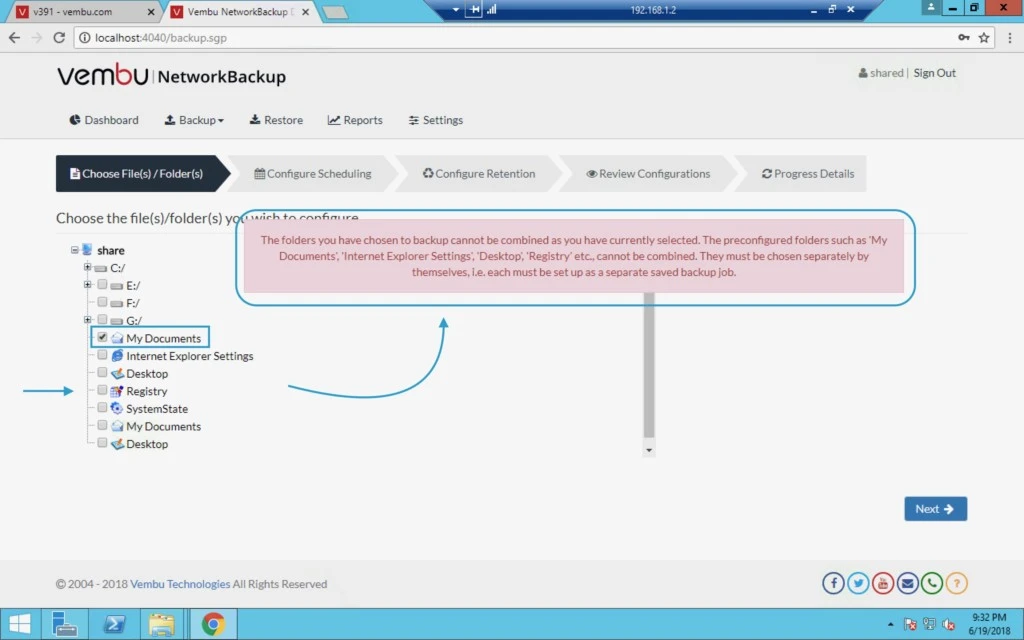
6. On below screen, you can see My Documents, Internet Explorer Settings, Desktop etc when you select “My Documents” and trying to select other files it will show you an error that selected items could not be combined so you have to configure backup separately for these.


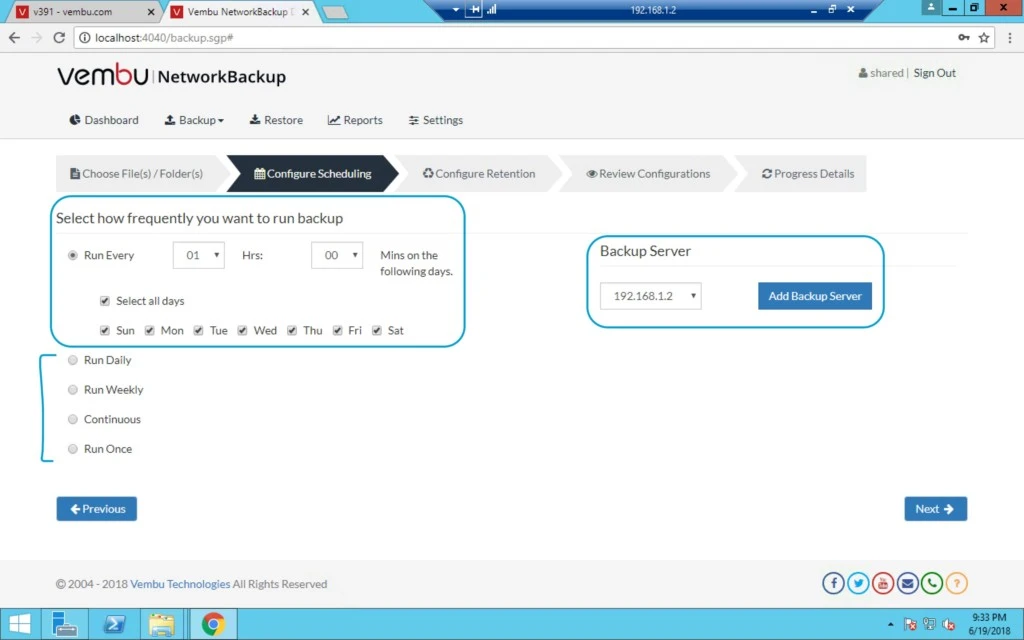
7. After that, you can configure or schedule timing for backup like hourly or define the time as per your requirement along with days like Sunday or Monday.

There are few more options available like you can run this backup Daily, Weekly, Continuous or Just Once.


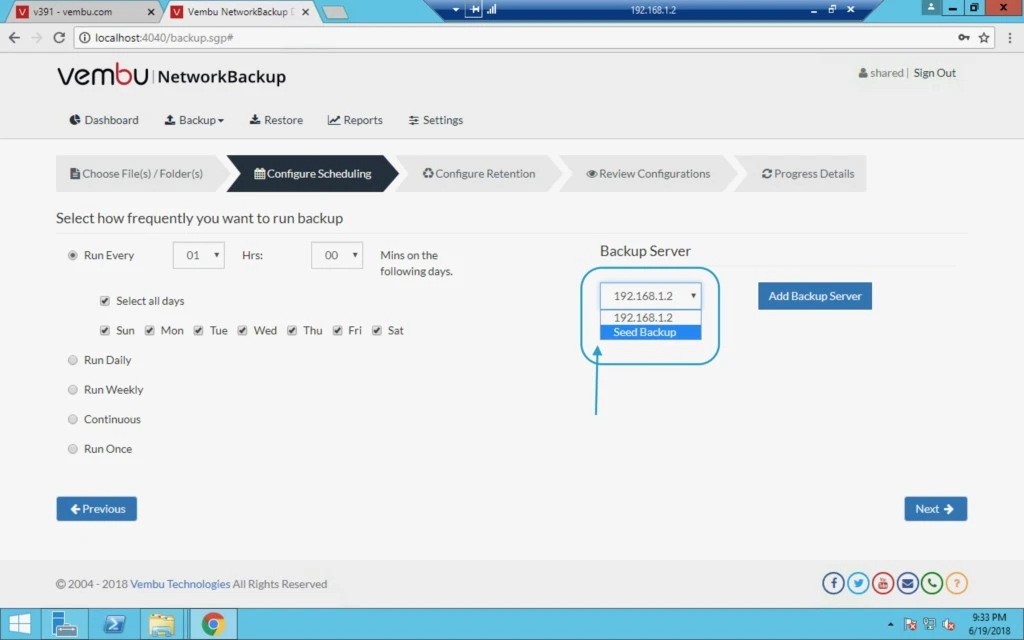
8. On the right-hand side, you can select Vembu BDR server if you have more than one then select from a drop-down list.


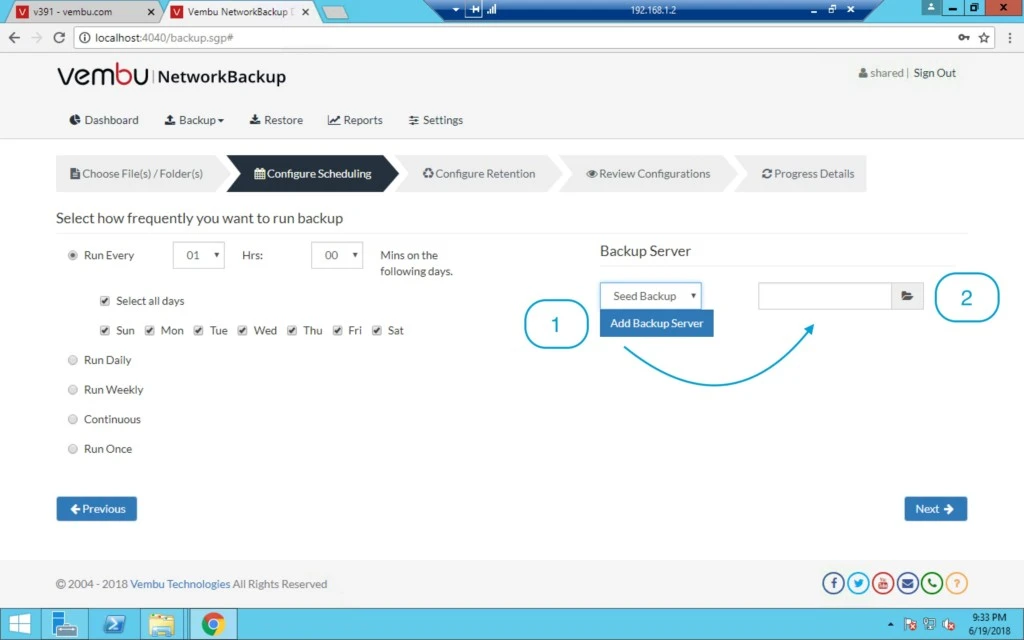
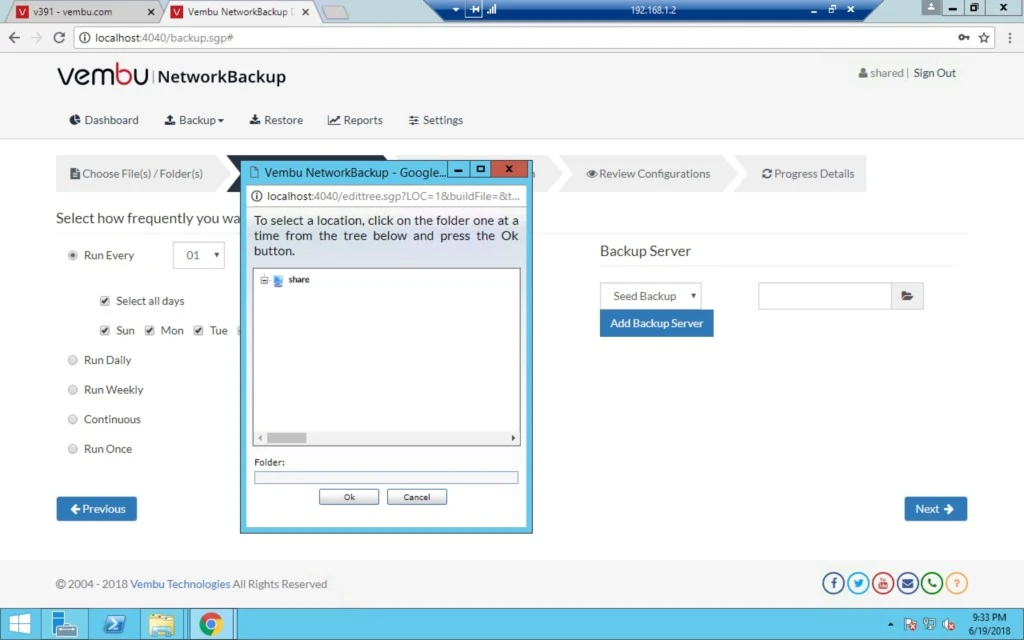
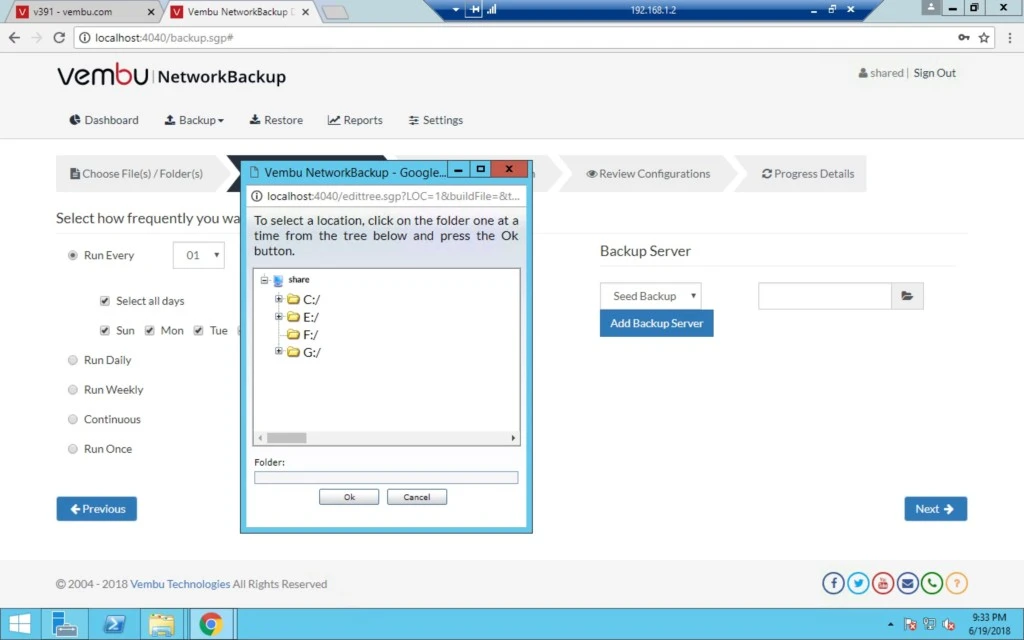
9. We can also schedule the backup for seed backup and click on the second option for Seed backup server.

Seed Backup migration is very efficient feature when it comes to copying a large backup initial data from a client machine to a backup server which helps in fastening the backup process and this can be taken in an external local drive connected to the client machine and then this drive can be easily moved to the remote backup server’s environment to migrate the data into the backup server. After performing the client side Seed Backup Migration steps, data migration and incremental backups can run directly from the client to the remote backup Server. (Reference storgrid.com)


10. Here you can select the drive where you will keep this backup.

Seed backup migration is one of the key features in the Vembu BDR suite, where a user can get the initial full backup data stored locally and get it transferred over a storage medium (HDD/USB) to a backup server.

Advantages:

  • This will be helpful for users with low bandwidth network and large backup size.
  • At most times, reduce bandwidth and time consumed.


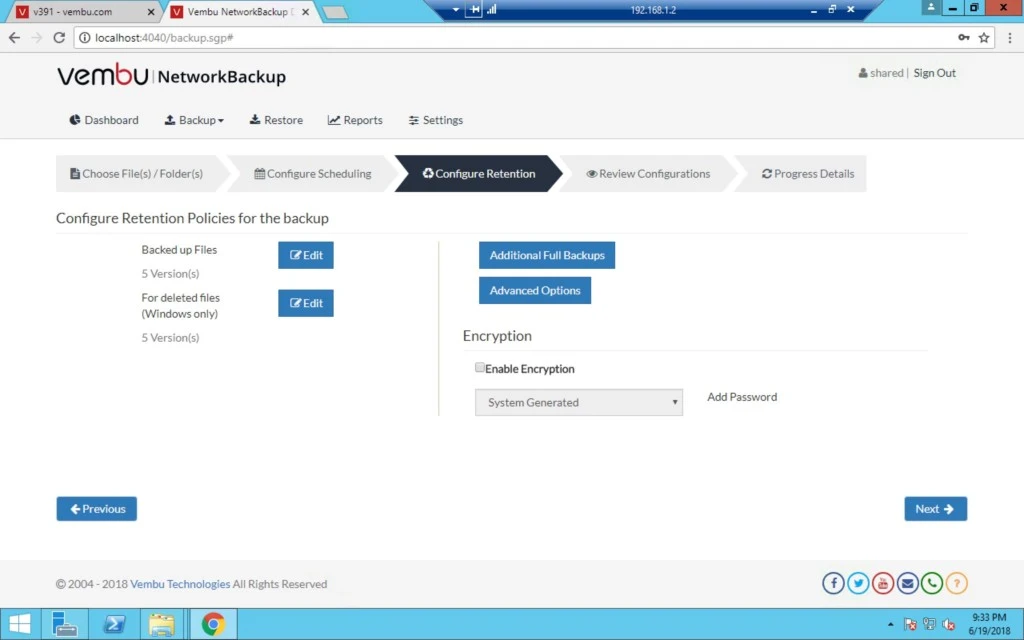
11. Now we have two options on the left-hand side.

A) Backed up files

B) For deleted files


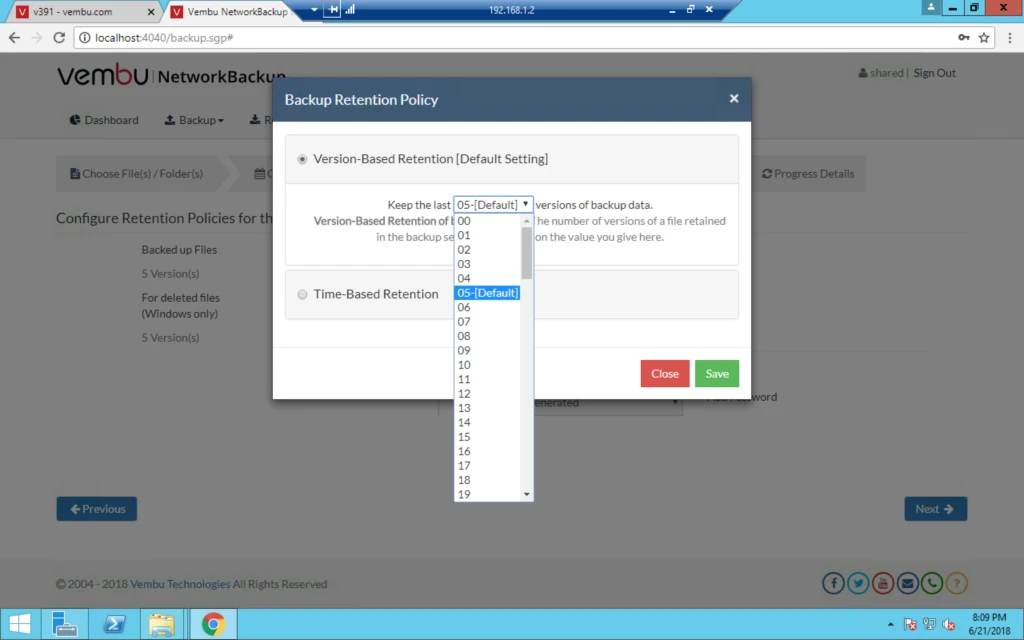
12) Backed up files -> under this you have two options.

i) Version Based retention: here you can keep up to 99 versions and default is 5.


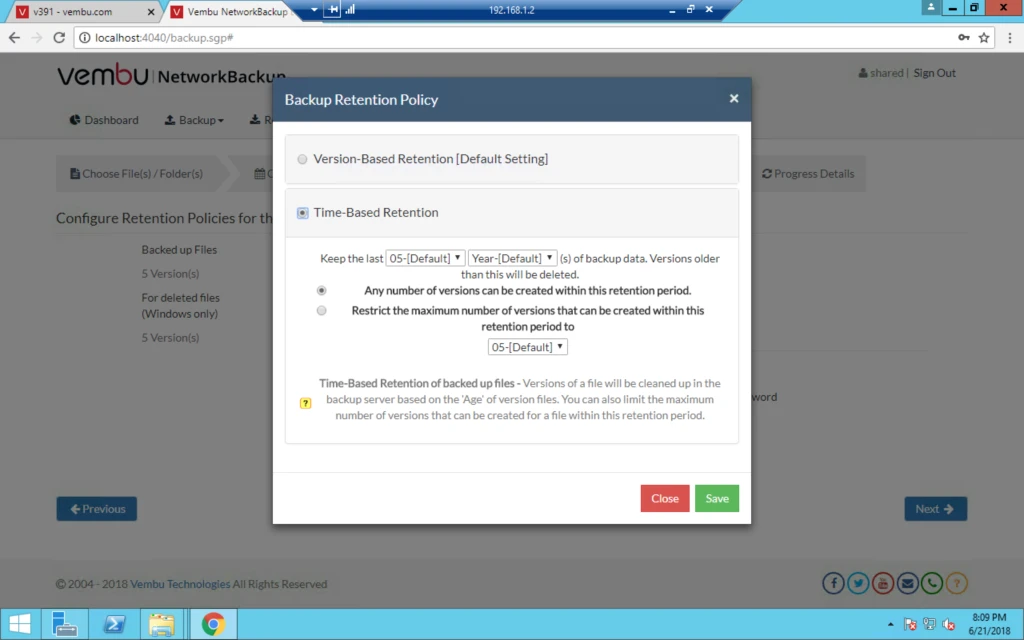
ii) Time-based retention: Maximum up to 10 and default is 5 with Days, Weeks, Months and Year.

Restrict the maximum number of versions that can be created within this retention period to Default 5 and Max 99.


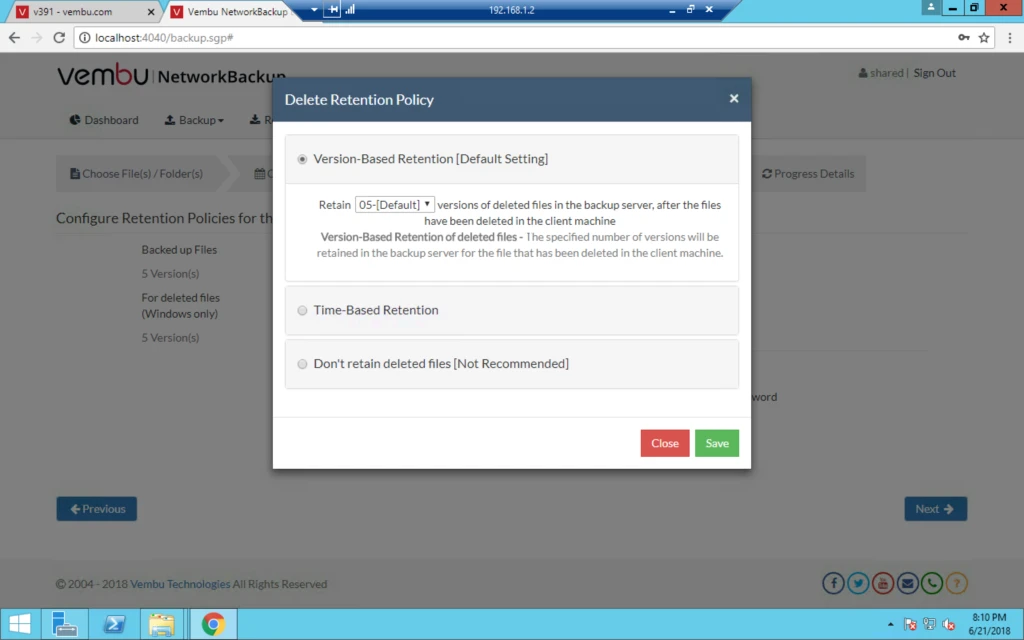
13) Now Deletion Policy :

  1. Version-Based Retention.
  2. Time-Based Retention.
  3. Don’t retain deleted files.


i) Time-Based Retention of deleted files – The versions of a file will be retained for the specified time period after the file has been deleted in the client machine.

ii) Don’t retain deleted files – If files are deleted in the client machine, ALL versions of these files will be deleted from the server as well.

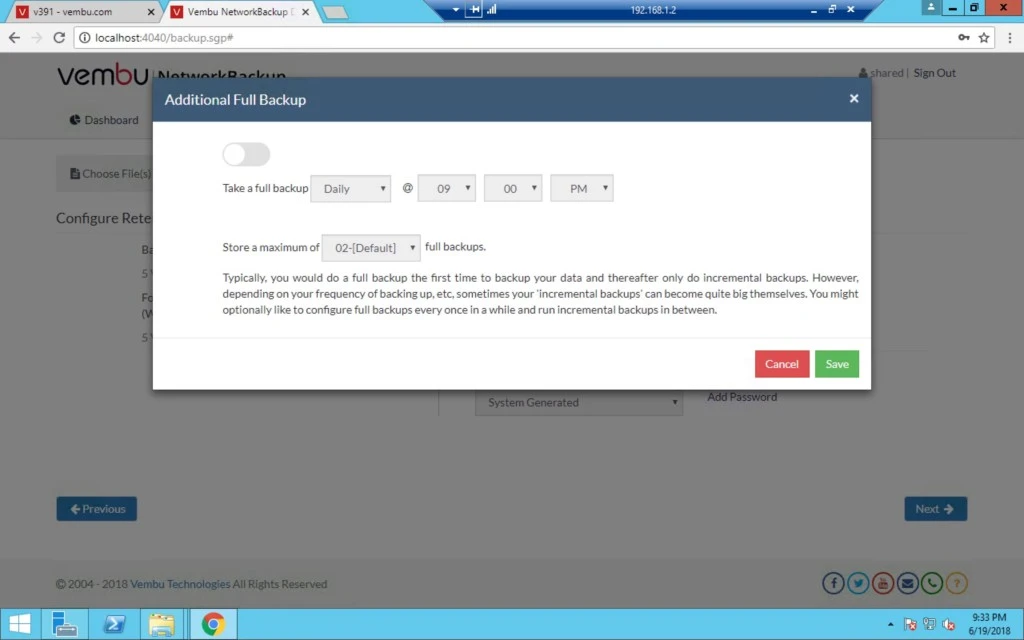
iii) If you click on Additional full backup then you can see below screen.


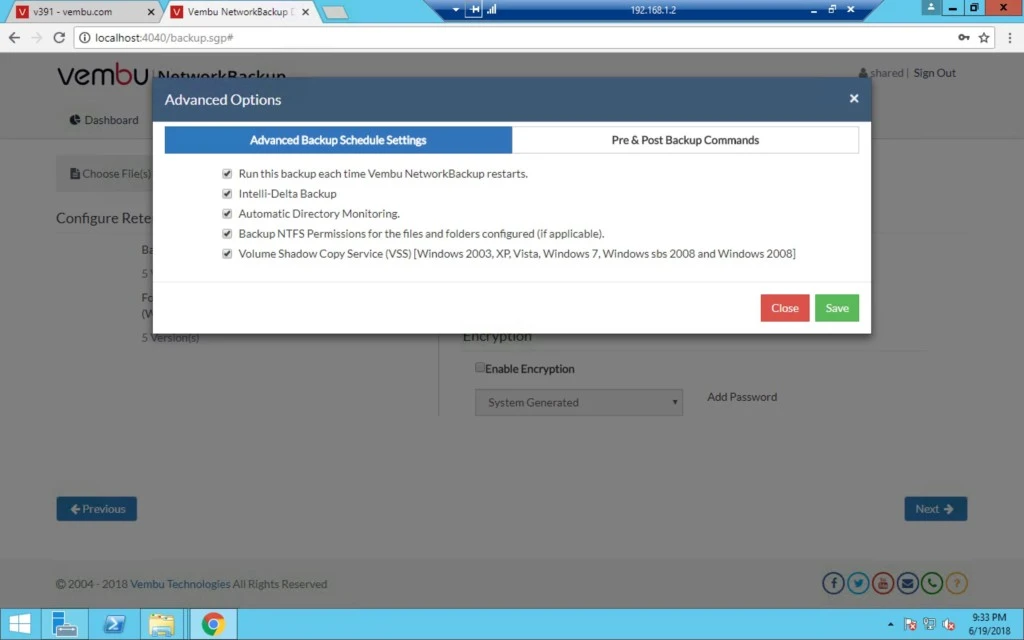
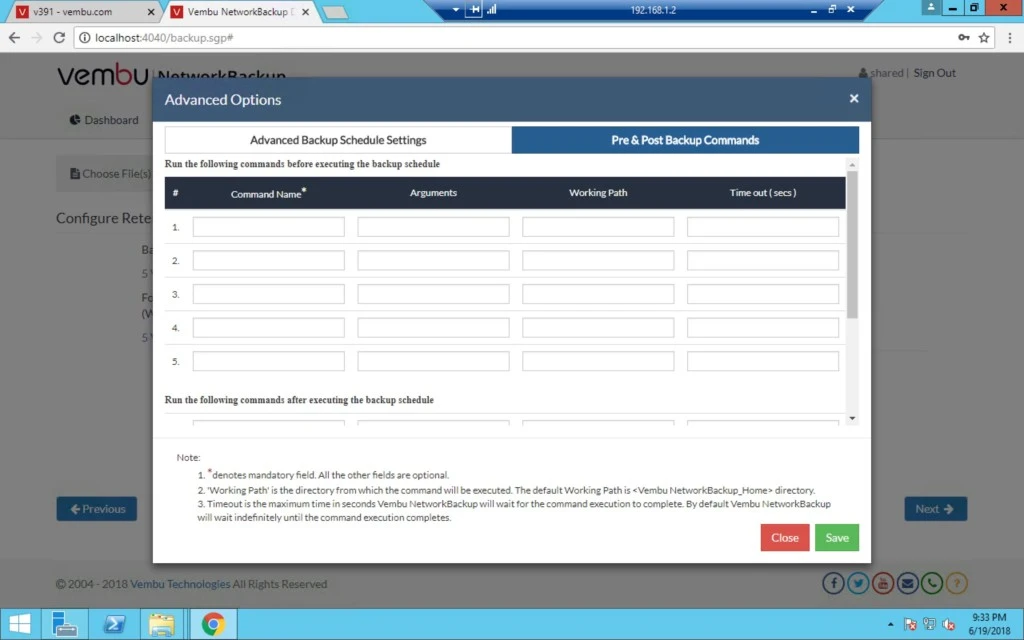
14. In Advanced option, you have two choices :

a) Advanced backup schedule settings

b) Pre & Post backup commands


15. If you have any script or command which you want to run before and after backup then configure here.


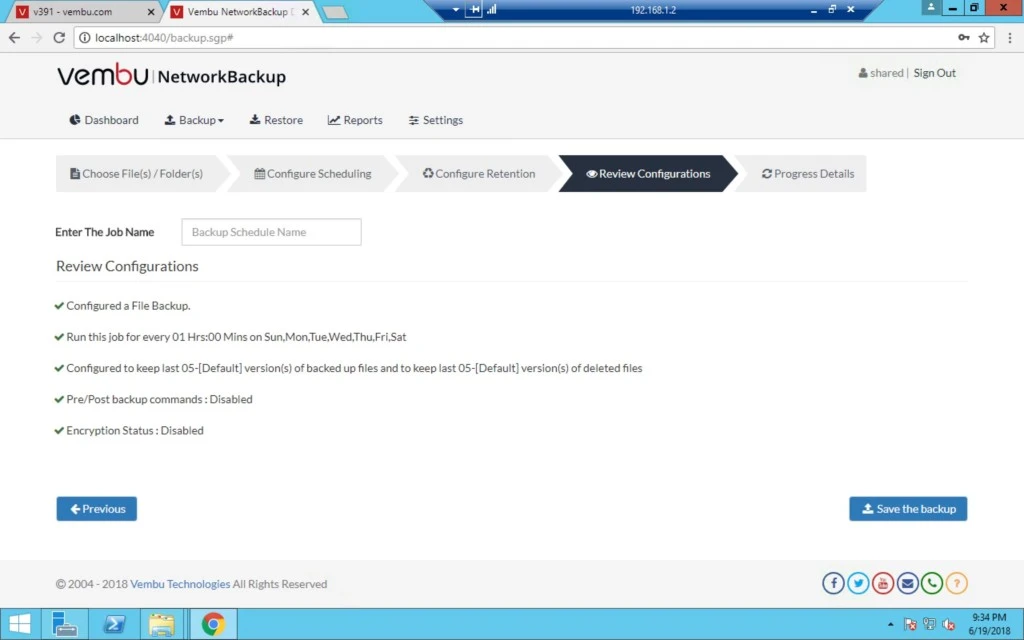
16. Now Type Job name is a mandatory field and after that Save this job.

0

How to install Vembu Network Backup client

Enterprise data is anything but uniform. Which is why your data protection, backup and recovery solution needs to cover the full range of data sources, file types, storage media and backup modes — from snapshots to streaming.

With all that diversity, the last thing you want is to maintain a separate point solution for each distinct backup and recovery requirement.

Vembu File Backup is very convinient,  simple to use and a powerful tool to backup of all your files and folders from your servers and workstations. It eliminates the manual administration overhead for backup and recovery of your files and data from almost all the versions of Windows, Linux and Mac operating systems. Vembu helps in implementing a better policy to manage and protect your data, with flexible scheduling options, you can eliminate unnecessary backups and the inbuilt compression and deduplication which will reduce your storage space consumption of the backup data, that efficiently improves the storage space utilisation.
With the unique incremental backup technology, only the modified data will be alone backed up in the successive backup schedule and the backed up data can be stored in both onsite or cloud location.


Topic outline:

 Download Vembu Network Backup MSI.

 For which OS MSI supported.

 Installation Options

 Custom Options


1. Login into Windows box and install Network Backup client MSI into that for which you want to protect files.

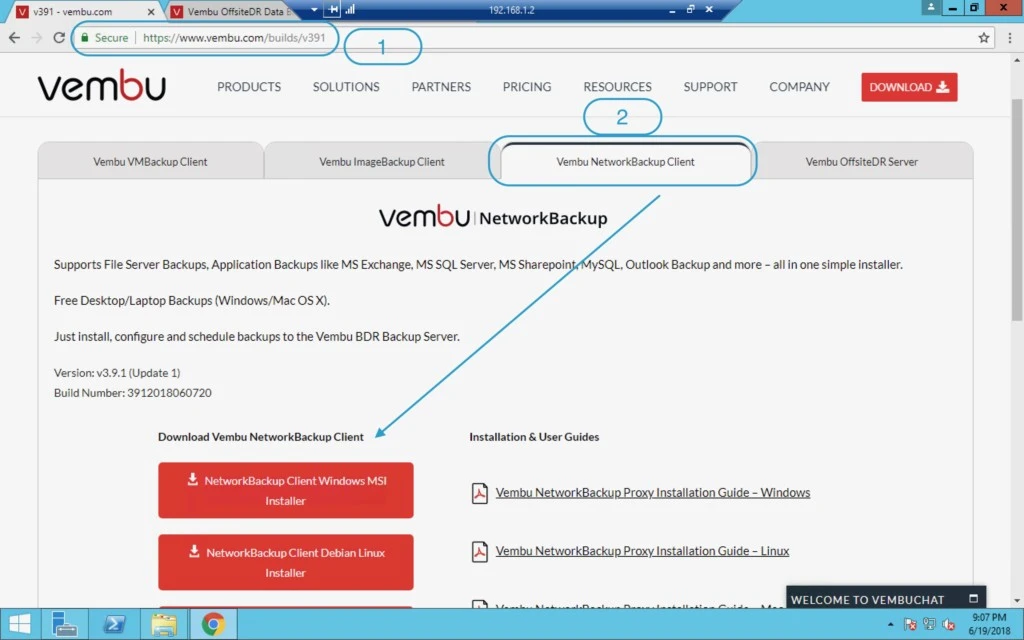
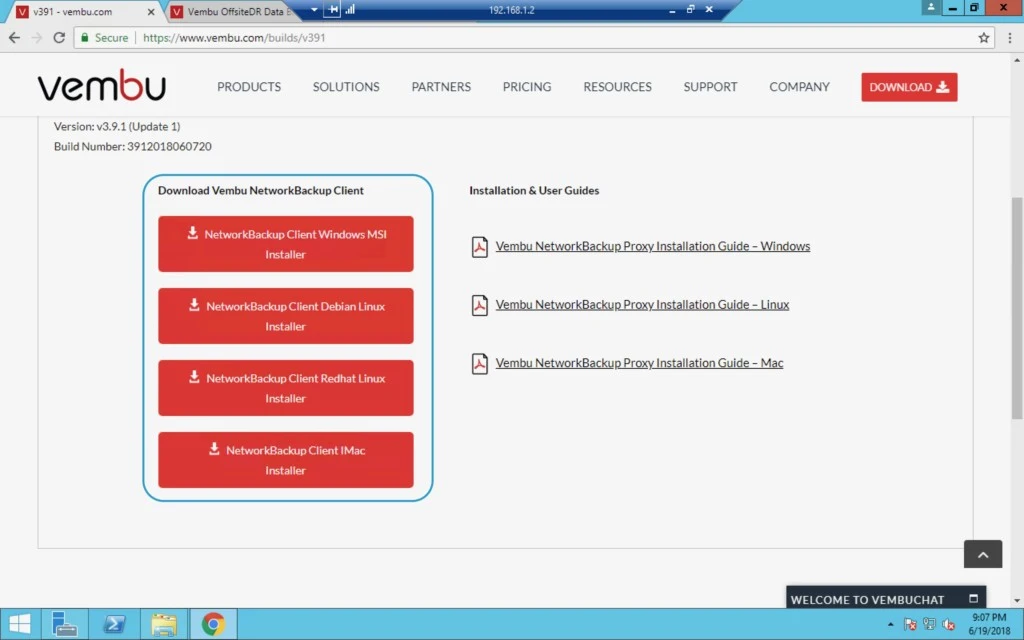
2. Now Go to https://www.vembu.com/builds/v391 and under the third option, you can see all the supported OS MSI.


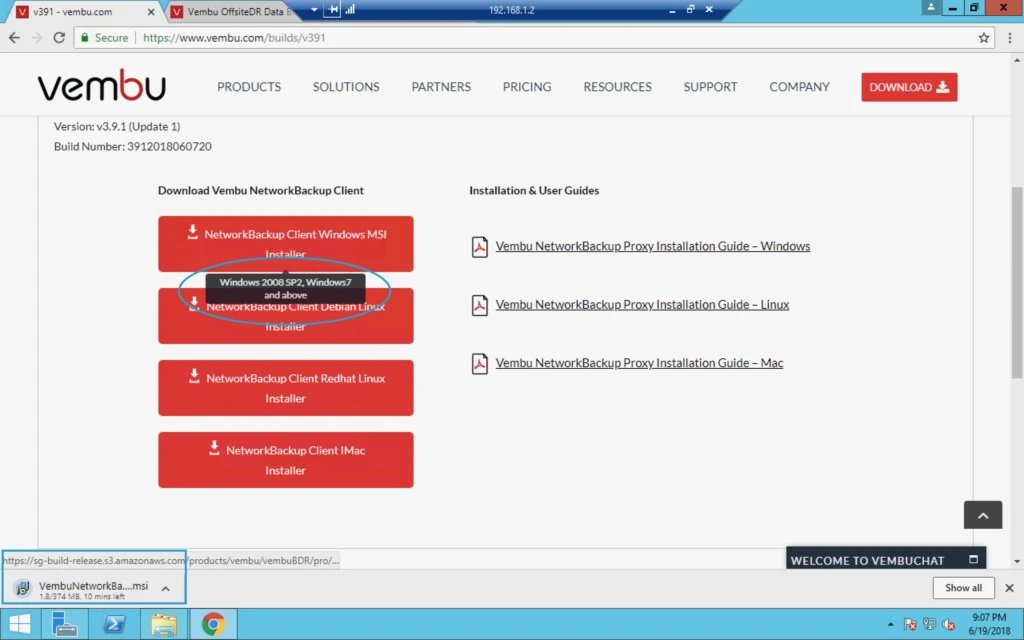
3. I am downloading the Windows MSI and will install on destination server which i want to protect.


4. When you are downloading MSI please check the supported OS for the same.


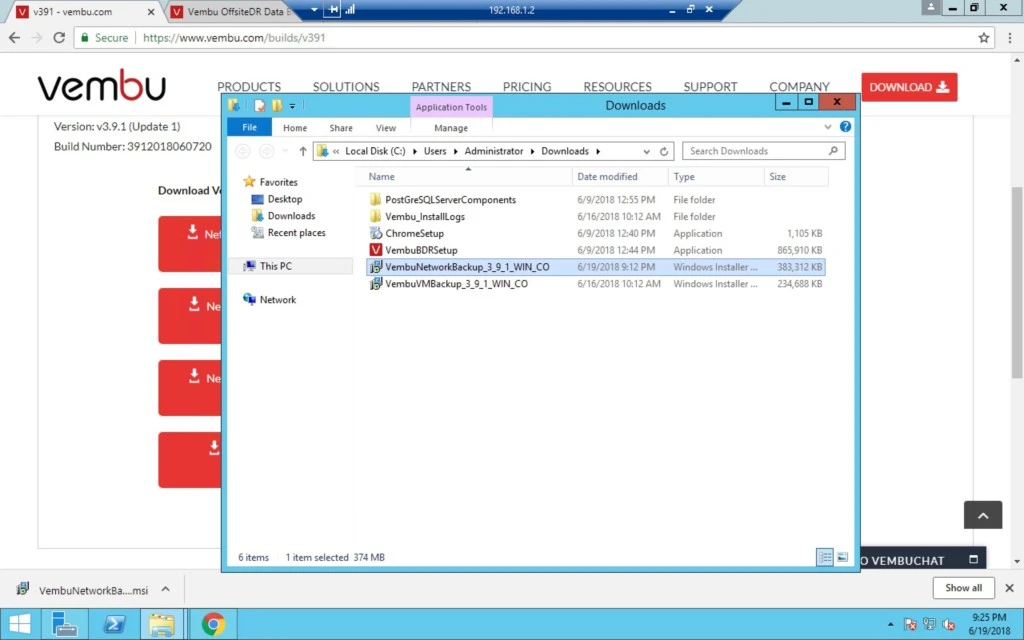
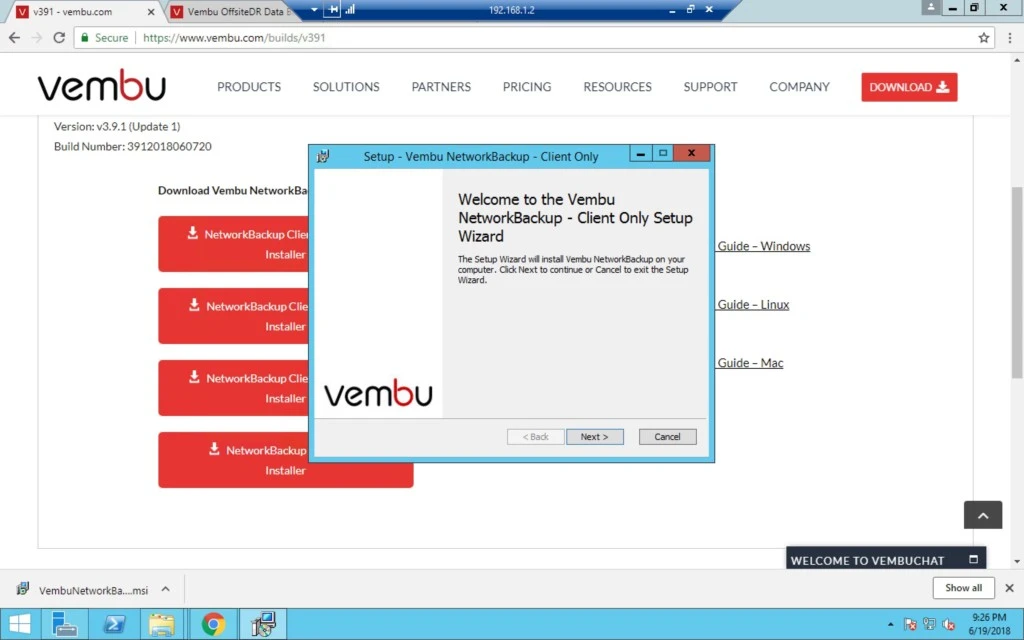
5. Once it’s downloaded then double click and follow the instruction.


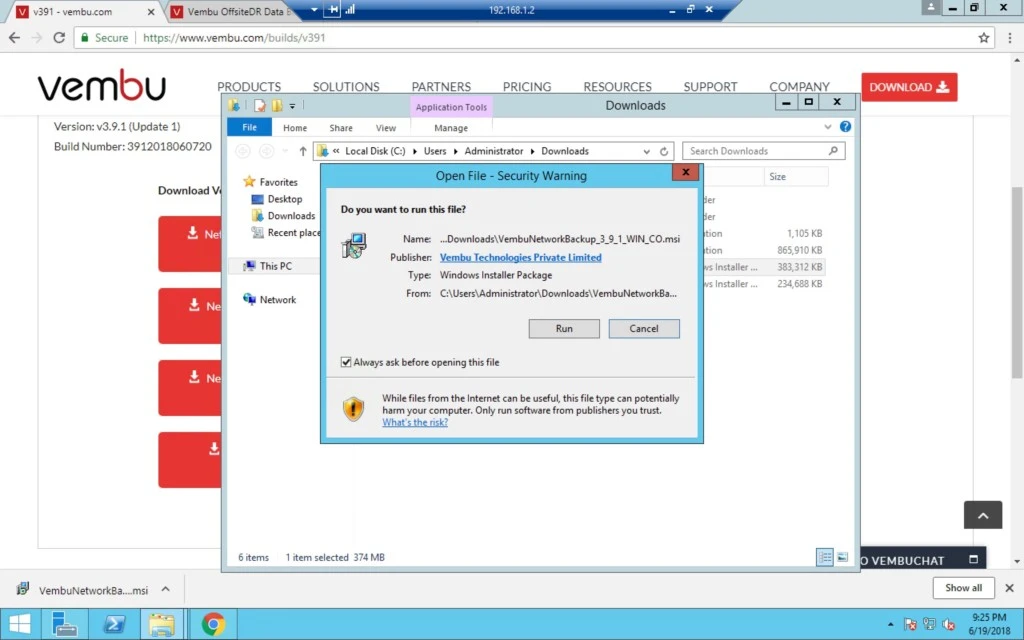
6. Click on Run.


7. Click on Next.

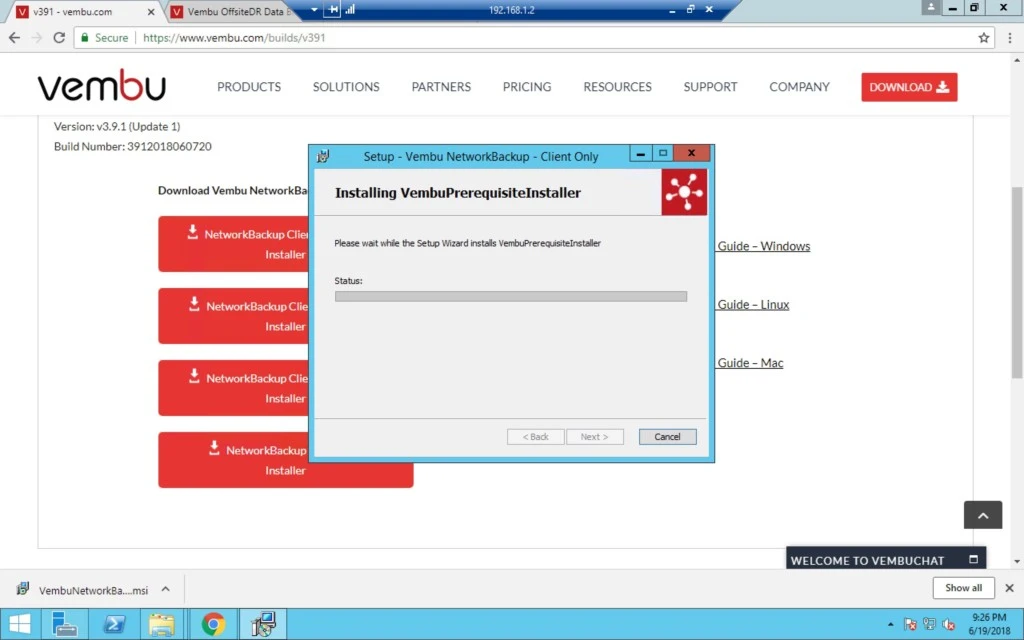
8. Now it started installing the installer.


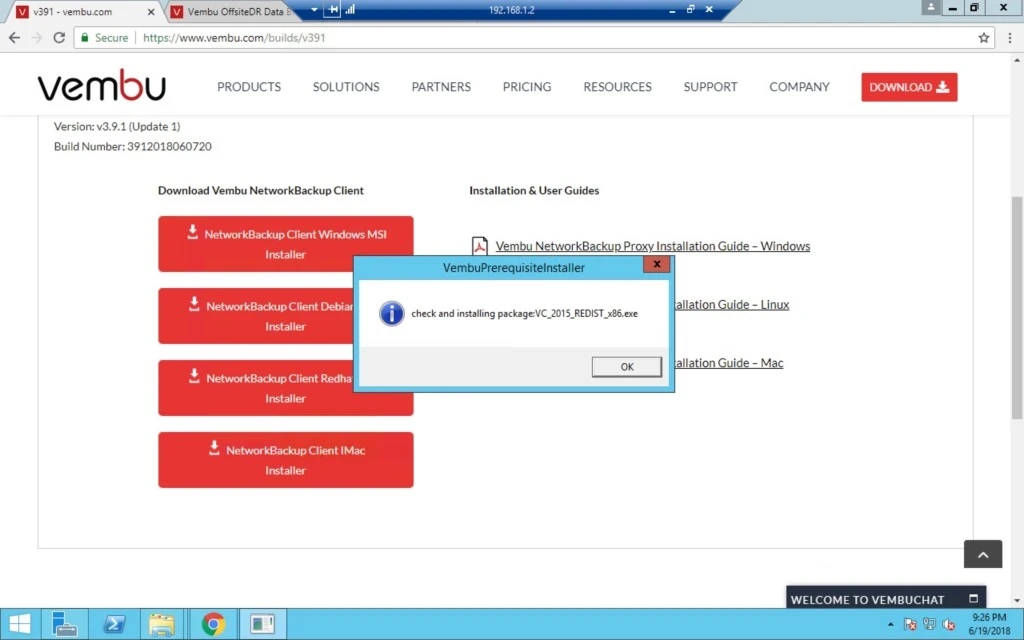
9. It will first check the pre-requisites package and Click Ok.


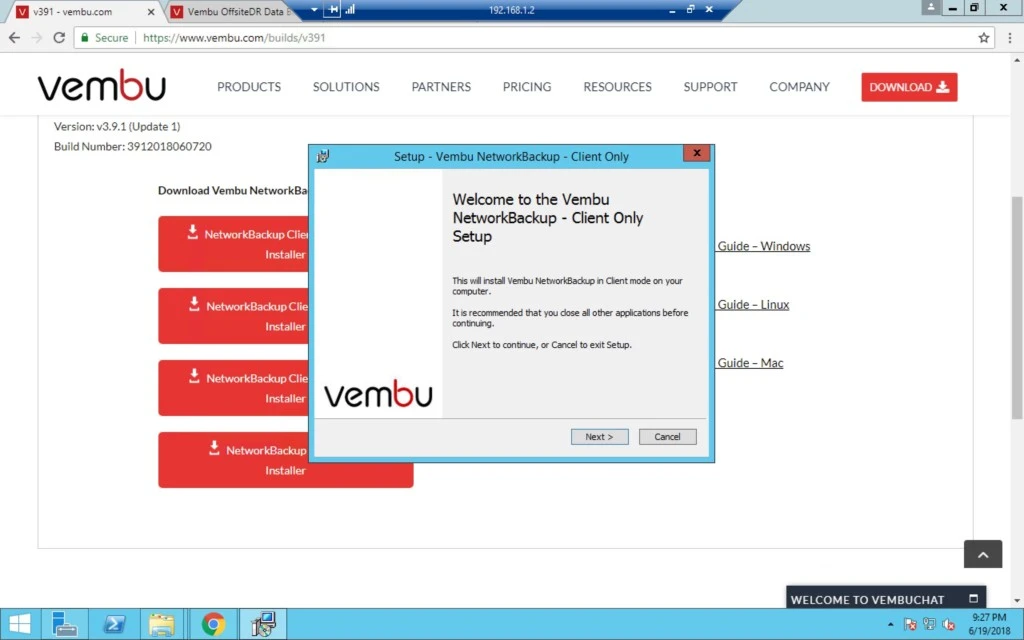
10. Click on Next.


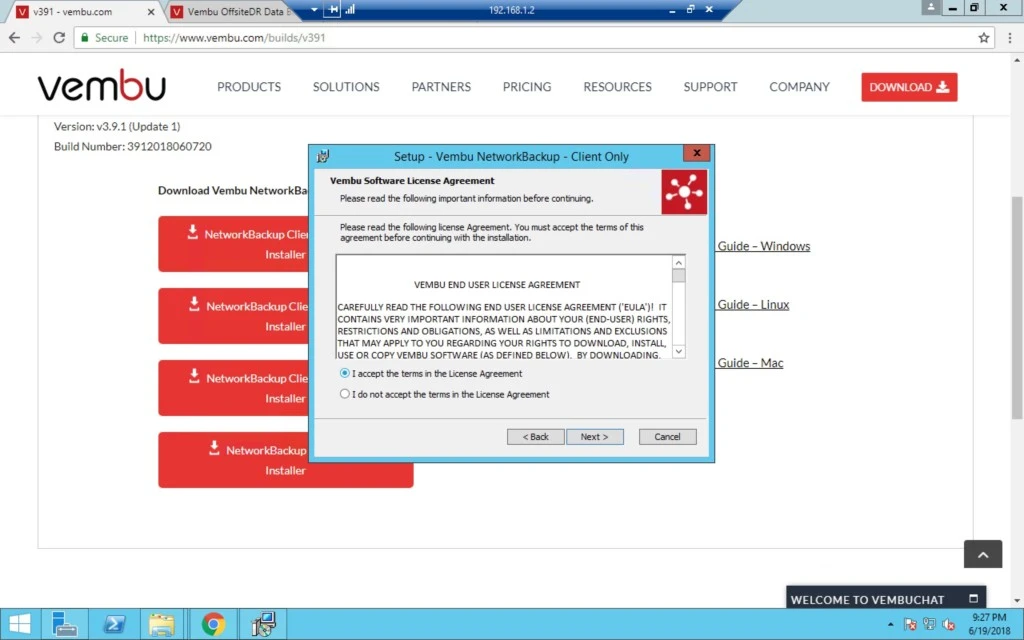
11. Accept End User License Agreement > click Next.


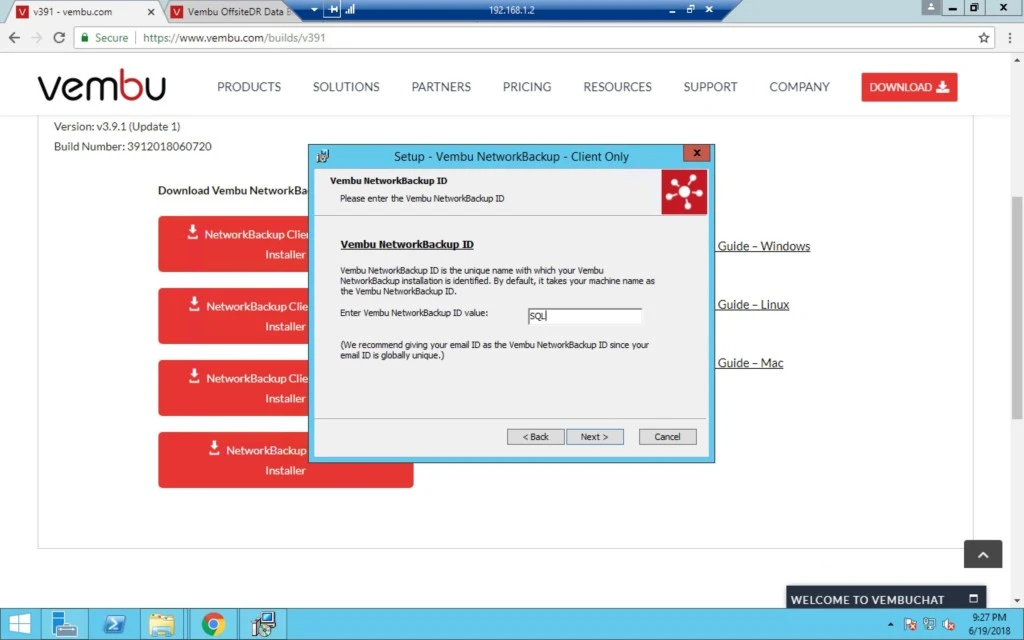
12. Here you can choose the default value for computer name or can provide IP address too.


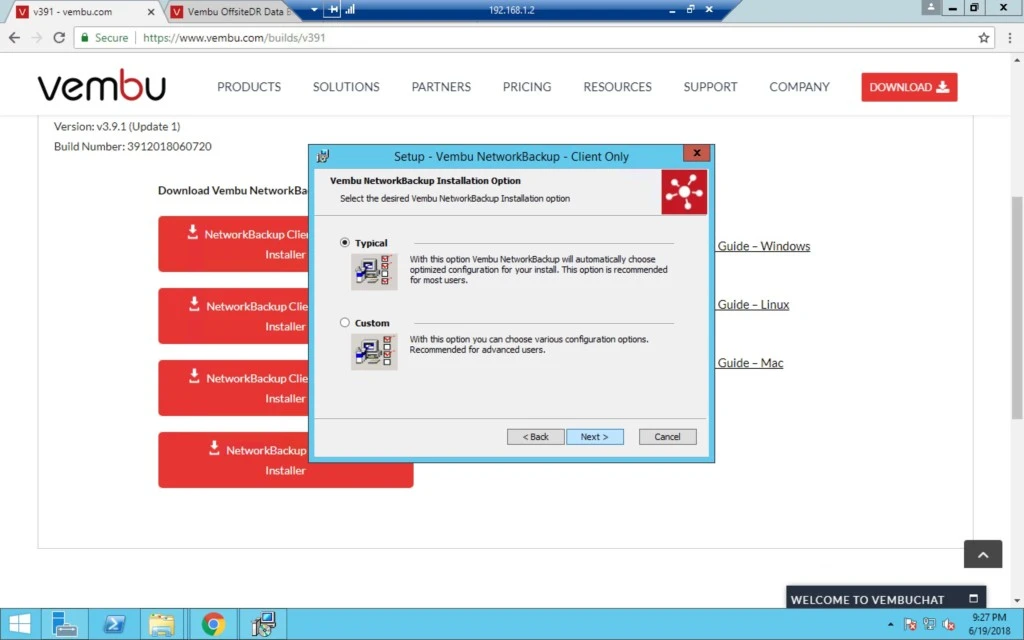
13. Here you have two options:

a) Typical with default settings.

b) Custom where you can change username or password as per your requirement.


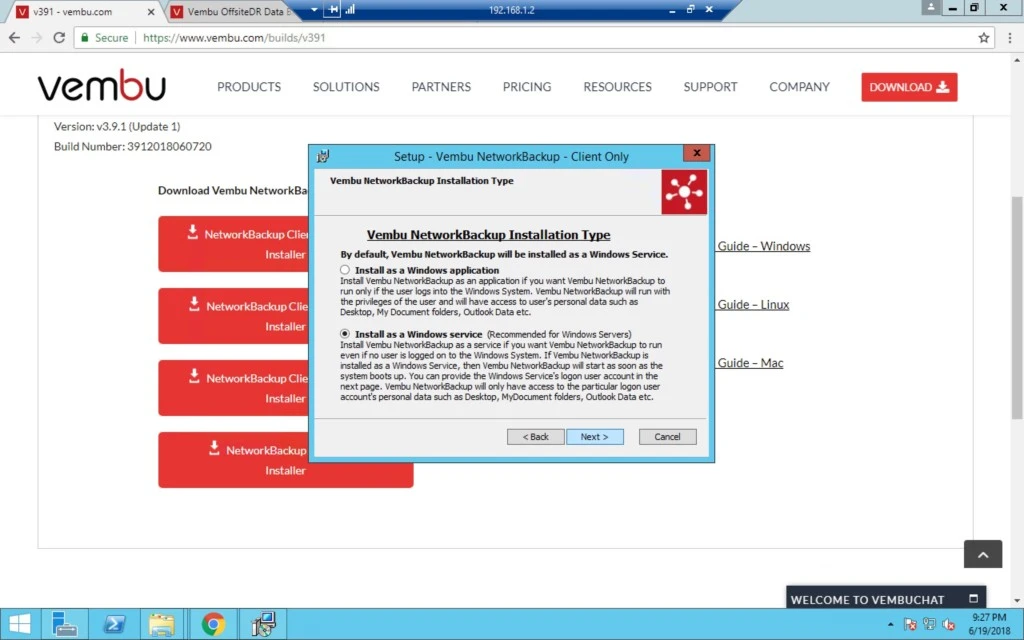
14. When you select Custom it will give you two options given below:

a) Install as a Windows application.

b) Install as a Windows service (this is recommended for windows server).


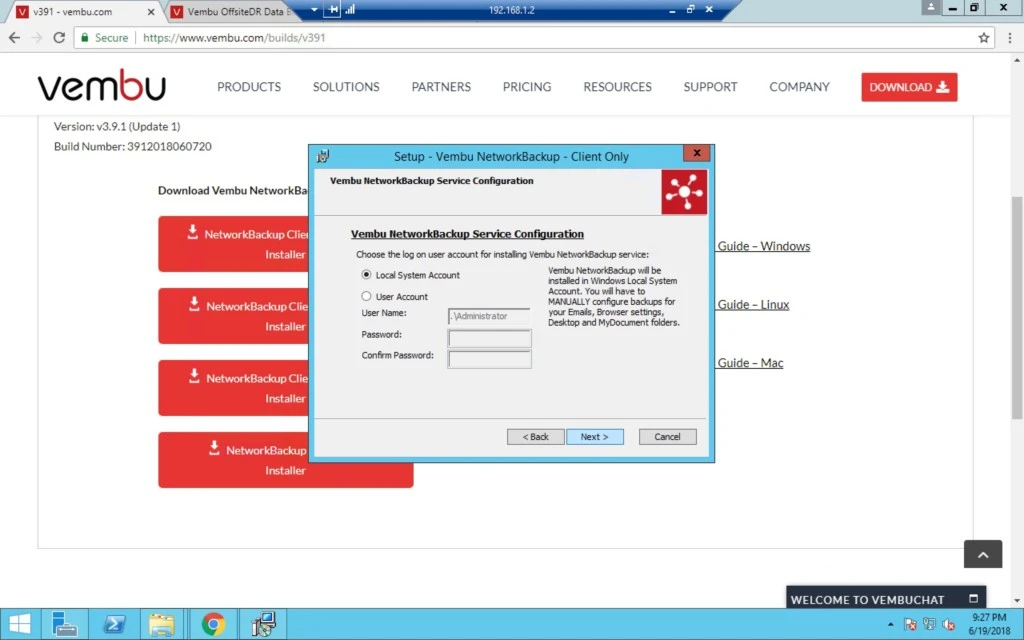
15. Here you can either use a local user or  you can create you own account.


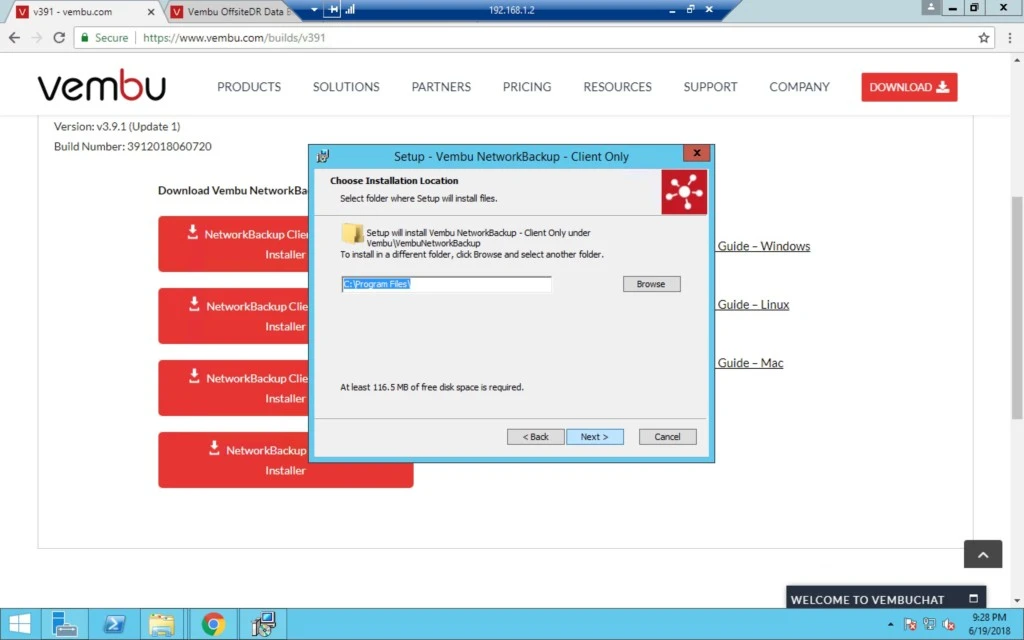
16. If you want to install in default directory then click next otherwise click on browse and select different directory but Create a folder with Program Files before that in the selected drive.
 

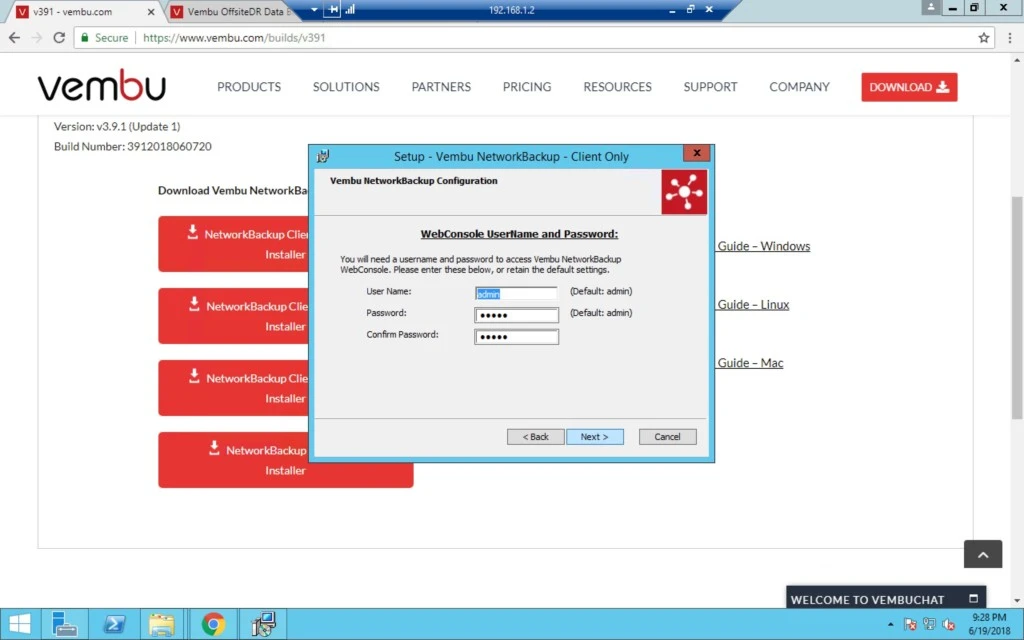
17. For WebConsole you can set the user name and password.


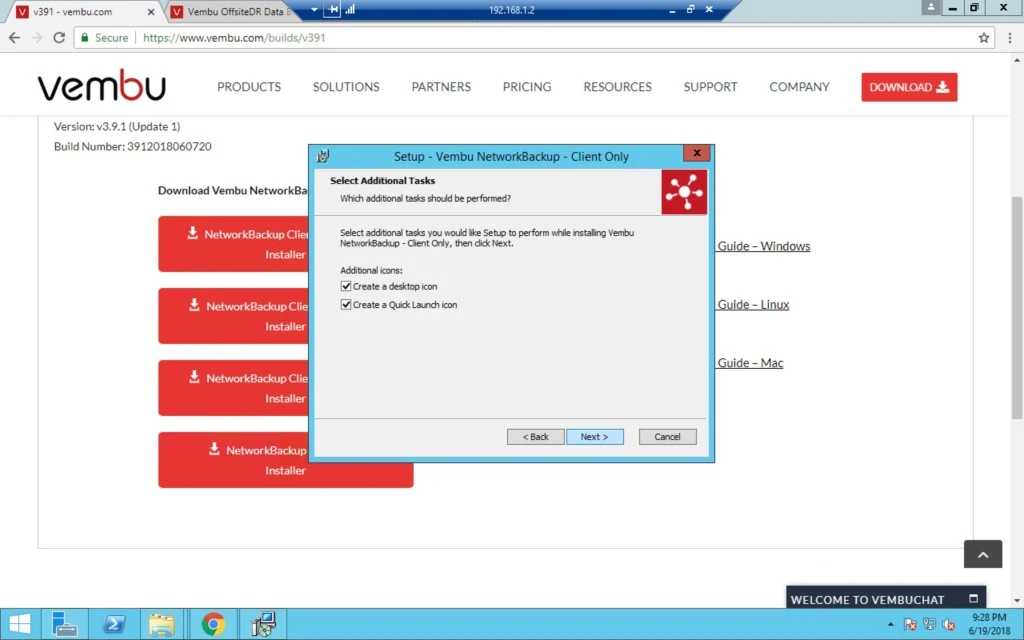
18. Click on Next.


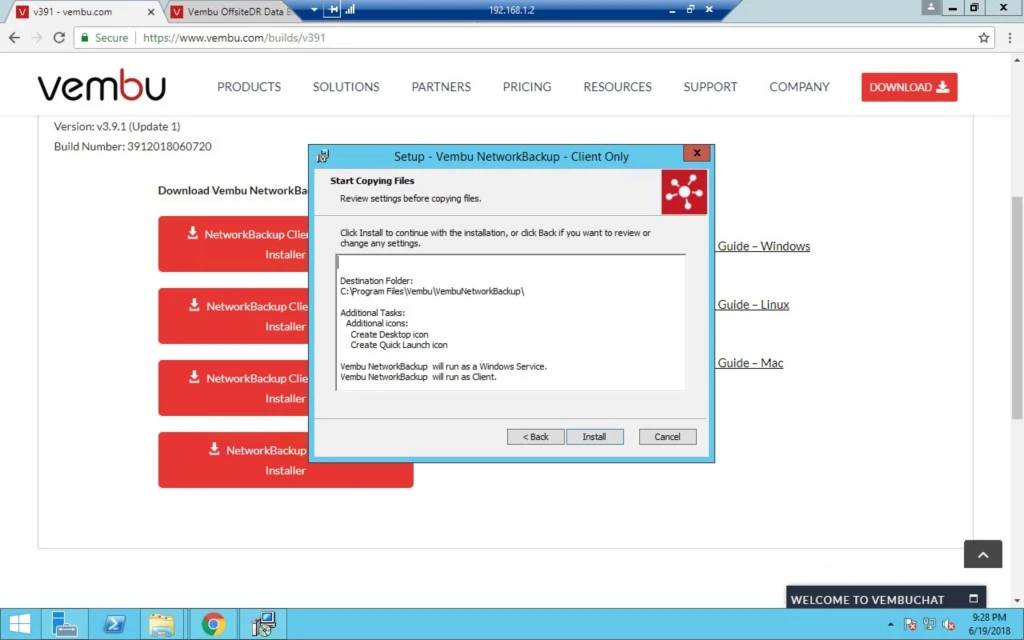
19. Now Review the summary and if everything is ok then click install otherwise click back and change the settings.
 

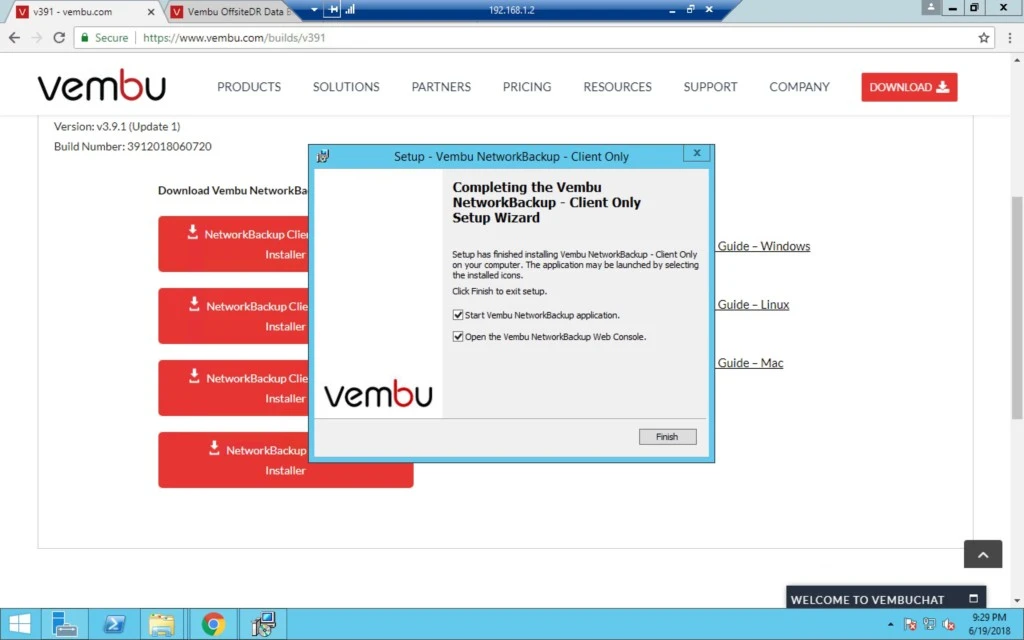
20. Click Finish and it will open up a web browser with Vembu Network backup console.